DA80F/DA95F AddressRight™ Printers Service Manual (SV61962 Rev. A)
5-69
Removal and Replacement • 5
DA95F (WF96) - Printer Parts Removal
5.38 Media
Belts
1. Disengage the feeder assembly from the printer (see section 5.22).
2. Remove all covers, shafts, support frames, print heads, belt drive assem-
bly, etc. from printer (see sections 5.28 to 5.37).
3. Remove the encoder cable and set it aside.
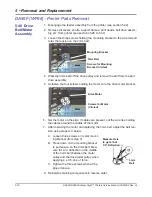
4. Completely loosen the tensioning wedges using the screws which are
recessed into the floor.
5. Remove the tensioning wedges and screws.
6. Unfasten all of the flat head screws attaching the floor to the roller mount-
ing rails except for the ones on each side next to the drive roller. Loosen
those two screws to allow the floor to open up on the other end.
Screws for
Increasing
the Tension
Belt
Tensioning
Wedge
Belt
Tensioning
Wedge
Loosen
Screw
Loosen
Screw
Remove
Screws
Remove
Screws
Entry
Roller


