5-10
DA80F/DA95F AddressRight™ Printers Service Manual (SV61962 Rev. A)
5 • Removal and Replacement
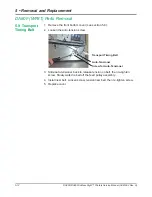
Feeder Sensor
Assembly
Screws
Circled in
White
1. Remove the rear cover (see section 5.2) and the main processor board
(see section 5.3).
2. Disconnect both feeder sensor assembly cables from the processor
board connectors (J22 and J24).
3. Cut the tie wrap holding the cables inside the rear chassis assembly.
4. Unfasten the two screws (circled in white in figure below) securing the
feeder sensor assembly and remove sensor assembly.
DA80F (WF81) Parts Removal
5.7 Feeder
Sensor
Assembly
(Emitter and
Receiver)
5. Reinstall in reverse order.
NOTE: Replacing the feeder sensor assembly will require an adjustment.
Refer to section 6.3
Feeder Sensor Test and Calibration
for more infor-
mation.

