background image

SDC2035C Communication Device Advanced Setup Guide

EN

<< Return to Contents

Wi-Fi Protected Setup

Introduction

The Communication Device can be setup for wireless usage, enabling you to move 

your Franking Machine to any location that is within the range of a wireless access 

point on your network. 
If your network/router supports Wi-Fi Protected Setup (WPS), you may choose to 

follow these instructions instead of performing the standard Wi-Fi setup instructions 

described previously in this guide. WPS is a method used to set up wireless 

communication among devices without having to manually enter long passphrases.
You can determine if your router supports Wi-Fi Protected Setup by checking your 

router documentation or looking on the router to see if it has a button labelled 

“WPS” or the symbol

Before setting up the Communication Device for Wi-Fi Protected 

operation:

•  Make sure that your router is set to one of the following: WPA-PSK/WPA2-PSK or 

[AES]/WPA2-PSK [TKIP]. 

WEP or “None” cannot be used.

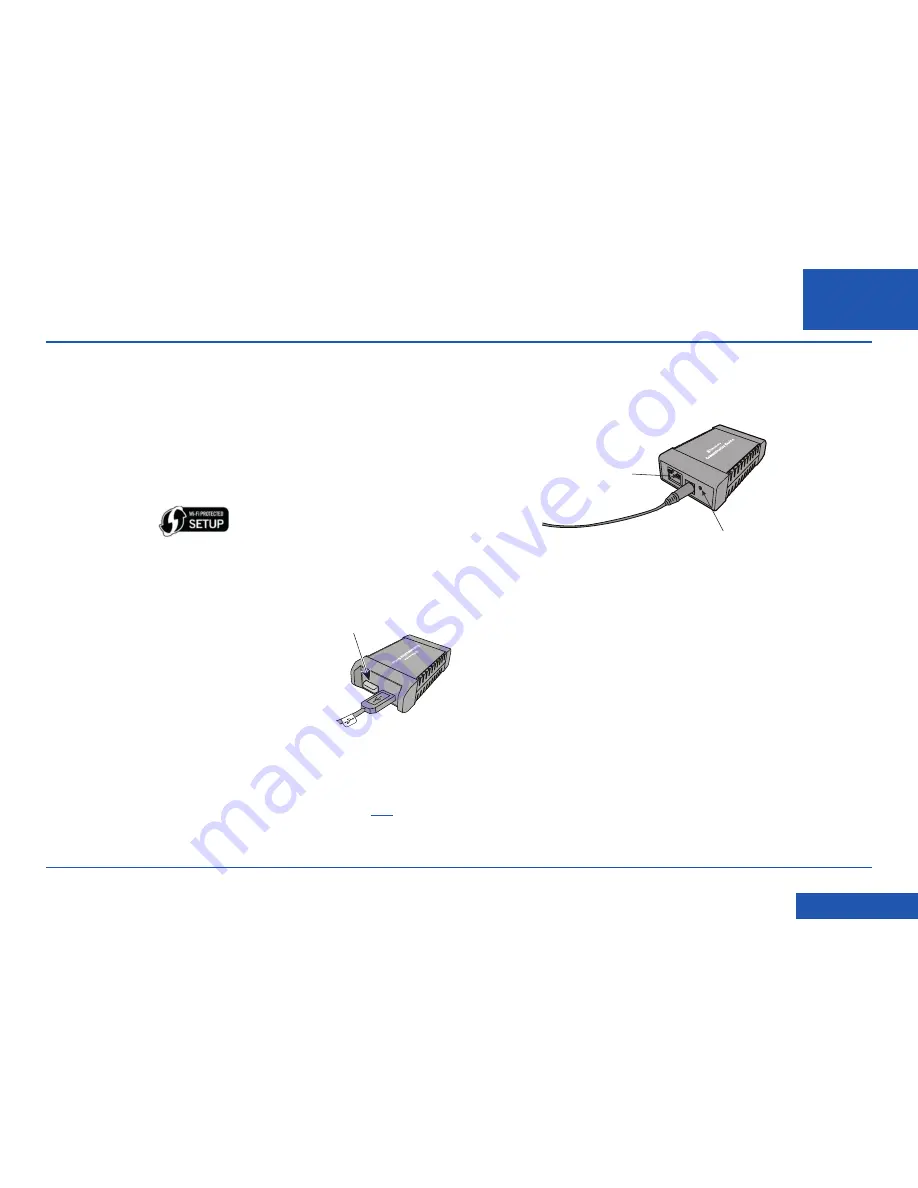
•  Ensure the Wireless USB Plug-in is installed in one 

of the USB ports in the Communication Device 

(see illustration).

•  Be sure a wireless access point (transmitter) is close enough to the location of 

your Franking Machine to have good signal strength.

•  If you are installing your Franking Machine and have just taken the 

Communication Device out of its box, it will be in the factory default state 

and you can continue with the steps that follow. If the Communication Device 

has been confi gured and used before, fi rst reset it as described 

here

 before 

proceeding.

1.  Prepare the Communication Device  

a.  Connect the AC power adapter to the Communication Device.
b.  Wait about 30 seconds for the Orange LED to light, then press the Reset Button. 

When the LED lights green, release the button.

c.  Wait another 45 seconds for the Communication Device to complete its startup 

routine. When the LED is blinking in a regular pattern (typically Orange, Green, 

Orange, Green, Pause), continue with step 2 below.

2.  WPS Setup Procedure  

a.  Put your wireless router into its WPS state (refer to its operation guide).
b.  Press and hold down the Reset Button on the Communication Device for 15 

seconds, then release the button. The LED fl ashes rapidly.

c.  The random fl ashing continues for about a minute. When the LED stops fl ashing 

rapidly, unplug the AC power adapter from the Communication Device and then 

connect it again.

d.  Wait another 45 seconds for the Communication Device to complete its startup 

routine.  


If the LED blinks orange only (if not connected to the Franking Machine) or 

blinks green only (if connected to the Franking Machine), you have successfully 

set up the Communication Device to run wirelessly.


If the rapid fl ashing lasts more than a minute then WPS has failed. Repeat Steps 

1 and 2 on this page again.

e.  Connect the Franking Machine and Communication Device using the supplied 

USB cable.

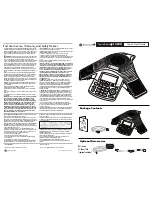
Reset Button

LED

Wireless USB Plug-in

Summary of Contents for dm60 series

Page 1: ...Advanced Setup Guide DM50 55 60 Series Communication Device EN NO DE EN Shipping Mailing Franking Machines ...

Page 2: ... Software 3 Restart the Communication Device 4 Continue with Franking Machine Installation Wi Fi Protected Setup Introduction Before setting up the Communication Device for Wi Fi Protected operation 1 Prepare the Communication Device 2 WPS Setup Procedure 3 Continue with Franking Machine Installation REFERENCE Connectivity Requirements File extensions and URLs that the network firewall needs to al...

Page 3: ...tic IPs and proxy server settings These settings will need to be added to the Communication Device You may need the help of your IT specialist network administrator to do this Follow the instructions exactly in the sequence that follows If you are installing your Franking Machine and have just taken the Communication Device out of its box it will be in the factory default state and you can continu...

Page 4: ...tings Note Your network firewall will also need to be open to certain ports protocols domains and file extensions Details are given in the Reference section of this guide 2 Download and run the Setup Software a Use a computer that is connected to the same network or router as the Communication Device Download the setup software to your computer by going to PC pitneybowes com UK DM60wifipc Mac pitn...

Page 5: ...tage funds get software updates and carry out the required Postal Authority inspections Choose which of the two connection methods described in the table below best suits your needs Consider the requirements and ensure that there is a suitable network socket or internet enabled PC within reach of the supplied cables You must also ensure that the franking machine has a constant power supply and you...

Page 6: ...tom of your wireless router Find out if any special settings are necessary to install a new device on your wireless network such as static IPs proxy servers or non standard wireless network settings Ensure the Wireless USB Plug in is installed in one of the USB ports in the Communication Device see illustration Be sure a wireless access point transmitter is close enough to the location of your Fra...

Page 7: ...ur type of computer Note If a firewall message appears click the button that allows the download to proceed b Save the software pbSmartLAN to your computer then open and run it c Click the Setup for Wireless Connection button d Read and accept the User License Agreement e The setup software will search for devices on your network and display a list of the devices found Highlight the device you are...

Page 8: ...twork listed click Search If required enter and re enter the password key for the selected wireless network and click Next Note If the wireless network you use does not broadcast its name the name will not appear on this list To enter this information scroll down and select Other Network Then click Next and enter the settings for your wireless network manually h Follow the setup wizard and enter t...

Page 9: ...to connect it Please DO NOT connect power until instructed Your franking machine has to connect to the Pitney Bowes Data Centre to add postage funds get software updates and carry out the required Postal Authority inspections Choose which of the two connection methods described in the table below best suits your needs Consider the requirements and ensure that there is a suitable network socket or ...

Page 10: ...will be in the factory default state and you can continue with the steps that follow If the Communication Device has been configured and used before first reset it as described here before proceeding 1 Prepare the Communication Device a Connect the AC power adapter to the Communication Device b Wait about 30 seconds for the Orange LED to light then press the Reset Button When the LED lights green ...

Page 11: ...oftware updates and carry out the required Postal Authority inspections Choose which of the two connection methods described in the table below best suits your needs Consider the requirements and ensure that there is a suitable network socket or internet enabled PC within reach of the supplied cables You must also ensure that the franking machine has a constant power supply and you have space arou...

Page 12: ...gh your network and firewall NOTE URLs accessed by your franking machine may contain pb com anywhere within the URL Firewalls must therefore be set to allow traffic to any URL containing pb com Your firewall may need to be configured using wildcards for example pb com The Connectivity Device uses the following ports and protocols that must be allowed through your network and firewall Type Protocol...

Page 13: ...n Device has reset If the LEDs start blinking then the Communication Device is not reset Repeat the process from Step a above e Disconnect the AC power adapter Reset Button LED Reference Resetting the Device Reference Troubleshooting My Franking Machine will not connect to the Pitney Bowes Data Centre Check that other PC Mac s on the network can access the internet If they cannot there is a connec...

Page 14: ...nd starten Sie sie 3 Starten Sie das Kommunikationsgerät erneut 4 Fahren Sie mit der Installation der Frankiermaschine for Wi Fi Geschützte Einrichtung Einleitung Bevor Sie das Kommunikationsgerät für den Wi Fi geschützten Betrieb einrichten 1 Einrichten des Kommunikationsgeräts 2 WPS Einrichtungsverfahren 3 Fahren Sie mit der Installation der Frankiermaschine fort HINWEISE Verbindungsvoraussetzun...

Page 15: ...tellungen Diese Einstellungen werden dem Kommunikationsgerät hinzugefügt Möglicherweise benötigen Sie die Hilfe Ihres IT Spezialisten Netzwerkadministrators um dies durchzuführen Folgen Sie den Anweisungen in genau der Reihenfolge wie beschrieben Wenn Sie Ihre Frankiermaschine installieren und das Kommunikationsgerät gerade aus der Verpackung genommen haben befindet es sich in Werkseinstellung und...

Page 16: ...otokolle Domains und Dateierweiterungen offen sein Einzelheiten dazu finden Sie im Abschnitt Referenzen in dieser Anleitung 2 Laden Sie die Setup Software herunter und starten Sie sie a Verwenden Sie einen Computer der an dasselbe Netzwerk oder denselben Router wie das Kommunikationsgerät angeschlossen ist Laden Sie die Einrichtungssoftware auf Ihren Computer herunter gehen Sie hierzu auf die Seit...

Page 17: ...king machine has to connect to the Pitney Bowes Data Centre to add postage funds get software updates and carry out the required Postal Authority inspections Choose which of the two connection methods described in the table below best suits your needs Consider the requirements and ensure that there is a suitable network socket or internet enabled PC within reach of the supplied cables You must als...

Page 18: ...in Finden Sie heraus ob besondere Einstellungen notwendig sind um ein neues Gerät in Ihrem drahtlosen Netzwerk zu installieren wie statische IPs Proxy Server oder nicht standardmäßige drahtlose Netzwerkeinstellungen Stellen Sie sicher dass der Drahtlos USB Stecker in einem der USB Ports im Kommunikationsgerät installiert ist siehe Abbildung Stellen Sie sicher dass der drahtlose Zugangspunkt Sender...

Page 19: ...Wenn eine Firewall Meldung erscheint klicken Sie auf die Schaltfläche um das Herunterladen zuzulassen um fortzufahren b Speichern Sie die Software pbSmartLAN auf Ihrem Computer dann öffnen und starten Sie sie c Klicken Sie auf die Schaltfläche Kabellos Netzwerkverbindung d Bitte lesen Sie die Software Lizensvereinbarung und akzeptieren Sie diese e Die Konfigurationssoftware sucht nach Geräten in I...

Page 20: ...rderlich geben Sie das Passwort Schlüssel für das ausgewählte Netzwerk aus bestätigen Sie es und klicken Sie dann auf Weiter Hinweis Wenn das drahtlose Netzwerk das Sie verwenden seinen Namen nicht sendet erscheint der Name nicht in dieser Liste Um diese Informationen einzugeben scrollen Sie hinunter und wählen Sie Anderes Netzwerkaus Klicken Sie dann auf Weiter geben Sie die Einstellungen für Ihr...

Page 21: ...PQRS TUV WXYZ Clear Back Space Shift PitneyBowes 2 Decide where to site your system and how to connect it Please DO NOT connect power until instructed Your franking machine has to connect to the Pitney Bowes Data Centre to add postage funds get software updates and carry out the required Postal Authority inspections Choose which of the two connection methods described in the table below best suits...

Page 22: ...genommen haben befindet es sich in Werkseinstellung und Sie können mit folgenden Schritten fortfahren Wenn das Kommunikationsgerät vorher konfiguriert und verwendet wurde setzen Sie es gemäß der Beschreibung hier zurück bevor Sie fortfahren 1 Einrichten des Kommunikationsgeräts a Schließen Sie das AC Netzteil an das Kommunikationsgerät an b Warten Sie ungefähr 30 Sekunden bis die orange LED leucht...

Page 23: ...s to connect to the Pitney Bowes Data Centre to add postage funds get software updates and carry out the required Postal Authority inspections Choose which of the two connection methods described in the table below best suits your needs Consider the requirements and ensure that there is a suitable network socket or internet enabled PC within reach of the supplied cables You must also ensure that t...

Page 24: ...rleistet sein Hinweis URLs auf die von Ihrem Pitney Bowes System zugegriffen wird können die oben angegebenen Zeichenfolge innerhalb der URL enthalten Beispiel pb com Firewalls müssen daher so eingestellt werden dass Sie Traffic zu jeder URL zulässt die die oben genannten Domains enthalten Ihre Firewall muss möglicherweise für die Verwendung von Wildcards konfiguriert werden wie beispielsweise pb ...

Page 25: ...nikationsgerät nicht zurückgesetzt Wiederholen Sie den Schritt wie oben beschrieben e Trennen Sie das AC Netzteil vom Kommunikationsgerät Resettaste LED Referenz Rücksetzen des Kommunikationsgerätes Referenz Problembehebung Meine Frankiermaschine verbindet sich nicht mit dem Pitney Bowes Daten Zentrum Prüfen Sie ob andere PC s Mac s im Netzwerk zugriff auf das Internet haben Wenn diese auch keinen...

Page 26: ...eval system of any type or transmitted by any means electronically or mechanically without the express written permission of Pitney Bowes We have made every reasonable effort to assure the accuracy and usefulness of this guide however we cannot assume responsibility for errors or omissions or liability for the misuse or misapplication of our products SDC2035C ...

Reviews: