background image


59324 V0605

Finish Gate Setup

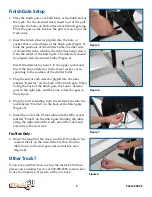
1 .  Place the finish gate over both lanes at the finish end of 

the track . For the elevated track, insert four of the pull 

pins into the holes on both sides of each finish gate leg . 

Place the gate on the track so the pins rest on top of the 

track sides .

2 .  Insert the finish detector pigtails into the hole, or  

socket, that is on both legs of the finish gate (Figure 5) . 

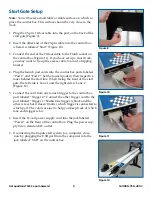
Note the positions of the emitter bulbs on either side 

of the emitter tube, which is the tube that hangs down 

from the center of the finish gate . The detectors should 

be aligned with the emitter bulbs (Figure 6) . 

  Insert the detector for Lane 1 in the upper socket and 

insert the Lane 2 detector in the lower socket, corre-

sponding to the position of the emitter bulbs .

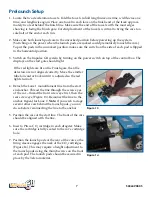
3 .  Plug the end of each detector pigtail into the jacks 

labeled “Detector” on the back of the finish gate . When 

facing the back of the finish gate, the Lane 1 detector 

goes in the right jack, and the Lane 2 detector goes in 

the left jack .

4 .  Plug the cord extending from the emitter tube into the 

jack labeled “Emitter” on the back of the finish gate  

(Figure 7) .

5 .  Insert the end of the 70-foot cable into the DIN socket 

labeled “Finish” on the finish gate . Routing the cable 

along the right side of the track, unroll the cable and 

extend it to the start end . 

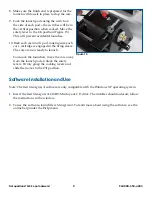
FasTrak Only:

6 .  Down the length of the track, run the DIN cable in the

  conduit that is on the side of the FasTrak . Run the

  cable down to the start gate and control box area

  (Figure 8) .

Other Track?

If you have another track, such as the metal EL 80 track, 

please call Customer Service at 800-358-4983 to learn how 

to use the Impulse GII system with your track .

Figure 5

Figure 6

Figure 7

Figure 8

Summary of Contents for IMPULSEG II

Page 1: ......

Page 2: ......

Page 3: ...Running a Race 12 Let s Communicate 12 Racetrack Safety 13 Warranty Pitsco provides a one year limited warranty against defects in manufacturing on all items purchased In a warranty situation Pitsco...

Page 4: ...rips of Velcro material Power supply 12V 2 5A 2 black ABS line anchors 2 launch triggers 1 red and 1 black Start mat USB cable GII Race Management CD ROM Windows Please find the above items in the Imp...

Page 5: ...feet If your track is less than 40 feet you should use short shot four gram CO2 cartridges See the Pitsco catalog Here are some things to think about when planning the racetrack setup Actual Racing D...

Page 6: ...eet long The line should be tightly stretched A tight line should prevent cars from going off course as they race down the track Cut off any excess line extending from the loop s knot Note If your tra...

Page 7: ...itter bulbs 3 Plug the end of each detector pigtail into the jacks labeled Detector on the back of the finish gate When facing the back of the finish gate the Lane 1 detector goes in the right jack an...

Page 8: ...Pod 2 Set the launch pods in their respective lanes behind the start line When facing the front of the start gate the left side is Lane 1 and the right side is Lane 2 Figure 12 5 Connect the cord from...

Page 9: ...e should light If the red lights are lit on the Finish gate then the detectors are not aligned correctly Move the emitter tube forward or back until it is adjusted so the red lights turn off 4 Detach...

Page 10: ...now ready to launch To uncock the launchers move the cars away from the launch pods Unlock the safety levers Firmly grasp the cocking levers and slide them over to the Off position Software Installat...

Page 11: ...tion 5 When ready press the Reset button on the control box The Christmas tree lights will activate The three top pairs of yellow bulbs will light in succes sion followed by the pair of green lights C...

Page 12: ...ove the launch pod safety levers to the Off position 4 To start the launch press the Reset button on the control box The Christmas tree lights on the start gate will begin their sequence When the gree...

Page 13: ...will reset After the Launch As the cars reach the end of the track they should strike the towels and come to a safe halt Finish End 1 Move the towels aside and roll the cars to the end of the parking...

Page 14: ...crew must do the following tasks Position the checkered towels at the finish line to safely stop the cars Park the cars after the run and replace the towels Signal the start crew when ready to proceed...

Page 15: ...s to the On position after cocking the launch pods 3 Never turn the control box power switch on or connect the power supply when the launchers are already cocked This could trigger the launchers The l...

Page 16: ...ers the FasTrak s racing distance from start to the finish line is 20 meters one twentieth of a quarter mile This simplifies mathematical comparisons to real race cars A staging area behind the start...

Reviews: