background image

Page 4

For technical questions, please call 1-888-866-5797.

Item 04077

Operating Instructions

Read the ENTIRE IMPORTANT SAFETY INFORMATION section at the 

beginning of this document including all text under subheadings therein 

before set up or use of this product.

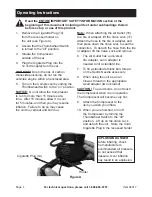
1.  Remove the Cigarette Plug (14) 

from the recessed holder on 

the unit (see Figure A).

2.  Assure that the Thumbwheel Switch 

is turned to the “off” position.

3.  Situate the Compressor 

outside of the car.

4.  Plug the Cigarette Plug into the 

12 Volt receptacle in the car.    

WARNING!

 Due to the risk of carbon 

monoxide poisoning, do not run the 

vehicle’s engine within an enclosed area.
5.  Turn on the Compressor by sliding the 

Thumbwheel Switch to the “on” position.

NOTICE:

  Do not allow the Compressor 

to run for more than 15 minutes at a 

time.  After 15 minutes, allow it to cool 

for 5 minutes, and then you may resume 

inflation.  Failure to do so may cause 

the unit to overheat and burn out.

Note:

  When attaching the Air Outlet (16) 

to a tire or adapter, lift the Valve Lock (17).  

Attach the hose to the tire or adapter, and 

then press down the Valve Lock to seal the 

connection.  To detach the hose from the tire 

or adapter, lift the Valve Lock and remove.
6.  The Air Outlet has a universal 

tire adapter, so no adapter is 

needed to fill a standard tire.

7.  To fill a standard athletic ball, thread 

on the Sports Needle accessory.

8.  When using the unit as an air 

blower, thread on the appropriate 

sized adapter (two included).

CAUTION!

  To avoid burns, do not touch 

the Compressor when it is in operation.  

The Compressor will become very hot.
9.  Attach the Compressor to the 

item you wish you inflate.

10.  When you are finished, turn off 

the Compressor by turning the 

Thumbwheel Switch to the “off” 

position.  Lift up on the Valve Lock 

and detach the unit.  Store the Cord/

Cigarette Plug in the recessed holder.

Cigarette Plug (14)

Holder

EXPLOSION DANGER

Before inflating, check 

the manufacturer’s  

recommended air pressure.  

Do not exceed that 

pressure. Over inflation 

may result in an explosion.

Figure A

Summary of Contents for 04077

Page 1: ......

Page 2: ...Page 2 For technical questions please call 1 888 866 5797 Item 04077 Specifications Electrical Rating 12VDC Maximum Air Pressure 250 PSI Overall Dimensions 5 1 2 L x 2 7 8 W x 4 7 8 H ...

Page 3: ...ded only 3 Inspect before every use do not use if parts are loose or damaged 4 Disconnect cigarette lighter plug in when not in use 5 Avoid unintentional starting Be sure the Thumbwheel Switch is in the Off position when not in use and before plugging in 6 Store idle equipment When not in use tools must be stored in a dry location to inhibit rust Always lock up tools and keep out of reach of child...

Page 4: ...it to overheat and burn out Note When attaching the Air Outlet 16 to a tire or adapter lift the Valve Lock 17 Attach the hose to the tire or adapter and then press down the Valve Lock to seal the connection To detach the hose from the tire or adapter lift the Valve Lock and remove 6 The Air Outlet has a universal tire adapter so no adapter is needed to fill a standard tire 7 To fill a standard ath...

Page 5: ...use 1 BEFORE EACH USE inspect the general condition of the air compressor Check for loose hardware misalignment or binding of parts cracked or broken parts damaged electrical wiring and any other condition that may affect its safe operation 2 AFTER USE wipe external surfaces of the compressor with a clean cloth 3 Check that the cigarette plug is clean of dirt grease or debris 4 Make sure the unive...

Page 6: ...E MANUFACTURER AND OR DISTRIBUTOR HAS PROVIDED THE PARTS LIST AND ASSEMBLY DIAGRAM IN THIS DOCUMENT AS A REFERENCE TOOL ONLY NEITHER THE MANUFACTURER OR DISTRIBUTOR MAKES ANY REPRESENTATION OR WARRANTY OF ANY KIND TO THE BUYER THAT HE OR SHE IS QUALIFIED TO MAKE ANY REPAIRS TO THE PRODUCT OR THAT HE OR SHE IS QUALIFIED TO REPLACE ANY PARTS OF THE PRODUCT IN FACT THE MANUFACTURER AND OR DISTRIBUTOR...

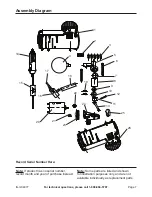
Page 7: ... 5 6 7 8 9 10 12 11 13 25 26 24 19 18 22 23 21 20 16 17 15 14 4 Record Serial Number Here Note If product has no serial number record month and year of purchase instead Note Some parts are listed and shown for illustration purposes only and are not available individually as replacement parts ...

Page 8: ...so the above limitation of exclusion may not apply to you THIS WARRANTY IS EXPRESSLY IN LIEU OF ALL OTHER WARRANTIES EXPRESS OR IMPLIED INCLUDING THE WARRANTIES OF MERCHANTABILITY AND FITNESS To take advantage of this warranty the product or part must be returned to us with transportation charges prepaid Proof of purchase date and an explanation of the complaint must accompany the merchandise If o...

Reviews: