D200-89-00
2
I56-1332-02
2. Tamper Resistance:
The sensor bases have a tamper-resistant capability. When this capability is enabled, sensors cannot be removed from
the base without the use of a small screwdriver or other similar tool. Refer to the sensor base installation instruction
manual for details in using this capability.
3. After all sensors have been installed, apply power to the control unit.
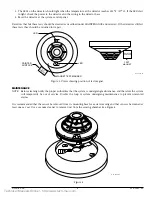
4. Test the sensor by placing a small magnet against the sensor plastic, as shown in Figure 2. The alarm level should be
recognized in the panel and the LED controlled by communication command from the panel.
5. The reset of the sensor LED is controlled by communication command from the panel.
TESTING
Sensors must be tested after installation and periodic maintenance. The sensor may be tested in the following ways.
A. Test Magnet (Model No. M02-04)
1. Place the magnet against the cover in the magnet test area as shown in Figure 2 to activate the test feature.
2. The LEDs should latch ON within 10 seconds, indicating alarm and annunciating the panel.
3. Reset the detector at the system control panel.
B. Test sensitivity from the control panel.
C. Direct Heat Method (Hair dryer of 1000 – 1500 watts)
1. From the side of the detector, direct the heat toward the sensor. Hold the heat source about 6 inches (15cm) away to
prevent damage to the cover during testing.
NOTE: All wiring must conform to applicable local codes, ordinances, and regulations.
NOTE: Verify that all sensor bases are installed and that the wiring polarity is correct at each base.
WARNING:
Disconnect the power from the loop before installing sensors.
1. Install Sensors:
a. Verify that the sensor type matches the type written on the label in the base.
b. Set the sensor to a desired address and then write the address on the label on the base.
c. Place the sensor into the sensor base.
d. Turn the sensor clockwise until it drops into place.
e. Continue turning the sensor clockwise to lock it in place.
3
2
1
3
2
1
3
2
1
+
-
-
+
U.L. LISTED COMP
A
TIBLE
CONTROL
P
ANEL
CLASS A OPTIONAL WIRING
REMOTE ANNUNCIATOR
+
-
CAUTION: Do not loop wire under terminal 1 or 2.
Break wire run to provide supervision of connections.
A78-1253-01
Figure 1
Technical Manuals Online! - http://www.tech-man.com


