- 14 -
12 - REPLACEMENT OF THE SPRING
12.2
12.4
12.5
12.6
12.7
12.7
WARNING! The disassembly of the spring is only permitted to the staff au-
thorized and suitably trained by the manufacturer. Handle with the greatest
care the spring; serious accidents might occur.
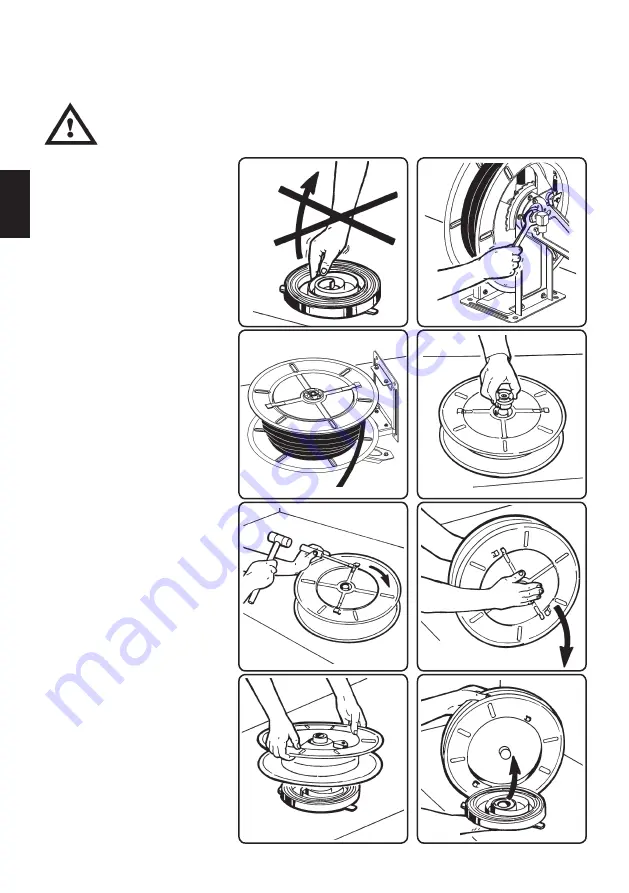
12.1) Make sure that the
rewinding system is to-
tally unloaded and that
the drum is free (see
point 11.1)
12.2) Loosen the swivel joint
12.3) Loosen the two screws
of the spring linka-
ge shaft by a 10 mm
wrench (see point 11.3).
12.4) Disassemble the ope-
ning on the spring side
by a 10 mm wrench and
take out the drum.
12.5) Take out the shaft from
the spring housing.
12.6) Lift the tangs on the
drum by a screwdriver
and rotate the spring
housing centre in order
to release it from the
drum.
12.7) Turn upside down the
drum and take out the
spring housing cen-
tre paying the greatest
care so that the spring
does not go out of it.
12.8) Insert and hook the
shaft into the new
spring housing centre.
Lubricate the spring
and the shaft.
12.9) Put the drum straight
and place the new
spring housing centre
with the utmost care.
Block the tangs.
12.10) Assemble all the parts
and go on as indicated
at point 7.3 of the chap-
ter "Mounting of the
hose"
The spring which allows to rewind the hose is placed inside a proper housing centre which
is joint to the drum.
12.9
EN


