background image


23 


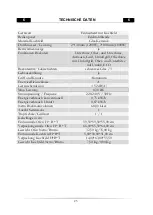
TECHNISCHE DATEN


Geräteart 

Einbauherd mit Kochfeld 

Bedienpanel 

Edelstahlblende 

Material Kochfeld 

Glas-Keramik 

Durchmesser/ Leistung  

2*140mm (1200W), 2*180mm (1800W) 

Restwärmeanzeige 

ja 

Funktionen Backofen 

Unterhitze, Ober- und Unterhitze, 

Auftauen, Grill, Umluftgrill, Oberhitze 

mit Umluftgrill, Ober- und Unterhitze 

mit Umluft,ECO 

Backofentür/ Glasschichten 

schwarzes Glas / 3 

Gehäusekühlung 

ja 

Griff und Knöpfe 

Aluminium 

Energieeffizienzklasse 

Geräuschemission 

< 52 dB(A) 

Max. Leistung  

8,30 kW 

Stromspannung / Frequenz 

220-240V / 50Hz 

Energieverbrauch konventionell 

0,75 kW/h 

Energieverbrauch Umluft 

0,87 kW/h 

Netto Backraumvolumen 

68,00 Liter 

Anzahl Seitenracks 

Tropfschale/ Grillrost 

1 / 1 

Kabellänge in cm 

Einbaumaße Ofen H * B * T  

59,50*59,50*55,00 cm 

Verpackungsmaße Ofen H * B * T 

66,00*65,50*64,00 cm 

Gewicht Ofen Netto/Brutto 

32,50 kg/35,00 kg 

Einbaumaße Kochfeld H*B*T 

5,00*58,00*51,00 cm 

Verpackung Kochfeld H*B*T 

14,00*63,00*55,50 

Gewicht Kochfeld Netto/Brutto 

7,50 Kg/9,00 Kg 


Summary of Contents for BIC7 GK-IX-2H

Page 1: ...eehrter Kunde Sehr geehrte Kundin Wir möchten Ihnen herzlich danken dass Sie sich zum Erwerb eines Produkts aus unserem reichhaltigen Angebot entschieden haben Lesen Sie die gesamte Bedienungsanleitung bevor Sie das Gerät zum ersten Mal benutzen Verwahren Sie diese Bedienungsanleitung zur zukünftigen Verwendung an einem sicheren Ort Falls Sie das Gerät weitergeben müssen Sie diese Bedienungsanleit...

Page 2: ...s von dem tatsächlichen Design Ihres Geräts abweichen Folgen Sie in einem solchen Fall dennoch den beschriebenen Sachverhalten Lieferung ohne Inhalt Der Hersteller behält sich das Recht vor solche Änderungen vorzunehmen die keinen Einfluss auf die Funktionsweise des Geräts haben Entsorgen Sie das Verpackungsmaterial entsprechend den örtlichen Vorschriften Ihres Wohnorts Das von Ihnen gekaufte Gerä...

Page 3: ...eise um Unfälle oder eine Beschädigung des Geräts zu vermeiden Prüfen Sie auf jeden Fall auch das technische Umfeld des Geräts Sind alle Kabel oder Leitungen die zu ihrem Gerät führen in Ordnung Oder sind sie veraltet und halten der Geräteleistung nicht mehr Stand Daher muss durch eine qualifizierte Fachkraft Elektrotechniker in eine Überprüfung bereits vorhandener wie auch neuer Anschlüsse erfolg...

Page 4: ...an die Stromversorgung an wenn das Gerät das Netzkabel oder der Netzstecker sichtbare Beschädigungen aufweisen 4 Versuchen Sie niemals selbst das Gerät zu reparieren Falls Ihr Gerät nicht ordnungsgemäß funktioniert kontaktieren Sie das Geschäft in dem Sie das Gerät erworben haben Lassen Sie nur Original Ersatzteile einbauen 5 Wenn das Netzanschlusskabel beschädigt ist darf es ausschließlich vom He...

Page 5: ...s Gerät ab und ersticken Sie das Feuer mittels eines Deckels oder einer Feuerdecke 10 Der Küchenraum muss trocken und gut zu belüften sein Wenn das Gerät aufgebaut wird müssen alle Kontroll und Bedienelemente gut zugänglich sein 11 Die Furnierungen von Schränken müssen mit einem hitzeresistenen Leim befestigt sein der Temperaturen von 100 0 C widersteht 12 Angrenzende Möbelstücke und alle zur Inst...

Page 6: ... in der Nähe des Geräts aufhalten VORSICHT 1 Das Gerät wird während des Betriebs heiß Berühren Sie nicht die heißen Teile innerhalb des Ofens 2 Benutzen Sie keine aggressiven oder ätzenden Reinigungsmittel und keine scharfkantigen Gegenstände zum Reinigen der Tür da diese die Oberfläche verkratzen und somit Risse im Glas verursachen 3 Stellen oder legen Sie kein Kochgeschirr und keine Backbleche d...

Page 7: ... Halten Sie das Gerät dabei aufrecht 2 Benutzen Sie niemals die Tür selbst zum Transport des Geräts da Sie dadurch die Scharniere beschädigen 3 Das Gerät muss von mindestens zwei Personen transportiert und angeschlossen werden 4 Merken Sie sich die Positionen aller Teile des Geräts wenn Sie es auspacken für den Fall es noch einmal einpacken und transportieren zu müssen 5 Benutzen Sie das Gerät nic...

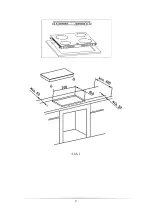
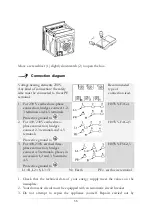
Page 8: ... nehmen 5 Stellen Sie das Gerät auf einem geraden trockenen und festen Untergrund auf Kontrollieren Sie mit einer Wasserwaage den ordnungsgemäßen Aufbau Ihres Geräts 6 Das Typenschild befindet sich im Inneren des Geräts oder außen an der Rückwand Einbau des Kochfelds Bereiten Sie die Einbauöffnung entsprechend der Angaben auf Abbildung 1 vor Passen Sie das Kochfeld in die Einbauvorrichtung ein Das...

Page 9: ...9 Abb 1 ...

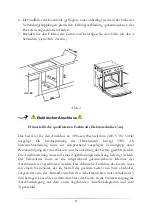
Page 10: ...sorgung durchgeführt werden Der Anschluss muss in Übereinstimmung mit den örtlich geltenden gesetzlichen Bestimmungen erfolgen 1 Die Öffnung des Umbauschranks muss über die auf Abbildung 2 genannten Abmessungen verfügen 2 Setzen Sie das Kochfeld ein 3 Stellen Sie den Ofen in die Nähe der Einbauöffnung 4 Schließen Sie den Ofen an das Stromnetz an 5 Setzen Sie den Ofen zum Teil in die vorbereitete Ö...

Page 11: ... 230V Als Netzanschlussleitung muss ein entsprechend ausgelegter Leistungstyp unter Berücksichtigung der Anschlussart und Nennleistung des Geräts gewählt werden Die Anschlussleitung muss mit einer Zugentlastungsvorrichtung befestigt werden Der Schutzleiter muss an die entsprechend gekennzeichnete Klemme der Anschlussleiste angeschlossen werden Der elektrische Anschluss des Geräts muss mit einem No...

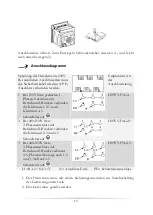
Page 12: ...ken verbinden die Klemmen 1 2 3 sowie Klemmen 4 5 Schutzleiter auf H05VV F3G4 2 Bei 400 230V Netz 2 Phasenanschluss mit Betriebsnull Brücken verbinden die Klemmen 2 3 und 4 5 Schutzleiter auf H05VV F4G2 5 3 Bei 400 230V Netz 3 Phasenanschluss mit Betriebsnull Brücke verbindet 4 5 Phasenreihenfolge nach 1 2 und 3 Null auf 4 5 Schutzleiter auf H05VV F5G1 5 L1 R L2 S L3 T N Anschluss Erde PE Schutzle...

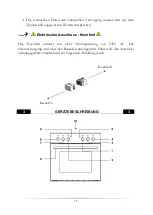
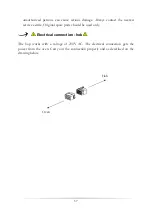
Page 13: ...benen Werten entsprechen Elektrischer Anschluss Kochfeld Das Kochfeld arbeitet mit einer Stromspannung von 230V AC Die Stromversorgung wird über den Backofen durchgeführt Führen Sie den Anschluss ordnungsgemäß entsprechend der folgenden Abbildung durch Kochfeld Backofen 3 GERÄTEBESCHREIBUNG 3 ...

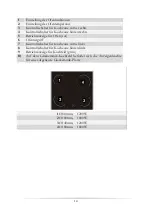
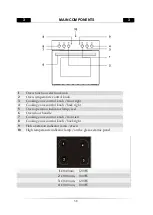
Page 14: ...inten rechts 5 Betriebsanzeige für Ofen rot 6 Ofentürgriff 7 Kontrollschalter für Kochzone vorne links 8 Kontrollschalter für Kochzone hinten links 9 Betriebsanzeige für Kochfeld grün 10 Auf dem Glaskeramik Kochfeld befindet sich die Anzeigenleuchte für eine aufgeheizte Glaskeramik Platte 1 Ø140mm 1200W 2 Ø180mm 1800W 3 Ø140mm 1200W 4 Ø180mm 1800W ...

Page 15: ...raum HINWEIS Reinigen Sie den Innenraum des Ofens nur mit etwas warmem Wasser und Spülmittel Bedienfeld A Kochzone hinten links Zum Einschalten nach links oder rechts drehen B Kochzone vorne links Zum Einschalten nach links oder rechts drehen C Temperaturkontrolle des Ofens von 500 bis 2500 C D Auswahl der Ofenfunktionen E Kochzone vorne rechts Zum Einschalten nach links oder rechts drehen F Kochz...

Page 16: ...reingestellte Temperatur erreicht Falls ein Kochrezept das Vorwärmen von Tellern empfiehlt sollten diese erst in den Ofen gestellt werden wenn das rote Licht zum ersten Mal erloschen ist Beim Backen geht das rote Licht gelegentlich an oder aus um die voreingestellte Temperatur im Inneren des Ofens aufrechtzuerhalten Das orange Licht zeigt an dass der Ofen eingeschaltet ist Das orange Licht leuchte...

Page 17: ...etts darunter 3 Halten Sie die Ofentür beim Grillen immer geschlossen 4 Wenden Sie das Grillgut nach der Hälfte der Garzeit 5 Reiben Sie Fisch oder Fleisch vor dem Grillen mit ein wenig Öl ein 6 HINWEIS Verwenden Sie keine Aluminiumfolie beim Grillen weder zum Einwickeln des Grillguts noch zum Abdecken des Rostes oder des Abtropfblechs Die Aluminiumfolie reflektiert die Hitze der Grillelemente wod...

Page 18: ...oder heißem Salzwasser Gießen Sie niemals kaltes Wasser über das Fleisch Energie sparen Benutzen Sie geeignetes Kochgeschirr Kochgeschirr mit einem dicken und geraden Boden kann bis zu einem Drittel an Energie sparen Decken Sie ihr Kochgeschirr ab wenn möglich andernfalls verbrauchen Sie das 4 fache an Energie Der Durchmesser des Kochgeschirrs sollte nicht kleiner als der Durchmesser des verwendet...

Page 19: ...nd ein mildes Reinigungsmittel Entfernen Sie Fettflecken mit warmem Wasser oder einem Spezialreiniger für Glaskeramik Verwenden Sie keine Scheuermittel Lassen Sie keine sauren oder basischen Substanzen Zitronensaft Essig Salz etc auf den Oberflächen Reinigungsmittel Benutzen Sie niemals raue und oder aggressive Reinigungsmittel Benutzen Sie niemals Lösungsmittel Ofen Reinigen Sie den Ofen nach jed...

Page 20: ... des Leuchtmittels 1 Schalten Sie das Gerät aus und trennen Sie es von der Stromversorgung 2 Drehen Sie die Abdeckung heraus Reinigen Sie die Abdeckung anschließend gut trocken wischen 3 Drehen Sie das Leuchtmittel aus der Fassung und ersetzen Sie es durch ein neues derselben Art und Leistung Hitzeresistentes Backofenleuchtmittel 3000 C 230V 25W E 14 Gewinde 4 Verwenden Sie kein anderes Leuchtmitt...

Page 21: ...st ist schließen Sie wieder vorsichtig den Sicherheitsbügel 7 Falls der Sicherheitsbügel nicht ordnungsgemäß geschlossen ist wird das Scharnier beim Schließen der Tür beschädigt Glasscheibe herausnehmen 1 Drücken Sie vorsichtig mit einer Hand von außen gegen das Glas Mit der anderen Hand ziehen Sie vorsichtig an der gesamten inneren Tür Heben Sie den inneren Teil nun vorsichtig an und entfernen Si...

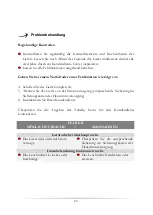
Page 22: ...ie das Gerät komplett ab 5 Trennen Sie das Gerät von der Stromversorgung entsprechende Sicherung im Sicherungskasten der Hausstromversorgung 6 Kontaktieren Sie Ihren Kundendienst Überprüfen Sie die Angaben der Tabelle bevor Sie den Kundendienst kontaktieren FEHLER MÖGLICHE URSACHE MASSNAHMEN Gerät arbeitet überhaupt nicht Das Gerät wird nicht mit Strom versorgt Überprüfen Sie die entsprechende Sic...

Page 23: ...g ja Griff und Knöpfe Aluminium Energieeffizienzklasse A Geräuschemission 52 dB A Max Leistung 8 30 kW Stromspannung Frequenz 220 240V 50Hz Energieverbrauch konventionell 0 75 kW h Energieverbrauch Umluft 0 87 kW h Netto Backraumvolumen 68 00 Liter Anzahl Seitenracks 1 Tropfschale Grillrost 1 1 Kabellänge in cm Einbaumaße Ofen H B T 59 50 59 50 55 00 cm Verpackungsmaße Ofen H B T 66 00 65 50 64 00...

Page 24: ...vorher unbedingt funktionsuntüchtig Das bedeutet immer den Netzstecker ziehen und danach das Stromanschlusskabel am Gerät abschneiden und direkt mit dem Netzstecker entfernen und entsorgen 6 Demontieren Sie immer die komplette Tür damit sich keine Kinder einsperren und in Lebensgefahr geraten können 7 Die im Gerät verwendeten Materialien sind recycelbar und mit entsprechenden Informationen versehe...

Page 25: ...naten nach Lieferung an den Erstendabnehmer zu melden Für unsere Geräte leisten wir Garantie gemäß nachstehenden Bedingungen Mängel am Gerät die nachweislich auf einem Material oder Herstellungsfehler beruhen werden durch das Geschäft in welchem das Gerät gekauft wurde unentgeltlich behoben Soweit der Mangel innerhalb von 6 Monaten auftritt wird vermutet dass ein Material oder Herstellungsfehler v...

Page 26: ...emäße Installation oder Inbetriebnahme 5 mangelnde oder fehlerhafte Wartung 6 Geräten die nicht ihrem vorgesehenen Zweck entsprechend verwendet werden 7 Schäden durch höhere Gewalt oder Naturkatastrophen insbesondere aber nicht abschließend bei Brand oder Explosion Garantieleistungen bewirken weder eine Verlängerung der Garantiefrist noch setzen sie eine neue Garantiefrist in Lauf Die Garantiefris...

Page 27: ...instruction manual comply with the harmonized regulations The relevant documents can be requested from the final retailer by the competent authorities The figures in this instruction manual may differ in some details from the current design of your appliance Nevertheless follow the instructions in such a case Delivery without content Any modifications which do not influence the functions of the ap...

Page 28: ...wly made connections must be done by an authorized professional All connections and energy leading components incl wires inside a wall must be checked by a qualified professional All modifications to the electrical mains to enable the installation of the appliance must be performed by a qualified professional The appliance is intended for private use only The appliance is intended for cooking in a...

Page 29: ...rent circuit must be equipped with a safety shut down device 3 All modifications to the electrical mains to enable the installation of the appliance must be performed by a qualified professional 4 In case of an event caused by a technical malfunction disconnect the appliance from the mains Report the malfunction to your service centre so it can be repaired 5 If the glass ceramic is cracked or dama...

Page 30: ...Do not store any objects in the oven RISK OF FIRE 19 Household equipment and connection leads must not touch the hot oven or the hob as the insulation material is usually not heat resistant 20 Never use a steam cleaner to clean the appliance The steam will cause serious damage to the electric components of the appliance Risk of electrical shock 21 The accessible parts of the oven become hot during...

Page 31: ...ill retain and emit heat even if it has stopped operating NOTICE 1 When you move the appliance hold it at its base and lift it carefully Keep the appliance in an upright position 2 Never use the door for moving the appliance as you will damage the hinges 3 The appliance must be transported and installed by at least two persons 4 When you unpack the appliance you should take note of the position of...

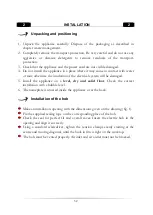
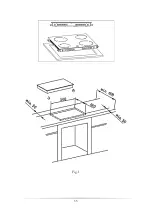
Page 32: ...ical system will be damaged 5 Install the appliance on a level dry and solid floor Check the correct installation with a bubble level 6 The nameplate is situated inside the appliance or at the back Installation of the hob Make an installation opening with the dimensions given on the drawing fig 1 Fix the supplied sealing tape on the corresponding place of the hob Check the seal for perfect fit and...

Page 33: ...33 Fig 1 ...
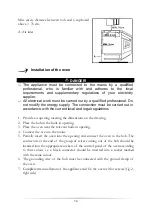
Page 34: ...Provide an opening meeting the dimensions on the drawing 2 Place the hob in the built in opening 3 Place the oven near the relevant built in opening 4 Connect the oven to the mains 5 Partially insert the oven into the opening and connect the oven to the hob The connectors at the end of the group of wires coming out of the hob should be inserted into the appropriate sockets of the control panel of ...

Page 35: ...e cooker The connection cable must be secured in a strain relief clamp The ground wire must be connected to the marked clamp of the terminal The electric supply of the appliance must be equipped with an emergency switch with a distance between the contacts of at least 3 mm which disconnects the entire appliance from the mains in a case of emergency Read the information on the rating label and the ...

Page 36: ...0 230V earthed two phase connection bridges connect 2 3 terminals and 4 5 terminals Protective ground to H05VV F4G2 5 3 For 400 230V earthed three phase connection bridges connect 4 5 terminals phases in succession 1 2 and 3 Neutral to 4 5 Protective ground to H05VV F5G1 5 L1 R L2 S L3 T N Earth PE earth wire terminal 1 Check that the technical data of your energy supply meet the values on the nam...

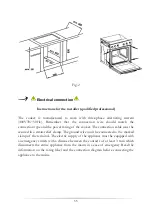
Page 37: ...e nearest service centre Original spare parts should be used only Electrical connection hob The hop works with a voltage of 230V AC The electrical connection gets the power from the oven Carry out the connection properly and as described on the drawing below Hob Oven ...

Page 38: ... Cooking zone control knob back right 5 Oven operation indicator lamp red 6 Oven door handle 7 Cooking zone control knob front left 8 Cooking zone control knob back right 9 Hob operation indicator lamp green 10 High temperature indicator lamp on the glass ceramic panel 1 Ø140mm 1200W 2 Ø180mm 1800W 3 Ø140mm 1200W 4 Ø180mm 1800W ...

Page 39: ...th warm water and washing up liquid only Hob A Cooking zone back left Turn clockwise anticlockwise to switch on B Cooking zone front left Turn clockwise anticlockwise to switch on C Temperature control oven from 500 to 2500 C D Oven functions E Cooking zone front right Turn clockwise anticlockwise to switch on F Cooking zone back right Turn clockwise anticlockwise to switch on Keep the cooking zon...

Page 40: ...has reached the temperature you preset lf a recipe recommends to place dishes in a warmed up oven place the dishes in the oven after the red light has gone off for the first time While the oven is used the red light will go off and on temporarily to maintain the preset temperature The orange light indicates that the oven is operating The orange light is also on when the interior light of the oven ...

Page 41: ...not use aluminium foil for grilling Do not wrap your food in aluminium foil and do not cover the grillage with aluminium foil The aluminium foil will reflect the heat of the grill so the appliance may be damaged Helpful hints We recommend to use the supplied baking tray provided with your appliance It is also possible to bake in cake tins and trays bought somewhere else For baking it is better to ...

Page 42: ...n Soils prevent heat transfer Repeatedly burnt on spillages can often be removed by products which will damage the environment only Do not uncover the cookware too often a watched pot content will never boil Do not open the oven door unnecessarily often Switch off the oven in good time and make use of the residual heat For long cooking times switch off the heating zones 5 to 10 minutes before you ...

Page 43: ...tside of the oven with warm soapy water Use a sponge or a soft cloth Never use abrasive or aggressive detergents If you use a special oven detergent check that the detergent is suitable for your appliance instructions on the packaging of the detergent Any damage that is caused to the appliance by a cleaning product will not be fixed free of charge even if the guarantee period of the appliance is s...

Page 44: ...h the safety catch upwards 2 Close the door slightly 3 Lift the door and pull it towards your direction 4 To reassemble proceed in reverse order 5 Check that the groove of the hinge bracket is positioned properly in its guide 6 After reassembling the door close the safety catch carefully 7 If the safety catch is not closed properly you will damage the hinges when closing the door ...

Page 45: ... Periodical controls Carry out periodic inspections of the control elements and cooking units of the cooker After the guarantee has expired you should provide a technical inspection of the cooker carried out at a service centre at least once every two years All malfunctions should be repaired immediately Emergency measures 1 Switch off the entire appliance 2 Disconnect the appliance from the mains...

Page 46: ...heat Top and bottom heat Defrost Grill Grill and fan Top heat and grill and fan Top heat and bottom heat and fan ECO Oven door Glass sheets black glass 3 Body cooling yes Handle buttons Aluminium Energy efficiency category A Noise emission 52 dB A Max power 8 30 kW Voltage Frequency 220 240V 50Hz Energy consumption conventional operation 0 75 kW h Energy consumption fan 0 87 kW h Net volume oven 6...

Page 47: ...rative Unplug the appliance and cut off the entire power cord Dispose of the power cord and the plug immediately 6 Remove the door completely so children are not able to get into the appliance as this endangers their lives 7 The materials of the appliance are recyclable and labelled with relevant information When recycling materials or other parts from used appliances you make a significant contri...

Page 48: ...ection and within 24 months after the delivery to the first ultimate vendee The guarantee for our appliances is valid under the following conditions Defects of the appliance which are verifiably caused by material or fabrication deficiency will be rectified free of charge by the shop you purchased the appliance at When the defect appears within 6 months we suppose that there is a material or fabri...

Page 49: ...endor the installer or a third party 4 the installation or the start up is performed inappropriately 5 the maintenance is inadequately or incorrectly performed 6 the appliance is not used for its intended purpose 7 the appliance is damaged by force majeur or natural disasters including but with not being limited to fires or explosions The guarantee claims neither extend the guarantee period nor in...

Page 50: ...finden alle Informationen zum Kundendienst auf der Einlage in dieser Bedienungsanleitung Aftersales service information on the leaflet inside this instruction manual Änderungen vorbehalten Stand März 2019 Subject to alterations Updated March 2019 PKM GmbH Co KG Neuer Wall 2 47441 Moers ...

Reviews: