background image

77

 ~


10. After use, always switch off the cooking zones. 
11. The hob should be clean at every time. Soiled cooking zones do not 

transfer the heat correctly. 

12. Protect the hob from corrosion. 
13. Switch off soiled cooking zones. 
14. Switch off the complete hob if any damage or malfunction occurs. 
15. Cooking utensils may become hot because of the heat transferred 

by  the  heated  food.  Potholders  or  oven  gloves  may  be  needed  to 
handle such utensils. 

16. The blades of scrapers for the cleaning of a glass-ceramic hob are 

very sharp. Do not cut yourself, especially when you have removed 
the safety cover of the scraper. 

17. Metal-made items such as knives, forks, spoons and pan lids should 

not be put on the appliance as they may become hot. 

18. 

This appliance complies with the current European safety legislation. 

We do wish to emphasise that this compliance does not negate the 
fact  that  the  surfaces  of 

the  appliance  will  become  hot 

while 

operating  and 

will  retain  and  emit  heat  even  if  it  has  stopped 

operating.


NOTICE


1.  When you move the appliance, hold it at its base and lift it carefully. 

Keep the appliance in an upright position. 

2.  Never use the door for moving the appliance as you will damage the 

hinges. 

3.  The  appliance  must  be  transported  and  installed  by  at  least 

two 

persons

4. 

When you unpack the appliance, you should take note of the position 
of every part of the interior accessories in case you have to repack 
and transport it at a later point of time. 

5.  Do  not  operate  the  appliance  unless  all  components  are  installed 

properly. 

6.  Do not put any heavy items on the hob. 
7. 

Do not put heavy cookware on the hob. 

8.  Only use  cookware  which  is suitable  to  be  used on  ceramic glass; 

otherwise, you will damage the appliance. 

9.  Do not stand or lean on the base, the drawers, the doors etc of the 

appliance. 

10. 

Do not put any heavy items onto the open door of the oven. Do not 

put any cookware onto the open door of the oven. Do not lean against 
the open door of the oven as you will damage the hinges. 


Summary of Contents for BIC8 GK-2KB

Page 1: ...OGIE FÜR DEN HAUSHALT TECHNOLOGY FOR DOMESTIC USE 08 08 2021 Bedienungsanleitung Instruction Manual EINBAU BACKOFEN MIT KOCHFELD BUILT IN OVEN HOB BIC8 GK 2KB Deutsch Seite 2 English Page 69 www pkm online de ...

Page 2: ...herheitsanweisungen 6 2 Installation 13 2 1 Entpacken und Wahl des Standorts 14 2 2 Anforderungen vor der Installation 15 2 3 Installation des Kochfelds 15 2 3 1 Maßangaben Abmessungen 16 2 3 2 Belüftung und Installation 17 2 4 Installation des Backofens 21 2 5 Elektrischer Anschluss Kochfeld Backofen 24 2 5 1 Anschlussdiagramm 26 2 5 2 Elektrischer Anschluss Verbindung Backofen und Kochfeld 27 3 ...

Page 3: ...weltschutz Entsorgung 50 5 2 Umweltschutz Energie sparen 51 6 Hinweise für das Kochen 52 6 1 Hinweise für das Kochen und Braten auf einem Kochfeld 52 6 2 Hinweise für das Backen und Braten Rösten in einem Backofen 53 6 3 Hinweise für das Grillen in einem Backofen 54 7 Reinigung und Pflege 55 7 1 Reinigung des Kochfelds 55 7 2 Reinigung des Backofens 57 7 2 1 Reinigung des Backofens mit Wasserdampf...

Page 4: ...rial entsprechend den örtlichen Vorschriften Ihres Wohnorts Das von Ihnen gekaufte Gerät wurde möglicherweise inzwischen verbessert und weist somit vielleicht Unterschiede zur Bedienungsanleitung auf Dennoch sind die Funktionen und Betriebsbedingungen identisch sodass Sie die Bedienungsanleitung im vollen Umfang nutzen können Technische Änderungen bzw Druckfehler bleiben vorbehalten EG KONFORMITÄT...

Page 5: ... die zum Anschluss des Gerätes an die Stromversorgung notwendig sind dürfen nur von einer qualifizierten Fachkraft Elektrotechniker in durchgeführt werden Das Gerät ist ausschließlich zur privaten Nutzung bestimmt Das Gerät ist ausschließlich zum Kochen in einem Privathaushalt bestimmt Das Gerät ist ausschließlich zum Betrieb innerhalb geschlossener Räume bestimmt Dieses Gerät darf nicht für gewer...

Page 6: ...s Gerät darf nur durch eine qualifizierte Fachkraft Elektrotechniker in an die Stromversorgung angeschlossen werden welche die landesüblichen gesetzlichen Verordnungen und die Zusatzvorschriften der örtlichen Stromversorgungsunternehmen genau kennt und sorgfältig beachtet 3 Alle eventuell notwendigen elektrischen Arbeiten müssen von einer qualifizierten Fachkraft Elektrotechniker in durchgeführt w...

Page 7: ...sollte lassen Sie die Netzsteckdose immer von einer qualifizierten Fachkraft Elektrotechniker in ersetzen Keine Garantieleistung 11 Wenn das Netzanschlusskabel beschädigt ist darf es ausschließlich vom Hersteller oder einem vom Hersteller autorisierten Kundendienst oder einer qualifizierten Fachkraft Elektrotechniker in ausgetauscht werden 12 Benutzen Sie zum Ziehen des Netzsteckers niemals das Ne...

Page 8: ...GEFAHR 10 Dieses Gerät darf nicht unter Zuhilfenahme eines externen Timers oder einer vom Gerät unabhängigen Fernbedienung betrieben werden 11 Der Küchenraum muss trocken und gut zu belüften sein Wenn das Gerät aufgebaut wird müssen alle Kontroll und Bedienelemente gut zugänglich sein 12 Die Furnierungen von Schränken müssen mit einem hitzeresistenten Leim befestigt sein der Temperaturen von minde...

Page 9: ...ren Versuchen Sie NIEMALS ein durch Öl oder Fett unterstütztes Feuer mit Wasser zu löschen Stattdessen schalten Sie das Gerät ab und ersticken Sie das Feuer mittels eines Deckels oder einer Feuerdecke 26 Berühren Sie niemals die Kochzonen Kochplatten solange die Restwärmeanzeige nicht erloschen ist VERBRENNUNGSGEFAHR 27 Die zugänglichen Bereiche und Teile des Kochfelds werden bei der Benutzung seh...

Page 10: ... Sie niemals einen Dampfreiniger zum Reinigen des Gerätes Der Dampf kann die Elektrik des Gerätes nachhaltig beschädigen STROMSCHLAGGEFAHR 37 Kinder dürfen nicht mit dem Gerät spielen 38 Beaufsichtigen Sie Kinder stets wenn diese sich in der Nähe des Gerätes aufhalten 39 Erlauben Sie Kindern nur dann das Gerät unbeaufsichtigt zu benutzen wenn sie vorher in einer solchen Art und Weise im Gebrauch d...

Page 11: ...Sie nicht in Kontakt mit den heißen Bereichen oder mit dem Dampf der aus dem geöffneten Backofen entweicht VERBRENNUNGS GEFAHR VERBRÜHUNGSGEFAHR 8 Benutzen Sie stets Backofenhandschuhe 9 Schalten Sie das Kochfeld nicht an bevor Sie ein Kochgeschirr auf eine Kochzone gestellt haben 10 Schalten Sie die Kochzonen nach Benutzung immer aus 11 Halten Sie das Kochfeld immer sauber Verunreinigte Bereiche ...

Page 12: ...oder legen Sie keine schweren Gegenstände auf das Kochfeld 7 Stellen Sie kein überschweres Kochgeschirr auf das Kochfeld 8 Benutzen Sie ausschließlich für Glaskeramik geeignetes Kochgeschirr da Sie ansonsten das Gerät beschädigen 9 Benutzen Sie den Boden die Schubladen die Türen etc des Gerätes niemals als Standfläche oder Stütze 10 Stellen oder legen Sie keine schweren Gegenstände auf die geöffne...

Page 13: ...n die Stromversorgung angeschlossen werden welche die landesüblichen gesetzlichen Verordnungen und die Zusatzvorschriften der örtlichen Stromversorgungsunternehmen genau kennt und sorgfältig beachtet GEFAHR Alle eventuell notwendigen elektrischen Arbeiten müssen von einer qualifizierten Fachkraft Elektrotechniker in durchgeführt werden Es dürfen keine Änderungen oder willkürlichen Veränderungen an...

Page 14: ...ht verantwortlich gemacht werden 2 1 Entpacken und Wahl des Standorts 1 Packen Sie das Gerät vorsichtig aus Beachten Sie unbedingt die Hinweise zur Entsorgung des Gerätes in dieser Bedienungsanleitung 2 Das Gerät ist möglicherweise für den Transport mit Transportsicherungen geschützt Entfernen Sie diese komplett Benutzen Sie keine aggressiven Reinigungsmittel um Reste der Transportsicherungen zu e...

Page 15: ...iert ist während des Betriebs des Gerätes widerstehen können Wenn Sie sich nicht sicher sind ob die anliegenden Schränke oder die Rückwand hitzebeständig sind sollten Sie einen Freiraum von ca 20 mm um den Backofen herum bereitstellen Die Installation des Gerätes Kochfeld und Backofen muss allen Sicherheitsanforderungen und relevanten Normen und gesetzlichen Bestimmungen entsprechen 2 3 Installati...

Page 16: ...destens 30 mm betragen Verwenden Sie für die Arbeitsplatte ausschließlich hitzeresistentes Material um Deformationen aufgrund der Wärmeabstrahlung des Kochfelds zu vermeiden 2 3 1 Maßangaben Abmessungen Alle Abmessungen sind in Millimetern angegeben MAßE DES KOCHFELDS A HÖHE B BREITE C TIEFE 52 mm 590 mm 520 mm MAßE DER EINBAUÖFFNUNG ...

Page 17: ...s STROMSCHLAGGEFAHR Der Sicherheitsabstand zwischen der Kochoberfläche und einem sich darüber befindenden Schrank muss mindestens 450 mm betragen Der Sicherheitsabstand zwischen der Kochoberfläche und einer sich darüber befindenden Dunstabzugshaube muss mindestens 760 mm betragen Lassen Sie das Gerät so installieren dass eine optimale Wärmeabstrahlung zur Aufrechterhaltung der Betriebssicherheit e...

Page 18: ...rät muss sich immer im ordnungsgemäßen Zustand befinden Die obere Abschlusskante des Einbaumöbels X darf nicht direkt an die Einbauöffnung anschließen 1 Bringen Sie die Abschlusskante versetzt an 2 oder schrägen Sie die Abschlusskante ab 3 S Abb unten C BELÜFTUNGSSCHLITZ A B C D E SCHRANK mind 450 mm DUNSTABZUGSHAUBE mind 760 mm mind 50 mm mind 20 mm Lufteinlass Luftauslass 5 mm Das Kochfeld muss ...

Page 19: ...nlich 1 DICHTUNG 2 KOCHFELD 3 ARBEITSPLATTE 4 ÄUßERE KANTE DES KOCHFELDS 5 ÄUßERE SEITE DER DICHTUNG 6 UNTERSEITE DES KOCHFELDS 2 Befestigen Sie die Halteklammern am Gerät s folgende Beschreibung BEFESTIGUNG DER HALTEKLAMMERN a Legen Sie das Gerät auf eine stabile und weiche Unterlage verwenden Sie die Verpackung b Üben Sie keine physikalische Kraft auf die Kontrollelemente des Gerätes aus c Befes...

Page 20: ...eld in die Installationsöffnung ein und richten Sie es korrekt aus Drücken Sie es vorsichtig nach unten bis es fest auf der Arbeitsplatte aufliegt s Abb unten Das Kochfeld muss sich ordnungsgemäß und fest in der Einbauvorrichtung befinden Die Dichtung muss ordnungsgemäß anliegen ...

Page 21: ...tes unbedingt die Stromversorgung ab entsprechende Haussicherung abschalten STROMSCHLAGGEFAHR GEFAHR Das Gerät darf nur durch eine qualifizierte Fachkraft Elektrotechniker in an die Stromversorgung angeschlossen werden welche die landesüblichen gesetzlichen Verordnungen und die Zusatzvorschriften der örtlichen Stromversorgungsunternehmen genau kennt und sorgfältig beachtet GEFAHR Alle notwendigen ...

Page 22: ...r Einbauöffnung 5 Schließen Sie den Backofen an das Stromnetz an siehe auch Kapitel 2 5 ELEKTRISCHER ANSCHLUSS KOCHFELD BACKOFEN ff Gehen Sie wie folgt vor a Setzen Sie den Backofen zum Teil in die vorbereitete Öffnung ein Verbinden Sie dann den Backofen ordnungsgemäß mit dem Kochfeld Es ist dabei unbedingt erforderlich die Kapitel bezüglich der elektrischen Anschlüsse zu beachten s Kapitel 2 5 EL...

Page 23: ... 23 ABB 1 MAßE DES BACKOFENS ABB 2 MAßE DER EINBAUÖFFNUNG ...

Page 24: ...nternehmen genau kennt und sorgfältig beachtet GEFAHR Die Stromspannung und die Leistungsfrequenz der Stromversorgung muss den auf dem Typenschild angegebenen Werten entsprechen HINWEISE FÜR DIE QUALIFIZIERTE FACHKRAFT ELEKTROTECHNIKER IN Das Gerät ist für den Anschluss an 3 Phasen Wechselstrom 380 415 V 3N 50 Hz ausgelegt Als Netzanschlussleitung muss ein entsprechend ausgelegter Leistungstyp unt...

Page 25: ...s Gerätes erforderlich ist muss bei der Installation eine Trennvorrichtung für jeden Pol eingebaut werden Als Trennvorrichtung werden Schalter mit einer Kontaktöffnung von mindestens 3 mm bezeichnet Dazu gehören LS Schalter Sicherungen und Schütze EN 60335 Kontaktschutz muss bei Installation des Gerätes gewährleistet sein Anschlussdose öffnen Zum Entriegeln Schraubenzieher ansetzen 1 und leicht na...

Page 26: ...R L Stromführende Leitung Netzleiter L 1 L 2 L 3 1 5 mm2 ROT N Nullleiter N 1 N 2 1 5 mm2 BLAU PE Schutzleiteranschluss GELB GRÜN 1 5 mm2 Der Hausstrom muss mit einem Sicherungsautomaten zur Notabschaltung des Gerätes ausgestattet sein Das Gerät muss geerdet werden Die technischen Daten der elektrischen Versorgung müssen den auf dem Typenschild angegebenen Werten entsprechen ...

Page 27: ... 27 2 5 2 Elektrischer Anschluss Verbindung Backofen und Kochfeld KLEMMLEISTE RICHTIGE VERBINDUNG FALSCHE VERBINDUNG ...

Page 28: ...LAY UND BEDIENTASTEN 2 GRIFF DER BACKOFENTÜR 3 TÜR DES BACKOFENS 4 2 KOCHZONEN Ø 165 mm 1200 W 5 DUALE KOCHZONE Ø 138 mm Ø 230 mm 1000 W 2200 W 6 OVALE KOCHZONE Ø 165 mm Ø 270 mm 1100 W 2000 W 7 RESTWÄRMEANZEIGEN Die RESTWÄRMEANZEIGEN leuchten nach dem Abschalten bei heißen Kochzonen auf und erlöschen sobald die entsprechende Kochzone abgekühlt ist ...

Page 29: ...ropfschale Backblech immer komplett in den Backofen eingeschoben sind sodass sie beim Schließen der Backofentür nicht mit dieser kollidieren BESCHÄDIGUNGSGEFAHR HINWEIS Verwenden Sie beim Grillen immer die Tropfschale oder das Backblech um das von dem Grillgut abtropfende Fett aufzufangen GRILLROST Der Grillrost ist zum Grillen zum Braten und zum Backen von Lebensmitteln geeignet ebenso ist er zum...

Page 30: ...TELESKOPAUSZÜGE Mit den Teleskopauszügen lassen sich die Einschubelemente Grillrost Tropfschale etc leichtgängig und bequem bewegen und herausnehmen Die Einschubelemente sitzen sicher auf den Teleskopauszügen Wenn Sie den Garpunkt von Gerichten prüfen möchten haben Sie beide Hände frei und müssen sich nicht in den heißen Innenraum des Backofens beugen Die Teleskopauszüge müssen eventuell noch inst...

Page 31: ...eitenracks einsetzen s Abb unten So können Sie ganz nach Ihren Bedürfnissen auf verschiedenen Einschubhöhen backen braten oder grillen Abb ähnlich Modifikationen sind möglich 3 2 Bedienfeld Abb ähnlich Modifikationen sind möglich A DISPLAY BEDIENTASTEN Beschreibung s Kapitel 3 3 B BETRIEBSANZEIGE des BACKOFENS ROT 7 Abhängig vom Modell ...

Page 32: ...er BACKOFENTEMPERATUR Die Temperatur des Backofens ist von 50 C bis 250 C einstellbar G DREHSCHALTER BACKOFENFUNKTIONEN Drehschalter zur Auswahl der BACKOFENFUNKTIONEN Funktionswahl zur Zubereitung verschiedener Speisen Acht verschiedene Backofenfunktionen sind wählbar s Kapitel 4 5 BACKOFENFUNKTIONEN H DREHSCHALTER ZUR STEUERUNG DES KOCHFELDS VORNE RECHTS Drehen Sie den Drehschalter mit oder gege...

Page 33: ...zu lösen drücken Sie einmal kurz auf den versenkten Drehschalter Der Drehschalter wird freigegeben Sie können mit dem Drehschalter nun wieder Einstellungen vornehmen 3 3 Display und Bedientasten Im STANDBY MODUS zeigt das Display die Systemzeit bzw die eingestellte Uhrzeit Abb ähnlich Die Anordnung der Anzeigen kann variieren K FUNKTIONS TASTE Taste zur PROGRAMMIERUNG des Backofens Taste zur Einst...

Page 34: ...ACKZEIT Die Funktion DAUER DER KOCH BACKZEIT ist aktiviert Siehe Kapitel 4 4 2 HALBAUTOMATISCHE KOCH BACKFUNKTION und Kapitel 4 4 3 AUTOMATISCHE KOCH BACKFUNKTION P BETRIEBSANZEIGE ENDE DER KOCH BACKZEIT Die Funktion ENDE DER KOCH BACKZEIT ist aktiviert Siehe Kapitel 4 4 2 HALBAUTOMATISCHE KOCH BACKFUNKTION und Kapitel 4 4 3 AUTOMATISCHE KOCH BACKFUNKTION Q ZEITANZEIGE 4 Bedienung Lesen Sie die ko...

Page 35: ...Sie die Ausstattungselemente heraus Blech etc und reinigen Sie diese mit warmem Wasser und etwas Spülmittel 4 Schalten Sie die Raumbelüftung ein oder öffnen Sie das Fenster 5 Lassen Sie den Backofen mit Ober und Unterhitze oder ähnliche Backofenfunktion 9 auf 250 C für 30 Minuten laufen s Kapitel 4 4 PROGRAMMIERUNG DES BACKOFENS ff Entfernen Sie anschließend Verunreinigungen und säubern Sie den In...

Page 36: ...Glaskeramik geeigneten Boden aufweist Der Boden des Kochgeschirrs sollte einen Mindestdurchmesser entsprechend der verwendeten Kochzone aufweisen Verwenden Sie kein Kochgeschirr mit zackigen oder scharfen Kanten und rauen oder gekrümmten Böden Der Boden Ihres Kochgeschirrs sollte gerade sein flach auf der Glaskeramik aufliegen und denselben Durchmesser wie die ausgewählte Kochzone aufweisen Zentri...

Page 37: ...OFEN UND KOCHFELD DREHSCHALTER KOCHZONE 6 s Abb in Kapitel 3 1 BACKOFEN UND KOCHFELD Abb ähnlich Modifikationen sind möglich 0 Kochzone ist ausgeschaltet 1 LEISTUNGSSTUFE 1 Geeignet zum Warmhalten von Speisen etc Niedrigste Einstellung 2 LEISTUNGSSTUFE 2 Geeignet zum Schmoren Dämpfen von Gemüse und zum langsamen Kochen 3 LEISTUNGSSTUFE 3 Geeignet zum Kochen von Suppen und größeren Gerichten 4 LEIS...

Page 38: ...lgemeine Bedienung des Kochfelds 1 Stellen Sie das Kochgeschirr mitten auf eine Kochzone Die Unterseite des Kochgeschirrs sowie die Kochzone sollten dabei stets sauber und trocken sein 2 Bewegen Sie den entsprechenden Drehschalter mit dem Uhrzeigersinn rechts oder gegen den Uhrzeigersinn links um das Kochfeld einzuschalten die Drehschalter der flexiblen Kochzonen nur mit dem Uhrzeigersinn drehen 3...

Page 39: ... Drehschalter beschädigen 4 3 Benutzung des Backofens WARNUNG Während des Betriebs können zugängliche Teile des Gerätes heiß werden Berühren Sie die heißen Bereiche nicht und halten Sie Kinder vom Gerät fern VERBRENNUNGSGEFAHR VORSICHT Die inneren Bestandteile des Backofens werden sehr heiß Berühren Sie keine dieser Bereiche während Sie mit Ihrem Kochgeschirr umgehen VERBRENNUNGSGEFAHR VORSICHT Se...

Page 40: ...ng des Backofens Der Backofen kann durch die Benutzung der Oberhitze und der Unterhitze mit Umluft aufgewärmt werden Die Benutzung des Backofens wird durch den DREHSCHALTER ZUR AUSWAHL DER BACKOFENFUNKTIONEN G s Kapitel 3 2 BEDIENFELD kontrolliert Acht verschiedene Backofenfunktionen sind wählbar Beleuchtung s Kapitel 4 5 BACKOFENFUNKTIONEN Bewegen Sie den Drehschalter hierbei auf die gewünschte E...

Page 41: ...ition drehen Ansonsten können Sie die Drehschalter beschädigen BETRIEBSANZEIGE DES BACKOFENS Das rote Licht B s Abb in Kapitel 3 2 BEDIENFELD zeigt an dass der Backofen aufgeheizt wird Wenn das rote Licht erlischt hat der Backofen seine voreingestellte Temperatur erreicht Falls ein Kochrezept das Vorwärmen von Tellern empfiehlt sollten diese erst in den Backofen gestellt werden wenn das rote Licht...

Page 42: ...ierung des Backofens WARNUNG Lassen Sie das Gerät während des Kochens niemals unbeaufsichtigt 4 4 1 Timer Der TIMER dient als Zeitmesser und zählt die eingestellte Zeit Countdown Zeit ab Die maximal einstellbare Countdown Zeit beträgt 23 Stunden und 59 Minuten EINSTELLEN DES TIMERS HERDWÄCHTER ZEITWÄCHTER 1 Der Backofen muss sich im STANDBY MODUS befinden Im STANDBY MODUS zeigt das Display die Uhr...

Page 43: ... wird DAUER DER KOCH BACKZEIT ODER Sie können die Uhrzeit einstellen an der der Backofen automatsch ausgeschaltet werden soll ENDE DER KOCH BACK ZEIT DAUER DER KOCH BACKZEIT EINSTELLEN Mit dieser Funktion können Sie eine Countdown Zeit einstellen bei der nach Ablauf der Zeit der Backofen automatisch ausgeschaltet wird Die maximal einstellbare Countdown Zeit beträgt 10 Stunden 1 Der Backofen muss s...

Page 44: ...omatisch ausgeschaltet werden soll Die maximal einstellbare Uhrzeit für das Ende der Koch Backzeit beträgt 10 Stunden ab der aktuellen Uhrzeit Systemzeit aktuelle Uhrzeit Systemzeit maximal 10 h 1 Der Backofen muss sich im STANDBY MODUS befinden Im STANDBY MODUS zeigt das Display die Uhrzeit Systemzeit an 2 Stellen Sie das Koch Backgut in den Backofen und schließen Sie die Tür ordnungsgemäß 3 Drüc...

Page 45: ...bare Uhrzeit für das Ende der Koch Backzeit beträgt 10 Stunden ab der aktuellen Uhrzeit Systemzeit aktuelle Uhrzeit Systemzeit maximal 10 h AUTOMATISCHE KOCH BACKFUNKTION EINSTELLEN 1 Der Backofen muss sich im STANDBY MODUS befinden Im STANDBY MODUS zeigt das Display die Uhrzeit Systemzeit an 2 Stellen Sie das Koch Backgut in den Backofen und schließen Sie die Tür ordnungsgemäß 3 Drücken Sie auf d...

Page 46: ...en Taste auf dem Display ausschalten Nach Beendigung des Koch Backvorgangs Stellen Sie den Drehschalter für die Backofenfunktionen auf die Position und den Drehschalter für die Temperaturkontrolle auf die Position 0 um den Backofen komplett auszuschalten BEISPIEL Es ist 8 00 Uhr Sie möchten Koch Backgut für 2 Stunden garen Um 13 00 Uhr soll die Koch Backzeit enden Zum Einstellen des Programms gehe...

Page 47: ...LÖSCHEN 1 Drücken Sie auf dem Display die Funktionstaste wiederholt bis die Betriebsanzeige DAUER DER KOCH BACKZEIT blinkt 2 Stellen Sie die angezeigte Zeit auf dem Display auf 00 00 zurück ENDE DER KOCH BACKZEIT LÖSCHEN 1 Drücken Sie auf dem Display die Funktionstaste wiederholt bis die Betriebsanzeige ENDE DER KOCH BACKZEIT blinkt 2 Stellen Sie die angezeigte Zeit auf dem Display auf die aktuell...

Page 48: ...eit von gefrorenen Lebensmitteln Auftauzeit abhängig von Zimmertemperatur sowie Menge und Art der Lebensmittel Die Auftauzeit können Sie auch der Anleitung auf dem Etikett der Lebensmittelverpackung entnehmen GRILL MIT OBERHITZE UND UMLUFT Der Grill die Oberhitze und die Umluft arbeiten gleichzeitig Beschleunigt das Grillen und verbessert den Geschmack des Grillguts Geeignet zum schnellen Bräunen ...

Page 49: ... benötigen Diese Funktion eignet sich ebenfalls für das schnelle Vorheizen des Backofens sowie für das Sterilisieren und Konservieren von Einweckgläsern Einstellbarer Temperaturbereich 50 C 250 C OBERHITZE UND UNTERHITZE MIT UMLUFT Bei dieser Einstellung wird der Backofen mit Umluft von oben und unten beheizt Aufgrund der Umluft zirkuliert die Hitze und sorgt so für ein gleichmäßiges Koch Backerge...

Page 50: ...C 250 C HINWEIS Wenn Sie den Temperaturregler des Backofens auf 0 stellen und gleichzeitig eine Backofenfunktion mit Umluft einstellen z B Oberhitze und Unterhitze mit Umluft so läuft nur das Gebläse auf diese Weise können Gerichte oder der Innenraum abgekühlt werden 5 Umweltschutz 5 1 Umweltschutz Entsorgung Geräte mit diesem Zeichen dürfen innerhalb der gesamten EU nicht zusammen mit dem Hausmül...

Page 51: ...stärke Reduzieren Sie dann die Leistungsstärke wenn das zu kochende Lebensmittel erhitzt ist Schalten Sie die Kochzonen bei langen Garzeiten 5 10 Minuten vor Ende der Garzeit ab Damit sparen Sie bis zu 20 an Energie Sie können die Restwärme der Kochzonen als Energiesparfunktion nutzen indem Sie weitere Kochvorgänge auf Kochzonen beginnen die noch heiß warm sind Öffnen Sie die Backofentür nicht unn...

Page 52: ...NUNGSGEFAHR VERBRÜHUNGSGEFAHR VORSICHT Kochutensilien können aufgrund der durch die Lebensmittel weitergeleitete Hitze heiß werden Verwenden Sie immer Topflappen oder Backofenhandschuhe zum Umgang mit Ihrem Essgeschirr Kochgeschirr HINWEIS Benutzen Sie ausschließlich für Glaskeramik geeignetes Kochgeschirr da Sie ansonsten das Gerät beschädigen 6 1 Hinweise für das Kochen und Braten auf einem Koch...

Page 53: ...egen Sie die benötigten Kochutensilien bereit Das Anschwenken sollte schnell von statten gehen Falls Sie eine große Menge zubereiten wollen teilen Sie das Kochgut in mehrere Teile auf 3 Heißen Sie den Wok die Pfanne kurz vor und geben Sie 2 Esslöffel Öl dazu 4 Bereiten Sie Fleisch zuerst zu Legen Sie es an die Seite und halten Sie es warm 5 Schwenken Sie das Gemüse an Wenn das Gemüse heiß aber imm...

Page 54: ...e den Funktionswahlknopf bis die gewünschte Grillfunktion auf dem Display angezeigt wird 2 Heizen Sie den Backofen für ca 4 Minuten vor 3 Geben Sie die zu grillenden Speisen in einer entsprechenden Höhe in das Gerät Wenn Sie auf dem Rost grillen schieben Sie ein Blech darunter um das abtropfende Fett aufzufangen und den Backofen sauber zu halten 4 Halten Sie die Ofentür beim Grillen immer geschlos...

Page 55: ...halter auf die Position 0 gestellt werden REINIGUNGSMITTEL Benutzen Sie keine Scheuermittel Benutzen Sie keine organischen Reinigungsmittel 13 Benutzen Sie keine ätherischen Öle Benutzen Sie niemals Lösungsmittel HINWEIS Alle durch ein Reinigungsmittel an Ihrem Gerät verursachten Schäden werden nicht kostenfrei behoben auch nicht innerhalb des Garantierahmens 7 1 Reinigung des Kochfelds Reinigen S...

Page 56: ...skeramik Reiniger während die Glaskeramik noch warm aber nicht heiß ist 3 Mit einem weichen Tuch Küchenpapier und klarem Wasser abwaschen und dann trockenwischen 4 Schalten Sie die Stromversorgung des Gerätes wieder ein Wenn das Gerät von der Stromversorgung getrennt ist leuchtet die Restwärmeanzeige nicht Die Kochzonen können somit trotzdem heiß sein Seien Sie äußerst vorsichtig Topfreiniger Nylo...

Page 57: ... sein und auch die Glaskeramik Oberfläche dauerhaft beschädigen Verwenden Sie den Glaskeramik Schaber äußerst vorsichtig damit Sie sich nicht an der Klinge schneiden besonders dann wenn Sie die Sicherheitsabdeckung zurückgeschoben haben 7 2 Reinigung des Backofens WARNUNG Benutzen Sie niemals einen Dampfreiniger STROMSCHLAGGEFAHR HINWEIS Wenn Sie einen speziellen Backofenreiniger anwenden überprüf...

Page 58: ...pülmittel 7 Wischen Sie nach der Reinigung das Innere des Backofens trocken 7 3 Reinigung der Backofentür Reinigen Sie die Glasscheibe der Backofentür äußerst vorsichtig Verwenden Sie keine Scheuermittel da Sie ansonsten die Scheibe zerkratzen oder zerbrechen können Verwenden Sie etwas Spülmittel und warmes Wasser 7 4 Austausch des Leuchtmittels WARNUNG Schalten Sie das Gerät unbedingt aus und las...

Page 59: ...ch ein neues Hochtemperatur Leuchtmittel 300 C gleicher Art Volt 230 V Leistung 25 W Benutzen Sie keinen anderen Leuchtmittel Typ 5 Setzen Sie das neue Leuchtmittel ein und überprüfen Sie sorgfältig ob dieses sich ordnungsgemäß in seinem Sockel befindet 6 Schrauben Sie die Lampenabdeckung wieder an 7 Entfernen Sie das Geschirrtuch und schalten Sie die entsprechende Sicherung im Sicherungskasten de...

Page 60: ...dass die Kerbe des Scharnierhalters sicher in der Führung sitzt 6 Nachdem die Tür wieder in den Backofen eingepasst ist schließen Sie wieder vorsichtig den Sicherheitsbügel 7 Falls der Sicherheitsbügel nicht ordnungsgemäß geschlossen ist wird das Scharnier beim Schließen der Tür beschädigt 7 6 Entnehmen Einsetzen der Teleskopauszüge ENTNEHMEN DER TELESKOPAUSZÜGE AUF DER LINKEN SEITE DES BACKOFENIN...

Page 61: ...alliert werden sollen 2 Setzen Sie die Schienenhaken an den mit B gekennzeichneten Punkten der oberen Führungsschiene an s Abb rechts 3 Drehen Sie dann die Teleskopschiene im Uhrzeigersinn s Abb rechts Pfeil 4 Drücken Sie die Schienenhaken vorsichtig an den mit C gekennzeichneten Stellen bis sie auf der unteren Führungsschiene des Seitenracks einrasten s Abb rechts Pfeil 5 Vergewissern Sie sich da...

Page 62: ...rsicht durch ansonsten können Sie die Emaille beschädigen WARNUNG Jegliche Schäden die durch die unsachgemäße Entnahme bzw durch das unsachgemäße Einsetzen der Seitenracks entstehen unterliegen nicht der Garantie ENTNEHMEN DER SEITENRACKS 1 Drücken Sie den Haken A des Seitenracks an der Klemmstelle leicht nach unten s Abb rechts Pfeil 2 Schwenken Sie das Seitenrack in einem Winkel von ca 45 Grad n...

Page 63: ...TFALL ODER EINER FEHLFUNKTION WIE FOLGT VOR 1 Schalten Sie das Gerät komplett ab 2 Trennen Sie das Gerät von der Stromversorgung entsprechende Sicherung im Sicherungskasten der Hausstromversorgung 3 Kontaktieren Sie Ihren Kundendienst oder das Geschäft in dem Sie das Gerät erworben haben Überprüfen Sie die Angaben der Tabelle bevor Sie den Kundendienst oder das Geschäft kontaktieren in dem Sie das...

Page 64: ...SCHALTET SICH UNERWARTET AB EIN AKUSTISCHES SIGNAL ERTÖNT UND ES WIRD EIN FEHLERCODE ANGEZEIGT15 MEIST ALTERNIEREND MIT EIN ODER ZWEI ZAHLEN AUF DEM TIMER DISPLAY 1 Technische Fehlfunktion 1 Schreiben Sie den Fehlercode16 auf trennen Sie das Gerät von der Stromversorgung und kontaktieren Sie den Kundendienst DIE INNENBELEUCHTUNG FUNKTIONIERT NICHT 1 Das Leuchtmittel ist locker oder beschädigt 1 Da...

Page 65: ...RMALE TEMPERATURMESSUNG IM BACKOFEN 1 Temperatursensor des Backofens defekt 1 Der Backofen darf nicht mehr benutzt werden Der Temperatur sensor muss ausgetauscht werden Kontaktieren Sie bitte umgehend den Kundendienst Sollte das Gerät Störungen abweichend von den oben beschriebenen aufweisen oder falls Sie alle Punkte der Liste überprüft haben das Problem aber nicht behoben werden konnte setzen Si...

Page 66: ...zone 1 Bräterzone ovale Kochzone 4 insgesamt Durchmesser der Kochfelder 2 165 mm 1200 W 1 138 230 mm 1000 W 2200 W 1 270 165 mm 2000 W 1100 W Restwärmeanzeige Backofenfunktionen Auftauen Grill Oberhitze Umluft Grill Oberhitze Unterhitze Heißluft Ober und Unterhitze Umluft Ober und Unterhitze Unterhitze Heißluft Grill Umluft Heißluft Vollglasinnentür Teleskopauszüge Timer Backofentür Glasschichten ...

Page 67: ...beliebiges Altgerät entsorgen machen Sie dieses vorher unbedingt funktionsuntüchtig Das bedeutet immer den Netzstecker ziehen und danach das Stromanschlusskabel am Gerät abschneiden und direkt mit dem Netzstecker entfernen und entsorgen Demontieren Sie immer die komplette Tür damit sich keine Kinder einsperren und in Lebensgefahr geraten können 4 Entsorgen Sie Papier und Kartonagen in den dafür vo...

Page 68: ... Beschaffenheit die auf den Gebrauchswert des Produkts keinen Einfluss haben 3 Schäden infolge Betriebs und Bedienungsfehler 4 Schäden durch aggressive Umgebungseinflüsse Chemikalien Reinigungsmittel 5 Schäden am Produkt die durch nicht fachgerechte Installation oder Transport verursacht wurden 6 Schäden infolge nicht haushaltsüblicher Nutzung 7 Schäden die außerhalb des Gerätes durch ein PKM Prod...

Page 69: ...on 78 2 1 Unpacking and positioning 79 2 2 Pre installation requirements 80 2 3 Installation of the hob 80 2 3 1 Dimensions 81 2 3 2 Ventilation and installation 82 2 4 Installation of the oven 86 2 5 Electrical connection 89 2 5 1 Connection diagram 90 2 5 2 Electrical connection connection oven and hob 91 3 Description of the appliance 92 3 1 Oven and hob 92 3 1 1 Accessories 93 3 2 Control pane...

Page 70: ... 1 Environmental protection disposal 114 5 2 Environmental protection energy saving 114 6 Cooking guidelines 115 6 1 Tips for cooking and frying hob 115 6 2 Tips for baking and roasting oven 116 6 3 Tips for grilling oven 117 7 Cleaning and maintenance 118 7 1 Cleaning of the hob 118 7 2 Cleaning of the oven 120 7 2 1 How to clean the oven with steam 120 7 3 Cleaning of the oven door 120 7 4 Repla...

Page 71: ...se dispose of the packing with respect to your current local and municipal regulations The appliance you have purchased may be an enhanced version of the unit this manual was printed for Nevertheless the functions and operating conditions are identical This manual is therefore still valid Technical modifications as well as misprints shall remain reserved EU DECLARATION OF CONFORMITY The products w...

Page 72: ...is intended for private use only The appliance is intended for cooking in a private household only The appliance is intended for indoor use only The appliance is not intended to be operated for commercial purposes during camping and in public transport Operate the appliance in accordance with its intended use only Do not allow anybody who is not familiar with this instruction manual to operate the...

Page 73: ...st meet the data on the rating plate of the appliance 7 Always check that the power cord is not placed under the appliance or damaged by moving the appliance 8 Never try to repair the appliance yourself Repairs carried out by unauthorised persons can cause serious damage If the appliance does not operate properly please contact the aftersales service or the shop you purchased the appliance at 19 O...

Page 74: ...e appliance must be performed by a qualified professional 7 Keep the cord away from heated surfaces 8 Do not carry out any modifications to your appliance 9 The appliance is not allowed to be operated with an external timer or a separate remote control system 10 Do not use adapters multiple sockets and extension cords for connecting the appliance to the mains 11 The room the appliance is installed...

Page 75: ...with a lid or a fire blanket 26 Never touch the cooking zones while the residual heat indicator is still on RISK OF BURNS 27 The accessible parts of the hob become hot during operation so keep children away from the operating appliance Touching the appliance while it is operating can cause serious burns 28 Do not fry in the appliance Hot oil can damage parts of the appliance and result in skin bur...

Page 76: ...gned by the manufacturer of the appliance or indicated by the manufacturer of the appliance in the instructions for use as suitable or hob guards incorporated in the appliance The use of inappropriate guards can cause accidents CAUTION 1 The appliance becomes hot while operating Do not touch the hot components inside the oven 2 Do not use any aggressive abrasive and acrid detergents or sharp edged...

Page 77: ...e appliance will become hot while operating and will retain and emit heat even if it has stopped operating NOTICE 1 When you move the appliance hold it at its base and lift it carefully Keep the appliance in an upright position 2 Never use the door for moving the appliance as you will damage the hinges 3 The appliance must be transported and installed by at least two persons 4 When you unpack the ...

Page 78: ...ll terms of the warranty become invalid SAVE THESE INSTRUCTIONS The manufacturer and distributor are not responsible for any damage or injury in the event of failure to comply with these instructions 2 Installation DANGER The appliance must be connected to the mains by a qualified professional who is familiar with and adheres to the local requirements and supplementary regulations of your energy s...

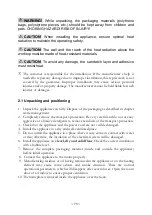
Page 79: ... as described in chapter waste management 2 Completely remove the transport protection Be very careful and do not use any aggressive or abrasive detergents to remove residuals of the transport protection 3 Check that the appliance and the power cord are not visible damaged 4 Install the appliance in a dry and well ventilated place 5 Do not install the appliance in a place where it may come in cont...

Page 80: ...he appliance hob and oven must meet the safety requirements as well as the legal rules and regulations 2 3 Installation of the hob DANGER The hob must be installed by a qualified professional only Do not carry out the installation yourself RISK OF ELECTRIC SHOCK SAFETY INSTRUCTIONS REGARDING THE INSTALLATION When installing the appliance ensure optimal heat radiation to maintain the operating safe...

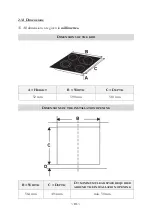
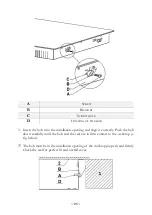
Page 81: ...s are given in millimetres DIMENSIONS OF THE HOB A HEIGHT B WIDTH C DEPTH 52 mm 590 mm 510 mm DIMENSIONS OF THE INSTALLATION OPENING B WIDTH C DEPTH D MINIMUM CLEAR SPACE REQUIRED AROUND THE INSTALLATION OPENING 564 mm 494 mm min 50 mm ...

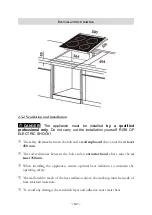
Page 82: ...between the hob and a wall cupboard above must be at least 450 mm The safety distance between the hob and an extractor hood above must be at least 760 mm When installing the appliance ensure optimal heat radiation to maintain the operating safety The wall and the reach of the heat radiation above the worktop must be made of heat resistant materials To avoid any damage the sandwich layer and adhesi...

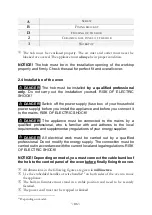
Page 83: ...n The top closing edge of the cabinet X must not be flush with the installation opening 1 Install the closing edge in offset positioning 2 or bevel the closing edge 3 S fig below C VENTILATION SLOT A B C D E WALL CUPBOARD min 450 mm EXTRACTOR HOOD min 760 mm min 50 mm min 20 mm Air inlet Air outlet 5 mm The hob must be ventilated properly The air inlet and outlet must never be blocked or covered ...

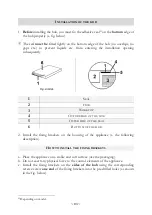
Page 84: ...P 4 OUTER EDGE OF THE HOB 5 OUTER SIDE OF THE SEAL 6 BOTTOM OF THE HOB 2 Install the fixing brackets on the housing of the appliance s the following description HOW TO INSTALL THE FIXING BRACKETS a Place the appliance on a stable and soft surface use the packaging b Do not exert any physical force to the control elements of the appliance c Install the fixing brackets on the sides of the hob using ...

Page 85: ... the installation opening and align it correctly Push the hob down carefully until the hob and the seal are in firm contact to the worktop s fig below The hob must be in the installation opening of the worktop properly and firmly Check the seal for perfect fit and overall cover ...

Page 86: ...SK OF ELECTRIC SHOCK DANGER The appliance must be connected to the mains by a qualified professional who is familiar with and adheres to the local requirements and supplementary regulations of your energy supplier DANGER All electrical work must be carried out by a qualified professional Do not modify the energy supply The connection must be carried out in accordance with the current local and leg...

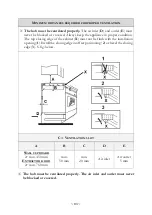
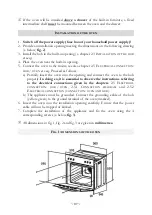
Page 87: ... follows a Partially insert the oven into the opening and connect the oven to the hob properly In doing so it is essential to observe the instructions referring to the electrical connections given in the chapters 2 5 ELECTRICAL CONNECTION HOB OVEN 2 5 1 CONNECTION DIAGRAM and 2 5 2 ELECTRICAL CONNECTION CONNECTION OVEN AND HOB b The appliance must be grounded Connect the grounding cable of the hob...

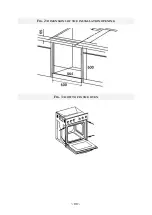
Page 88: ... 88 FIG 2 DIMENSIONS OF THE INSTALLATION OPENING FIG 3 HOW TO FIX THE OVEN ...

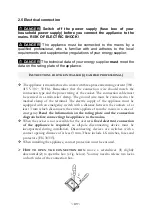
Page 89: ...rain relief clamp The ground wire must be connected to the marked clamp of the terminal The electric supply of the appliance must be equipped with an emergency switch with a distance between the contacts of at least 3 mm which disconnects the entire appliance from the mains in a case of emergency Read the information on the rating plate and the connection diagram before connecting the appliance to...

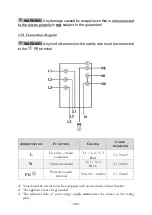
Page 90: ...e connected to the PE terminal ABBREVIATION FUNCTION COLOUR CABLE DIAMETER L Live wire mains conductor L 1 L 2 L 3 1 5 mm2 RED N Neutral terminal N 1 N 2 1 5 mm2 BLUE PE Protective earth terminal YELLOW GREEN 1 5 mm2 Your domestic circuit must be equipped with an automatic circuit breaker The appliance must be grounded The technical data of your energy supply must meet the values on the rating pla...

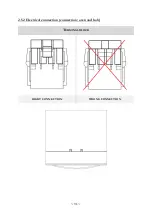
Page 91: ... 91 2 5 2 Electrical connection connection oven and hob TERMINAL BLOCK RIGHT CONNECTION WRONG CONNECTION ...

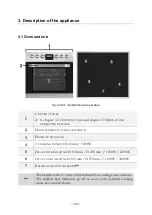
Page 92: ...TTONS 2 DOOR HANDLE OF THE OVEN DOOR 3 DOOR OF THE OVEN 4 2 COOKING ZONES Ø 165 mm 1200 W 5 DUAL COOKING ZONE Ø 138 mm Ø 230 mm 1000 W 2200 W 6 OVAL COOKING ZONE Ø 165 mm Ø 270 mm 1100 W 2000 W 7 RESIDUAL HEAT INDICATORS The RESIDUAL HEAT INDICATORS indicate hot cooking zones after use The residual heat indicators go off as soon as the relevant cooking zones have cooled down ...

Page 93: ...g grate drip tray baking tray are fully inserted into the oven so they do not collide with the oven door when closing it NOTICE If you grill on the grilling grate directly always use the drip tray or the baking tray to catch the dripping grease of the food to be grilled GRILLING GRATE The grilling grate is suitable for the grilling roasting and baking of food it is also suitable for the cooking of...

Page 94: ...grilled TELESCOPIC SLIDES With the telescopic slides the slide in elements grilling grate drip tray etc can be moved and removed easily and conveniently The slide in elements sit securely on the telescopic slides When you want to check the cooking point of dishes you have both hands free and do not have to lean into the hot interior of the oven The telescopic slides may need to be installed s also...

Page 95: ... five25 of the side rack According to your needs you can bake roast or grill at different insertion heights Fig similar modifications are possible 3 2 Control panel Fig similar modifications are possible A DISPLAY OPERATING BUTTONS Description s chapter 3 3 B OPERATIONAL STATUS INDICATOR OF THE OVEN RED 25 Depending on model ...

Page 96: ...election of the OVEN TEMPERATURE The temperature of the oven can be adjusted from 50 C to 250 C G ROTARY KNOB OVEN FUNCTIONS Rotary knob for the selection of the OVEN FUNCTIONS This rotary knob selects the desired cooking function Eight different oven functions are selectable s chapter 4 5 OVEN FUNCTIONS H ROTARY KNOB TO CONTROL THE FRONT RIGHT COOKING ZONE Turn the rotary knob clockwise or anticl...

Page 97: ...fly The rotary knob is released You can now use the rotary knob to carry out settings again 3 3 Display and operating buttons In STANDBY MODE the display indicates the system time or the set time Fig similar modifications are possible K FUNCTION BUTTON Button for the PROGRAMMING of the oven Button for the setting of the TIME Button for the setting of the TIMER See chapter 4 4 PROGRAMMING OF THE OV...

Page 98: ...IME is activated See chapter 4 4 2 SEMI AUTOMATIC COOKING BAKING FUNCTION and chapter 4 4 3 AUTOMATIC COOKING BAKING FUNCTION P OPERATIONAL STATUS INDICATOR END OF THE COOKING BAKING TIME The function END OF THE COOKING BAKING TIME is activated See chapter 4 4 2 SEMI AUTOMATIC COOKING BAKING FUNCTION and chapter 4 4 3 AUTOMATIC COOKING BAKING FUNCTION Q INDICATOR OF THE TIME 4 Operation Read the c...

Page 99: ...em with warm water and washing up liquid 4 Switch on the room ventilation or open a window 5 Let the oven operate for 30 minutes top and bottom heat or similar oven function27 250 C s chapter 4 4 PROGRAMMING OF THE OVEN A little bit of smoke and odour may be generated for approx 15 minutes This is normal They are generated by the substance that protects your appliance against damage caused by the ...

Page 100: ...t to the diameter of the cooking zone you use the cookware on Do not use cookware with sharp or serrated edges or a coarse and uneven base The base of your cookware should be flat contact the glass ceramic completely and have the same diameter as the relevant cooking zone Always centre the cookware on the cooking zone Always lift your cookware when you want to move it on the glass ceramic Do not p...

Page 101: ...chapter 3 1 OVEN AND HOB Fig similar modifications are possible 0 Cooking zone is switched off 1 POWER LEVEL 1 Suitable for keeping dishes warm Lowest setting 2 POWER LEVEL 2 Suitable for stewing the steaming of vegetables and slow cooking 3 POWER LEVEL 3 Suitable for the cooking of soups and larger dishes 4 POWER LEVEL 4 Suitable for slow frying 5 POWER LEVEL 5 Suitable for the grilling of meat a...

Page 102: ...sponding knob to position 0 to stop cooking Beware of the hot surfaces of the cooking zones The RESIDUAL HEAT INDICATOR 7 s chapter 3 1 OVEN AND HOB indicates which cooking zones are still hot The residual heat indicator disappears as soon as the relevant cooking zone has cooled down You can use the residual heat for saving energy when starting a new cooking procedure on a cooking zone which is st...

Page 103: ...AUTION Cooking utensils may become hot because of the heat transferred by the heated food Potholders or oven gloves may be needed to handle such utensils CAUTION Always use oven gloves NOTICE Use suitable ovenware only Proper positioning of the trays is mandatory for safe operation of the appliance Otherwise hot food or cookware can slide off the trays when removing them AFTER THE CONNECTION OF TH...

Page 104: ... oven functions to position and the rotary knob for the selection of the oven temperature to position 0 s fig below To switch on the oven you must set an oven function and an oven temperature too If you only select an oven function the oven does not switch on The appliance is equipped with a 24 hour display ROTARY KNOB OVEN FUNCTIONS ROTARY KNOB OVEN TEMPERATURES NOTICE Turn the rotary knob for th...

Page 105: ...ou connect the appliance to the mains for the first time the display indicates 12 00 and the operational status indicator TIME SYSTEM TIME flashes You can now set the current time system time 2 Set the correct time of the day using the BUTTONS 3 If the correct time is displayed 24 h display wait a few seconds 4 After approx 5 seconds the set time is saved 5 The display indicates the set time and t...

Page 106: ...rational status indicator of the timer goes off You can also switch off the acoustic signal by pressing any button on the display To switch off the oven completely the oven function knob must be set to position and the temperature control knob must be set to position 0 WARNING When using the timer in countdown mode the oven is not switched off automatically after the selected period of time has el...

Page 107: ...witched off automatically and the operational status indicator DURATION OF THE COOKING BAKING TIME flashes again 9 After approx 2 minutes the acoustic signal stops automatically and the operational status indicator DURATION OF THE COOKING BAKING TIME goes off You can also switch off the acoustic signal by pressing any button on the display After the cooking baking process is finished the oven func...

Page 108: ... indicator END OF THE COOKING BAKING TIME flashes again 9 After approx 2 minutes the acoustic signal stops automatically and the operational status indicator END OF THE COOKING BAKING TIME goes off You can also switch off the acoustic signal by pressing any button on the display After the cooking baking process is finished the oven function knob must be set to position and the temperature control ...

Page 109: ... the display to 13 00 o clock etc 8 After approx 5 seconds the set time is saved The operational status indicator END OF THE COOKING BAKING TIME is on permanently 9 Select the desired oven function s chapter 4 6 OVEN FUNCTIONS and oven temperature using the corresponding rotary knobs 10 The oven is in operation 11 The cooking process starts at the calculated time of the day 12 If the cooking bakin...

Page 110: ...4 4 How to cancel the programming CAUTION To switch off the oven completely the rotary knob of the oven function must be set to position and the rotary knob of the oven temperature must be set to position 0 If the rotary knobs are not set to these positions after you have cancelled the timer programme functions the oven will keep heating continuously HOW TO CANCEL THE TIMER HOB GUARD 1 Press the f...

Page 111: ...OOKING BAKING FUNCTION 1 Press the function button on the display repeatedly until the operational status indicator DURATION OF THE COOKING BAKING TIME flashes 2 Set the time which is indicated on the display back to 00 00 3 Press the function button on the display repeatedly until the operational status indicator END OF THE COOKING BAKING TIME flashes 4 Set the time which is indicated on the disp...

Page 112: ...ange 50 C 250 C GRILL AND TOP HEAT The grill and the top heat operate simultaneously The heat is emitted directly onto the food under the grill element Combined grilling allows higher temperatures in the top area intensifies browning and allows higher temperatures in the top area it also allows the preparing of larger portions e g of sausages steaks fish etc Settable oven temperature range 50 C 25...

Page 113: ... The oven is heated conventionally The oven should be preheated before you start cooking baking You can grill cook on one cooking level BOTTOM HEAT Switches on the bottom heat of the oven e g for final backing from the bottom This function is also suitable for slow cooking and for warming up HOT AIR FAN The fan is surrounded by a heating element so the hot air is evenly distributed You can cook on...

Page 114: ...e cookware too often a watched pot content will never boil Decrease the power level as soon as the desired cooking temperature is reached Use pot lids to shorten cooking times and save energy Minimise the amount of cooking liquids or fat oil to shorten cooking times Select a high power level when you start cooking Reduce the power level when your food has been heated up For long cooking times Swit...

Page 115: ...handle your cookware RISK OF BURNS CAUTION Be careful if you open the door Do not get in contact with the hot parts of the oven or the steam which will escape the oven RISK OF BURNS RISK OF SCALDING CAUTION Cooking utensils may become hot because of the heat transferred by the heated food Potholders or oven gloves may be needed to handle such utensils NOTICE Only use cookware which is suitable to ...

Page 116: ...e cooking should work fast If you want to cook a big amount of food you should divide the food into several portions 3 Preheat the wok pan briefly and add two tablespoons of oil 4 Cook the meat first Put it aside and keep it warm 5 Now cook the vegetable When the vegetable is hot but still crisp reduce the power level Add the meat and if desired a sauce 6 Sauté the complete food carefully so all c...

Page 117: ... grate also insert a drip tray to catch the dripping grease and to keep the appliance clean 4 Always keep the door of the oven closed 5 Turn your food over after half of the grilling time 6 Spread your food with a little bit of oil before grilling NOTICE Do not use aluminium foil for grilling Do not wrap your food in aluminium foil and do not cover the grillage with aluminium foil The aluminium fo...

Page 118: ...etely all of the relevant rotary knobs must be set to position 0 DETERGENTS Do not use any abrasive detergents Do not use any organic detergents 31 Do not use essential oils Never use solvents NOTICE Any damage that is caused to the appliance by a cleaning product will not be fixed free of charge even if the guarantee period of the appliance is still valid 7 1 Cleaning of the hob Clean the hob aft...

Page 119: ...f they are suitable to clean glass ceramic Do not leave any residuals of a detergent on the glass ceramic as it can turn stained permanently OVERCOOKED OR MELTED FOOD AND STAINS CAUSED BY HEATED SUGAR CONTAINING FOOD ON THE GLASS CERAMIC Remove such a contamination immediately with a suitable glass ceramic scraper Beware of cooking zones which are still hot 1 Disconnect the appliance from the main...

Page 120: ...e detergents 3 Dry thoroughly after cleaning 4 Clean the outside of the oven with warm soapy water Use a sponge or a soft cloth Never use abrasive or aggressive detergents 7 2 1 How to clean the oven with steam 1 Place a bowl of 250 ml of water at the lowest rack height of the oven 2 Close the oven door 3 Select the oven function top and bottom heat with fan and set the oven temperature to 100 C 4...

Page 121: ...otect it from possible damage 3 Unscrew the lamp cover anticlockwise s fig below Clean the lamp cover and wipe it dry thoroughly 4 Unscrew the illuminant from the socket s fig below and replace it with a high temperature illuminant 300 C of the same type Voltage 230 V Power 25 W Do not use any other type of illuminant 5 Screw the new illuminant in Check its proper position in the socket 6 Replace ...

Page 122: ... the hinge bracket is positioned properly in its guide 6 After reassembling the door close the safety catch carefully 7 If the safety catch is not closed properly you will damage the hinges when closing the door 7 6 Removing installing of the telescopic slides HOW TO REMOVE THE TELESCOPIC SLIDES FROM THE LEFT SIDE OF THE OVEN CAVITY 1 Press the slide hooks of the telescopic slide at the points mar...

Page 123: ...rtion level of the side racks first 2 Place the rail hooks at the points marked B on the upper guide rail s fig on the right 3 Then turn the telescopic rail clockwise s fig on the right arrow 4 Press the slide hooks of the telescopic slide at the points marked C until they snap into place on the lower guide rail of the side rack s fig on the right arrow 5 Ensure that the telescopic slide is proper...

Page 124: ...val of the side racks with utmost care otherwise you may damage the enamel WARNING Any damage caused by the improper removal or installation of the side racks is not covered by the guarantee HOW TO REMOVE THE SIDE RACKS 1 Press the hook A of the side rack slightly downwards s fig on the right arrow 2 Swivel the side rack inwards at an angle of approx 45 degrees s fig on the right arrow 3 Unhook th...

Page 125: ...2 EMERGENCY MEASURES 1 Switch off the entire appliance 2 Disconnect the appliance from the mains fuse box of your household power supply 3 Contact your aftersales service or the shop you purchased the appliance at Check the schedule below before you contact your aftersales service or the shop you purchased the appliance at MALFUNCTION POSSIBLE CAUSES MEASURES THE APPLIANCE DOES NOT WORK AT ALL 1 T...

Page 126: ...nction 1 Note the complete error code34 disconnect the appliance from the mains and contact the shop you purchased the appliance at THE APPLIANCE DOES NOT HEAT 1 You have not set a temperature 1 Set a temperature 2 You have not set the timer35 2 Set the timer 3 The heating element is defective 3 Please contact the aftersales service THE INTERNAL LIGHT DOES NOT WORK 1 The illuminant is loose or dam...

Page 127: ...tersales service 9 Technical data TECHNICAL DATA Model Built in oven with hob Control panel Stainless steel cover Material hob Glass ceramic Energy efficiency category A Energy efficiency index 91 20 Energy consumption conventional 0 80 kW h Energy consumption fan hot air 0 77 kW h Net volume oven in l 70 00 Number of heat sources per cooking chamber 1 electric Number of cooking chambers 1 Size of...

Page 128: ...tractable rotary knobs Drip pan grilling grate baking tray 1 1 Side racks 1 kit Max rated power oven hob 9 40 kW Max rated power hob 6 60 kW Max rated power oven 2 80 kW Voltage frequency 220 240 V AC 50 Hz Dimensions hob H W D in cm 5 20 59 00 52 00 Dimensions oven H W D in cm 59 50 59 50 56 80 Hob weight net gross in kg 8 80 10 20 Oven weight net gross in kg 30 00 32 00 Technical modifications r...

Page 129: ...ower cord and the plug immediately Remove the door completely so children are not able to get into the appliance as this endangers their lives 4 Dispose of any paper and cardboard into the corresponding containers 5 Dispose of any plastics into the corresponding containers 6 If suitable containers are not available at your residential area dispose of these materials at a suitable municipal collect...

Page 130: ...heir authorised condition if they do not influence the utility value of the product 3 damage caused by handling errors or false operation 4 damage caused by aggressive environmental conditions chemicals detergents 5 damage caused by non professional installation and haulage 6 damage caused by non common household use 7 damages which have been caused outside the appliance by a PKM product unless a ...

Page 131: ...finden alle Informationen zum Kundendienst auf der Einlage in dieser Bedienungsanleitung Aftersales service information on the leaflet inside this instruction manual Änderungen vorbehalten Subject to alterations STAND UPDATED 08 08 2021 08 08 2021 PKM GmbH Co KG Neuer Wall 2 47441 Moers ...

Reviews: