background image


67 


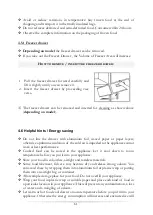
Store at -18 °C or colder. 


Avoid opening the freezer compartment door unnecessarily.  


F

REEZING OF FRESH FOOD 


Freeze fresh and undamaged food only.  


To retain the best possible nutritional value, flavour and colour, vegetables should 

be blanched before freezing. Aubergines, peppers, zucchini and asparagus do not 

require blanching.  


NOTICE!

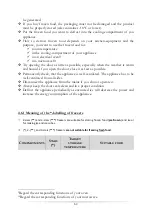
 Keep food to be frozen away from food which is already frozen.


T

HE FOLLOWING FOOD IS SUITABLE FOR FREEZING


Cakes and pastries. 


Fish and seafood. 


Meat, game and poultry. 


Vegetables, fruit and herbs. 


Eggs without shells. 


Dairy products such as cheese and butter. 


Ready meals and leftovers such as soups, stews, cooked meat and fish. 


Potato dishes and soufflés. 


Desserts. 


T

HE FOLLOWING FOOD IS NOT SUITABLE FOR FREEZING


Types of vegetables, which are usually consumed raw, such as lettuce or radishes. 


Eggs in shells. 


Grapes, whole apples, pears and peaches. 


Hard-boiled eggs, yogurt, soured milk, sour cream, and mayonnaise.  


H

OW TO PACKAGE THE FROZEN FOOD


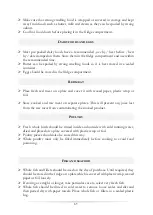
To  prevent  food  from  losing  its  flavour  or  drying  out,  place  food  in  airtight 

packaging. 


1.


Place food in packaging.  

2.


Remove air.  

3.


Seal the wrapping.  

4.


Label packaging with contents and dates of freezing.  

Summary of Contents for Dark Inox KG230A++

Page 1: ...ECHNOLOGIE F R DEN HAUSHALT TECHNOLOGY FOR DOMESTIC USE Bedienungsanleitung Instruction Manual K hl Gefrierkombination Fridge Freezer KG230A Dark Inox Deutsch Seite 2 English Page 42 www pkm online de...

Page 2: ...2 Sicherheitsanweisungen 5 2 Klimaklassen 11 3 Installation 11 3 1 Wahl des Standorts 11 3 2 Bel ftung 12 3 3 Ger t ausrichten 13 3 4 Wechsel des T ranschlags 13 4 Bedienung 16 4 1 Ger tebeschreibung...

Page 3: ...s haben Entsorgen Sie das Verpackungsmaterial entsprechend den rtlichen Vorschriften Ihres Wohnorts Das von Ihnen gekaufte Ger t wurde m glicherweise inzwischen verbessert und weist somit vielleicht U...

Page 4: ...ten Fachkraft Elektrotechniker in durchgef hrt werden Das Ger t ist ausschlie lich zur privaten Nutzung bestimmt sowie zur Nutzung 1 in Personalk chen von Gesch ften B ros und hnlichen Arbeitsumgebung...

Page 5: ...ituation die wenn sie nicht abgewendet wird eine m gliche Besch digung des Ger tes zur Folge hat 1 2 Sicherheitsanweisungen GEFAHR Zur Verringerung der Stromschlaggefahr 1 Eine Nichtbeachtung der Anwe...

Page 6: ...sch den 1 Ihr Ger t wird mit dem umweltfreundlichen K ltemittel R600a betrieben Das K ltemittel R600a ist brennbar Deshalb ist es unbedingt erforderlich dass keine Systemteile des K hlkreislaufs w hre...

Page 7: ...ng keine Steckdosenleisten Mehrfachsteckdosen oder Verl ngerungskabel 12 Schlie en Sie das Ger t nicht an elektronische Energiesparstecker z B Sava Plug und an Wechselrichter die Gleichstrom in Wechse...

Page 8: ...ltig besch digt werden 28 Benutzen Sie kein Dampfreinigungsger t um Ihr Ger t abzutauen oder zu reinigen Der Dampf kann in Kontakt mit elektrischen Teilen kommen und so einen Kurzschluss ausl sen STRO...

Page 9: ...ng abh ngig vom Modell bewegen f hren Sie nur Bewegungen nach vorne oder nach hinten aus Die Rollen sind nicht schwenkbar und lassen somit keine Bewegungen zur Seite zu Bewegungen zur Seite k nnen das...

Page 10: ...ssen Einbauvorrichtung falls Ihr Ger t f r einen Einbau geeignet ist m ssen immer frei und unbedeckt sein 16 Legen Sie Lebensmittel nicht direkt gegen den Luftauslass an der R ckwand innen im Ger t 17...

Page 11: ...die Wandabstandshalter aus Kunststoff Ausstattung abh ngig vom Modell am Kondensor auf der R ckseite des Ger tes um einen Bel ftungsspalt zwischen Ger t und Wand sicherzustellen Die ben tigten Abmess...

Page 12: ...r t auf einem geraden trockenen und festen Untergrund auf Kontrollieren Sie mit einer Wasserwaage den ordnungsgem en Aufbau 10 Das Ger t muss ordnungsgem mit der Stromversorgung verbunden sein 11 Das...

Page 13: ...ie F e komplett ein damit sich das Ger t frei auf den Rollen Ausstattung abh ngig vom Modell bewegen l sst Richten Sie das Ger t anschlie end wieder ordnungsgem aus HINWEIS Die Rollen Ausstattung abh...

Page 14: ...t niemals flach hin da Sie dadurch das K hlsystem besch digen k nnen Alle entfernten Teile m ssen f r die Neuinstallation der T ren sicher aufbewahrt werden Heben Sie die T ren immer vorsichtig ab Ve...

Page 15: ...rdnungsgem und sicher befestigt ist M glicherweise m ssen Sie das mittlere Scharnier um 1800 drehen um es an den vorbereiteten L chern auszurichten modellabh ngig 11 Entfernen Sie die oberen Lochabdec...

Page 16: ...r t von der Stromversorgung zu trennen m ssen Sie den Netzstecker aus der Netzsteckdose ziehen oder eine Abschaltvorrichtung verwenden 4 1 Ger tebeschreibung Das obere Bild dient ausschlie lich als Be...

Page 17: ...benutzen oder es l ngere Zeit von der Stromversorgung getrennt war lassen Sie es f r ca 3 4 Stunden auf mittlerer Temperaturstufe s Kapitel 4 3 TEMPERATUREINSTELLUNGEN k hlen bevor Sie darin frische o...

Page 18: ...erden 9 berf llen Sie das Ger t nicht 10 Betreiben Sie das Ger t entsprechend der im Folgendem beschriebenen Anweisungen 4 3 Temperatureinstellungen 4 3 1 Temperatureinstellung des K hlbereichs Die Ei...

Page 19: ...iche K hlung Die K hlstufe 3 wird f r den allt glichen Gebrauch des Ger tes geeignet Durch bet tigen der SET Taste bis zur Stufe 4 5 wird die K hltemperatur im K hlbereich erh ht hohe starke K hlung J...

Page 20: ...EREICHS Die Temperatureinstellung des Gefrierbereichs ist automatisiert Eine manuelle Einstellung der Temperatur des Gefrierbereichs ist nicht m glich VORSICHT Lagern Sie niemals Getr nke in Flaschen...

Page 21: ...F r Lebensmittel geeignete Beh lter aus Kunststoff Glas Keramik Lagern Sie frische verpackte Lebensmittel auf den Regalen frisches Obst und Gem se im Gem sefach Lagern Sie frisches Fleisch f r maximal...

Page 22: ...erfach Durch die K lte kann es zu Verletzungen im Mundbereich kommen WARNUNG Das Ber hren von Gefriergut Eis und Metallteilen im Inneren des Gefrierbereichs kann an der Haut verbrennungs hnliche Sympt...

Page 23: ...tauten Lebensmittel wieder ein Verbrauchen Sie diese Lebensmittel innerhalb von 24 Stunden Beachten Sie immer alle Informationen auf den Verpackungen eingefrorener Lebensmittel 4 5 1 Gefrierschublade...

Page 24: ...Sie diese einlagern da sonst der Energieverbrauch ansteigt Achten Sie beim Einkauf von Tiefk hlprodukten darauf dass deren Verpackung nicht besch digt ist und das Produkt ordnungsgem gelagert wurde V...

Page 25: ...Lagerdauer 3 Monate Geeignet zum Einfrieren von frischen Lebensmitteln Tiefk hlbereich 18 0 C Meeresfr chte Fisch Garnelen Schalentiere S wasser und Fleischprodukte Empfohlene Lagerdauer 3 Monate Nic...

Page 26: ...Durch die K lte kann es zu Verletzungen im Mundbereich kommen WARNUNG Das Ber hren von Gefriergut Eis und Metallteilen im Inneren des Gefrierbereichs kann an der Haut verbrennungs hnliche Symptome he...

Page 27: ...sind und von Nahrungsmitteln wie Butter Milch und Rahm ferngehalten werden da diese durch starke Ger che verdorben werden k nnen K hlen Sie hei e Speisen ab bevor Sie sie in das K hlfach legen MILCHP...

Page 28: ...trocken getupft werden Geben Sie ganzen Fisch oder Filets in einen verschlossenen Plastikbeutel Halten Sie Schalentiere jederzeit gek hlt und verwenden Sie sie innerhalb von 1 2 Tagen VORGEKOCHTE UND...

Page 29: ...IEREN FRISCHER LEBENSMITTEL Nur frische und unbesch digte Lebensmittel einfrieren Um den bestm glichen N hrwert den Geschmack und die Farbe zu erhalten sollte das Gem se vor dem Einfrieren blanchiert...

Page 30: ...strocknen verpacken Sie sie in eine luftdichte Verpackung 1 Lebensmittel in eine Verpackung geben 2 Luft entfernen 3 Versiegeln Sie die Verpackung 4 Etikettieren Sie die Verpackung mit Inhalt und Einf...

Page 31: ...der einem zu verwenden bis Datum einfrieren m ssen Sie sie einfrieren bevor dieses Datum abl uft Vergewissern Sie sich dass die Lebensmittel nicht bereits gefroren waren Tiefgefrorene Tiefk hlprodukte...

Page 32: ...mindestens einmal im Monat 1 Halten Sie Ihr Ger t immer sauber damit es nicht zur Ausbildung unangenehmer Ger che kommt 2 Staubablagerungen am Kondensator erh hen den Energieverbrauch Reinigen Sie de...

Page 33: ...inigen Sie regelm ig die Ablauf ffnung hinten im K hlbereich damit kein Abtauwasser in den K hlbereich gelangen kann Verwenden Sie dazu ein geeignetes Hilfsmittel z B einen Pfeifenreiniger 5 1 Abtauen...

Page 34: ...r aus der Steckdose ziehen 3 Legen Sie das Ger t mit T chern aus sobald das Eis abzutauen beginnt So k nnen Sie das Tauwasser auffangen 4 Benutzen Sie kein hei es Wasser um den Abtauvorgang zu unterst...

Page 35: ...r fen Sie die Energieversorgung KOMPRESSOR L UFT ZU LANGE 1 Ger t war k rzlich ausgeschaltet 1 Das Ger t ben tigt einige Zeit zum Erreichen der K hltemperatur 2 Zu viele oder zu hei e Lebensmittel im...

Page 36: ...TET NICHT 1 Das Leuchtmittel ist defekt 1 s Kapitel AUSTAUSCH DES LEUCHTMITTELS 2 Das Kontrollsystem Ausstattung abh ngig vom Modell hat die Beleuchtung deaktiviert weil die T r zu lange ge ffnet war...

Page 37: ...ssor verursacht w hrend er arbeitet KLOPFEN KNACKEN kann durch Ausdehnung und Schrumpfung der Bestandteile des K hlsystems entstehen und wird infolge von Temperaturschwankungen vor und nach dem Einsch...

Page 38: ...essor besch digt werden 3 Besch digen Sie die Standf e nicht AU ERBETRIEBNAHME ENDG LTIGE 1 Trennen Sie es von der Stromversorgung Netzstecker ziehen 2 Schneiden Sie das Netzanschlusskabel am Ger t ab...

Page 39: ...auf Standarttestresultaten f r 24 Stunden Der tats chliche Energieverbrauch h ngt von der Art der Nutzung sowie dem Aufstellungsort des Ger tes ab Volumen des Gefrierbereichs wurde mit einer Schublade...

Page 40: ...bt bringen Sie diese Materialien zu einer geeigneten kommunalen Sammelstelle 8 N here Informationen erhalten Sie von Ihrem Fachh ndler oder bei Ihren entsprechenden kommunalen Entsorgungseinrichtungen...

Page 41: ...s durch ein PKM Produkt entstanden sind soweit eine Haftung nicht zwingend gesetzlich angeordnet ist Die G ltigkeit der Garantie endet bei 1 Nichtbeachten der Aufstell und Bedienungsanleitung 2 Repara...

Page 42: ...4 3 1 Setting of the temperature of the fridge 57 4 3 2 Setting of the temperature of the freezer 58 4 4 The refrigerator 59 4 4 1 Glass shelves 59 4 5 The freezer 60 4 5 1 Freezer drawer 61 4 6 Helpf...

Page 43: ...r current local and municipal regulations The appliance you have purchased may be an enhanced version of the unit this manual was printed for Nevertheless the functions and operating conditions are id...

Page 44: ...ff kitchen areas of shops offices and other working environments 2 by clients in hotels motels B B and other residential type environments 3 for catering and similar non retail applications The applia...

Page 45: ...the rating plate of the appliance 4 Do not modify the plug provided with the appliance if it will not fit the outlet have a proper outlet installed by a qualified electrician not covered by the guara...

Page 46: ...g garage 6 EXPLOSION HAZARD Do not store any explosive materials or sprays which contain flammable propellants in your appliance Explosive mixtures can explode there 7 While unpacking the packaging ma...

Page 47: ...ance in a place where it may come in contact with water rain otherwise the insulation of the electrical system will be damaged 26 Do not put a water boiler or vases onto your appliance The electrical...

Page 48: ...on can damage the appliance and floor seriously 4 Do not tilt the appliance more than 450 5 If the appliance is transported in a horizontal position some oil may flow from the compressor into the refr...

Page 49: ...overfill the shelves drawer door trays to protect them from damage 18 Clean the appliance at least once a month s chapter CLEANING AND MAINTENANCE 19 The freezing compartment should be defrosted regul...

Page 50: ...3 2 VENTILATION 3 1 Site WARNING While unpacking the packaging materials polythene bags polystyrene pieces etc should be kept away from children and pets CHOKING HAZARD RISK OF INJURY 1 Unpack the app...

Page 51: ...ondenser at the back of the appliance to ensure a ventilation gap between the appliance and the wall MINIMUM DISTANCES REQUIRED FOR PROPER VENTILATION Back wall min 20 mm Sides wall min 20 mm Free spa...

Page 52: ...teral movements can damage your floor and the rollers 3 4 Change of the hinge position WARNING Switch off and unplug the appliance before changing the hinge position RISK OF ELECTRIC SHOCK CAUTION The...

Page 53: ...odel 2 Lift the upper door and remove it carefully 3 Unscrew the right middle hinge and remove it 4 Lift the lower door and remove it carefully 5 Unscrew the right bottom hinge and remove it It may be...

Page 54: ...e upper door to the middle hinge carefully and hold the door in position 13 Align the upper hinge to the prepared holes on the left side properly and screw it tightly Ensure that the upper door is fix...

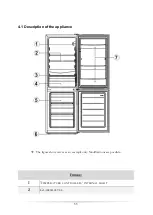
Page 55: ...55 4 1 Description of the appliance The figure above serves as an example only Modifications are possible FRIDGE 1 TEMPERATURE CONTROLLER INTERNAL LIGHT 2 GLASS SHELVES...

Page 56: ...eached its normal operating temperature this foods can thaw and or spoil 1 Remove all packaging materials 2 Adjust the feet and clean the appliance see chapter CLEANING AND MAINTENANCE 3 Do not start...

Page 57: ...set temperature depending on how much food you store and where you place them Ambient temperature may also affect the actual temperature inside the appliance When you set the temperature of the fridge...

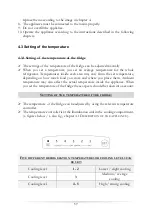
Page 58: ...ool or freeze foods The fast cool function will exit automatically after 26 hours or be disabled manually and change itself to the default level The description of the cooling levels represents standa...

Page 59: ...vant to your needs Crisper Fruit vegetable etc Door trays Eggs beverage cans bottled beverages packaged foodstuffs etc Store covered or packaged food in the appliance only so the smell or taste of the...

Page 60: ...ar to burns CAUTION Do not put any bottled or canned beverages neither still nor carbonated into the freezer compartment of the appliance as their containers could explode The freezer is intended for...

Page 61: ...h aluminium foil waxed paper or paper layers otherwise optimum circulation of the cold air is impeded so the appliance cannot work at best performance Cooked food can be stored in the appliance Let it...

Page 62: ...ast as possible Permanently check that the appliance is well ventilated The appliance has to be well ventilated from all sides Disconnect the appliance from the mains if you do not operate it Always k...

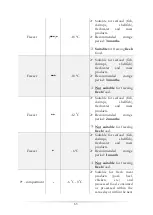
Page 63: ...freezing fresh food Freezer 12 0 C Suitable for seafood fish shrimps shellfish freshwater and meat products Recommended storage period 2 months Not suitable for freezing fresh food Freezer 6 0 C Suita...

Page 64: ...d properly Food must not get in touch with the surfaces inside the appliance directly It has to be wrapped separately in aluminium foil or in cellophane foil or in airtight plastic boxes STORING FOOD...

Page 65: ...e cooked and raw meat on separate plates This will prevent any juice lost from the raw meat from contaminating the cooked product POULTRY Fresh whole birds should be rinsed inside and outside with col...

Page 66: ...paya passion fruit cucumber peppers tomatoes Undesirable changes will occur at low temperatures such as softening of the flesh browning and or accelerated decaying Do not refrigerate avocados until th...

Page 67: ...me and poultry Vegetables fruit and herbs Eggs without shells Dairy products such as cheese and butter Ready meals and leftovers such as soups stews cooked meat and fish Potato dishes and souffl s Des...

Page 68: ...2 months Non oily fish shellfish pizza scones and muffins 3 months Ham cakes biscuits beef and lamb chops poultry pieces 4 months Butter vegetables blanched eggs whole and yolks cooked crayfish mince...

Page 69: ...ct the appliance from the mains before you clean or maintain it RISK OF ELECTRIC SHOCK WARNING To disconnect the appliance from the mains you must unplug the appliance or use a cut off device WARNING...

Page 70: ...ith warm water and a mild detergent 2 Use clear water to rinse 3 Dry the cleaned surfaces with a cloth 4 Check the water drain and clean it if needed DOOR SEALS Clean with warm water and a mild non ac...

Page 71: ...freezing compartment should be defrosted regularly to ensure proper operation 1 Remove the contents from the freezing compartment and put them into a cooling box 2 Place a container in front of the a...

Page 72: ...upply THE COMPRESSOR OPERATES FOR TOO LONG 1 The appliance has been switched off for a while 1 The appliance needs some time to reach the preset temperature 2 Too much or too hot food in the appliance...

Page 73: ...1 s chapter REPLACING OF THE ILLUMINANT 2 The control system depending on model has disabled the lights due to the door being kept open too long 2 Close and reopen the door to reactivate the lights I...

Page 74: ...nerated by sequential expansion and shrinkage of the components of the cooling system It is caused by variation of temperature before and after the compressor is activated or deactivated 7 Decommissio...

Page 75: ...Leave the shelves in their position so that children are not able to get into the appliance 5 Follow the advice for the disposal of the appliance in chapter WASTE MANAGEMENT 8 Technical data Model Fri...

Page 76: ...FIRE HAZARD 2 While unpacking the packaging materials polythene bags polystyrene pieces etc should be kept away from children and pets CHOKING HAZARD RISK OF INJURY 3 Old and unused appliances must b...

Page 77: ...ntees These are not restricted to the manufacturer s guarantee Any guarantee claim has to be made immediately after the detection and within 24 months after the delivery to the first ultimate vendee T...

Page 78: ...ately 5 the maintenance is inadequately or incorrectly performed 6 the appliance is not used for its intended purpose 7 the appliance is damaged by force majeur or natural disasters including but with...

Page 79: ...79 Aftersales service information on the leaflet inside this instruction manual nderungen vorbehalten Subject to alterations STAND UPDATED 13 07 2020 07 13 2020 PKM GmbH Co KG Neuer Wall 2 47441 Moers...

Reviews: