background image


39 


10. Guarantee conditions 


for large electric appliances; PKM GmbH & Co. KG, Neuer Wall 2, 47441 Moers. 
 

This  appliance  includes  a  24-month  guarantee 

for  the  consumer

  given  by  the 

manufacturer,  dated  from  the  day  of   purchase,  referring  to  its  flawless  material-
components and its faultless fabrication. The consumer is accredited with both the 

dues  of   the  guarantee  given  by  the  manufacturer  and  the  vendor's  guarantees. 
These are not restricted to the manufacturer's guarantee. Any guarantee claim has 
to  be  made 

immediately  after  the  detection  and  within  24  months

  after  the 

delivery to the first ultimate vendee. The guarantee claim has to be verified by the 
vendee by submitting a proof  of  purchase including the date of  purchase and/or 

the date of  delivery. The guarantee does not establish any entitlement to withdraw 
from  the  purchase  contract  or  for  a  price  reduction.  Replaced  components  or 
exchanged appliances demise to us as our property. 

The guarantee claim does not cover: 

1.


fragile components as plastic, glass or bulbs; 

2.


minor  modifications  of   the  PKM-products  concerning  their  authorized 

condition if  they do not influence the utility value of  the product; 

3.


damage caused by handling errors or false operation; 

4.


damage caused by aggressive environmental conditions, chemicals, detergents; 

5.


damage caused by non-professional installation and haulage; 

6.


damage caused by non common use; 

7.


damages  which  have  been  caused  outside  the  appliance  by  a  PKM-product 
unless a liability is forced by legal regulations. 

The validity of  the guarantee will be terminated if: 

1.


the  prescriptions  of   the  installation  and  operation  of   the  appliance  are  not 
observed. 

2.


the appliance is repaired by a non-professional. 

3.


the appliance is damaged by the vendor, the installer or a third party. 

4.


the installation or the start-up is performed inappropriately. 

5.


the maintenance is inadequately or incorrectly performed. 

6.


the appliance is not used for its intended purpose. 

7.


the  appliance  is  damaged  by  force  majeur  or  natural  disasters,  including,  but 

with not being limited to fires or explosions. 

The  guarantee  claims  neither  extend  the  guarantee  period  nor  initiate  a  new 

guarantee period.  The geographical scope of  the guarantee is limited with respect 
to  appliances,  which  are  purchased  and  used  in  Germany,  Austria,  Belgium, 
Luxembourg and the Netherlands. 


August 2014 

Summary of Contents for KG 160-3

Page 1: ...TECHNOLOGIE F R DEN HAUSHALT TECHNOLOGY FOR DOMESTIC USE Bedienungsanleitung Instruction Manual K hl Gefrierkombination Fridge Freezer KG 160 3 Deutsch Seite 2 English Page 22 www pkm online de...

Page 2: ...ssen Sie diese Bedienungsanleitung ebenfalls mit bergeben Inhalt 1 Sicherheitshinweise 3 2 Klimaklassen 7 3 Installation 8 3 1 Bel ftung 8 3 2 Wahl des Standorts 8 3 3 Ger t ausrichten 9 3 4 Wechsel d...

Page 3: ...tionen und Betriebsbedingungen identisch sodass Sie die Bedienungsanleitung im vollen Umfang nutzen k nnen Technische nderungen bzw Druckfehler bleiben vorbehalten 1 Sicherheitshinweise Lesen Sie vor...

Page 4: ...usschlie lich im Sinne seiner bestimmungsgem en Verwendung Erlauben Sie niemandem der mit der Bedienungsanleitung nicht vertraut ist das Ger t zu benutzen Dieses Ger t kann von Kindern ab 8 Jahren und...

Page 5: ...g z B Garage 6 EXPLOSIONSGEFAHR Lagern Sie keine explosiven Stoffe oder Spr hdosen mit brennbaren Treibmitteln in dem Ger t da ansonsten z ndf hige Gemische zur Explosion gebracht werden k nnen 7 Acht...

Page 6: ...MSCHLAGGEFAHR 22 Benutzen Sie niemals mechanische Gegenst nde ein Messer oder andere scharfe Gegenst nde um Eisablagerungen zu entfernen Durch dadurch resultierende Besch digungen des Innenraums droht...

Page 7: ...nn Sie es auspacken f r den Fall es noch einmal einpacken und transportieren zu m ssen 8 Benutzen Sie das Ger t nicht bevor alle dazugeh rigen Teile sich ordnungsgem an ihren daf r vorgesehenen Stelle...

Page 8: ...n zu entfernen 3 Bauen Sie das Ger t an einer geeigneten Stelle mit einem angemessenen Abstand zu extremen Hitze oder K ltequellen auf 4 berpr fen Sie vor dem Anschluss des Ger ts ob das Netzanschluss...

Page 9: ...Sie den Wechsel des T ranschlags mit mindestens zwei Personen durch weil Sie ansonsten das Ger t besch digen oder der Person die an dem Ger t arbeitet Schaden zuf gen Heben Sie die T ren immer vorsich...

Page 10: ...en Bringen Sie nun das mittlere Scharnier H an der gegen berliegenden Seite an 7 Platzieren Sie die K hlschrankt r auf dem mittleren Scharnier der Scharnierstift muss sich in der ffnung unten an der K...

Page 11: ...Schublade 7 Eisw rfelschale 8 Verstellbarer Fu 9 Eiereinsatz 10 Eiereinsatz 11 T rfach 12 Flaschenfach SOBALD SIE DAS GER T AUFGESTELLT HABEN WARTEN SIE BITTE4 6 STUNDEN BEVOR SIE ES ANSCHLIESSEN 0 OF...

Page 12: ...des Ger ts Sie k nnen zur zus tzlichen berpr fung der Innentemperatur ein K hlschrank Thermometer1 verwenden 4 3 Betriebsparameter 1 Das Ger t kann die entsprechenden Temperaturen nur dann erzeugen w...

Page 13: ...NISCHE DATEN 4 Kaufen Sie nur eingefrorenen Lebensmittel deren Verpackung unbesch digt ist Besch digte Verpackungen sind ein Hinweis auf eine m gliche Unterbrechung der K hlkette 5 Vermeiden bzw reduz...

Page 14: ...atur ist Eisablagerungen f hren zu einem h heren Stromverbrauch Tauen sie Eisablagerungen ab wenn diese gr er als 3 mm sind Reinigen Sie die R ckseite des Ger ts gelegentlich mit einem Pinsel oder vor...

Page 15: ...trocken T rdichtungen Waschen Sie diese mit warmem Wasser und einem milden Reinigungsmittel ab 5 1 Abtauen K hlbereich 1 Der K hlbereich verf gt ber ein automatisches Abtau System 2 Das Abtauwasser ve...

Page 16: ...Sie den Netzstecker aus der Steckdose 2 Entfernen Sie den Lichtdiffuser indem Sie an der Aussparungen an der Kante ziehen 3 Ersetzen Sie das verbrauchte Leuchtmittel durch ein neues derselben Art und...

Page 17: ...mutzt T rdichtung reinigen Ungew hnliche Ger uschbildung Das Ger t steht nicht auf einer flachen und geraden Oberfl che Das Ger t ber hrt eine Wand oder einen anderen Gegenstand Das K hlgut ist falsch...

Page 18: ...dose 2 Entfernen Sie s mtliche eingelagerten Lebensmittel aus dem Ger t 3 Reinigen und trocknen Sie das Innere des Ger ts und lassen Sie die T r f r einige Tage ge ffnet Bei einem durchschnittlichen U...

Page 19: ...ieren 180 l 117 l 54 l Sternekenzeichnung 4 Gefrierverm gen in 24 h 3 00 kg Max Lagerzeit bei St rung 10 00 h Ger uschemmission 42 dB A Regelbarer Thermostat ja Kompressor 1 K hlmittel R600a Wechselba...

Page 20: ...n und danach das Stromanschlusskabel am Ger t abschneiden und direkt mit dem Netzstecker entfernen und entsorgen Demontieren Sie immer die komplette T r damit sich keine Kinder einsperren und in Leben...

Page 21: ...l Beschaffenheit die auf den Gebrauchswert des Produkts keinen Einfluss haben 3 Sch den infolge Betriebs und Bedienungsfehler 4 Sch den durch aggressive Umgebungseinfl sse Chemikalien Reinigungsmittel...

Page 22: ...ction manual Index 1 Safety instructions 23 2 Climatic classes 27 3 Installation 27 3 1 Site 27 3 2 Ventilation 27 3 3 Levelling 28 3 4 Change of the hinge position 28 4 Operation 30 4 1 Appliance tem...

Page 23: ...ore you operate the appliance for the first time All information included in those pages serve for the protection of the operator If you ignore the safety instructions you will endanger your health an...

Page 24: ...plug are visibly damaged 2 Never try to repair the appliance yourself If the appliance does not operate properly please contact the shop you purchased the appliance at Original spare parts should be u...

Page 25: ...e appliance 16 Turn off the power before you install the appliance and before you connect it to the mains RISK OF FATAL ELECTRIC SHOCK 17 Disconnect the appliance from the mains before you clean or ma...

Page 26: ...more than 450 3 If the appliance is transported in a horizontal position some oil may flow from the compressor into the refrigerant circuit 4 Leave the appliance in an upright position for 4 6 hours b...

Page 27: ...ot use any aggressive or abrasive detergents to remove residuals of the transport protection 3 Install the appliance in a suitable position with an adequate distance from sources of heat and cold 4 Ch...

Page 28: ...rself or damage the appliance Always lift the doors carefully Store the doors at a place where they cannot be damaged 1 Remove the hinge cover A and the top hinge B 2 Lift the door upwards 3 Unscrew t...

Page 29: ...ed in the hole on the bottom of the fridge door Close the door then install the top hinge on the opposite side The top hinge pin must be inserted in the hole on the top of the fridge door Install the...

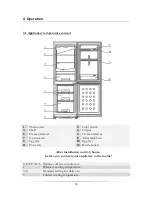
Page 30: ...reezer drawer 7 Ice cube tray 8 Adjustable foot 9 Egg tray 10 Egg tray 11 Door tray 12 Bottle pocket After installation wait 4 6 hours before you connect your appliance to the mains 0 OFF AUS Switches...

Page 31: ...elevant temperatures when a the a ambient temperature meets the climatic class b the doors close properly c you do not open the doors too often or too long d the door seals are in proper condition e t...

Page 32: ...the end of shopping and transport it in thermally insulated bags 6 Do not refreeze defrosted and semi defrosted food Consume within 24 hours 7 Observe the complete information on the packaging of froz...

Page 33: ...lean so that unpleasant odours do not occur 3 Dust deposits on the condenser will increase the energy consumption Clean the condenser twice a year with a vacuum cleaner or a soft brush 4 Take off all...

Page 34: ...crusted ice melts put some dry cloths into the freezer compartment to hold the water back 5 Remove the big pieces of ice first 6 Afterwards remove the small pieces of ice 7 Wipe and dry the appliance...

Page 35: ...the door too often too long Unsatisfactory cooling capacity The door was frequently opened The door is not properly closed Encrusted ice inside the appliance The current temperature setting is too wa...

Page 36: ...th high power to reach the preset temperature Condensed water in on the appliance may be generated inside or outside the appliance by high humidity or very warm ambient temperatures Clicking You will...

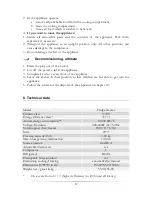
Page 37: ...emove every door of the appliance 4 Leave the shelves in their position so that children are not able to get into the appliance 5 Follow the advice for the disposal of the appliance in chapter 12 8 Te...

Page 38: ...e Unplug the appliance and cut off the entire power cord Dispose of the power cord and the plug immediately Remove the door completely so children are not able to get into the appliance as this endang...

Page 39: ...ng their authorized condition if they do not influence the utility value of the product 3 damage caused by handling errors or false operation 4 damage caused by aggressive environmental conditions che...

Page 40: ...inden alle Informationen zum Kundendienst auf der Einlage in dieser Bedienungsanleitung Aftersales service information on the leaflet inside this instruction manual nderungen vorbehalten Subject to al...

Reviews: