background image

18


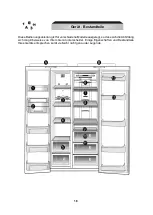
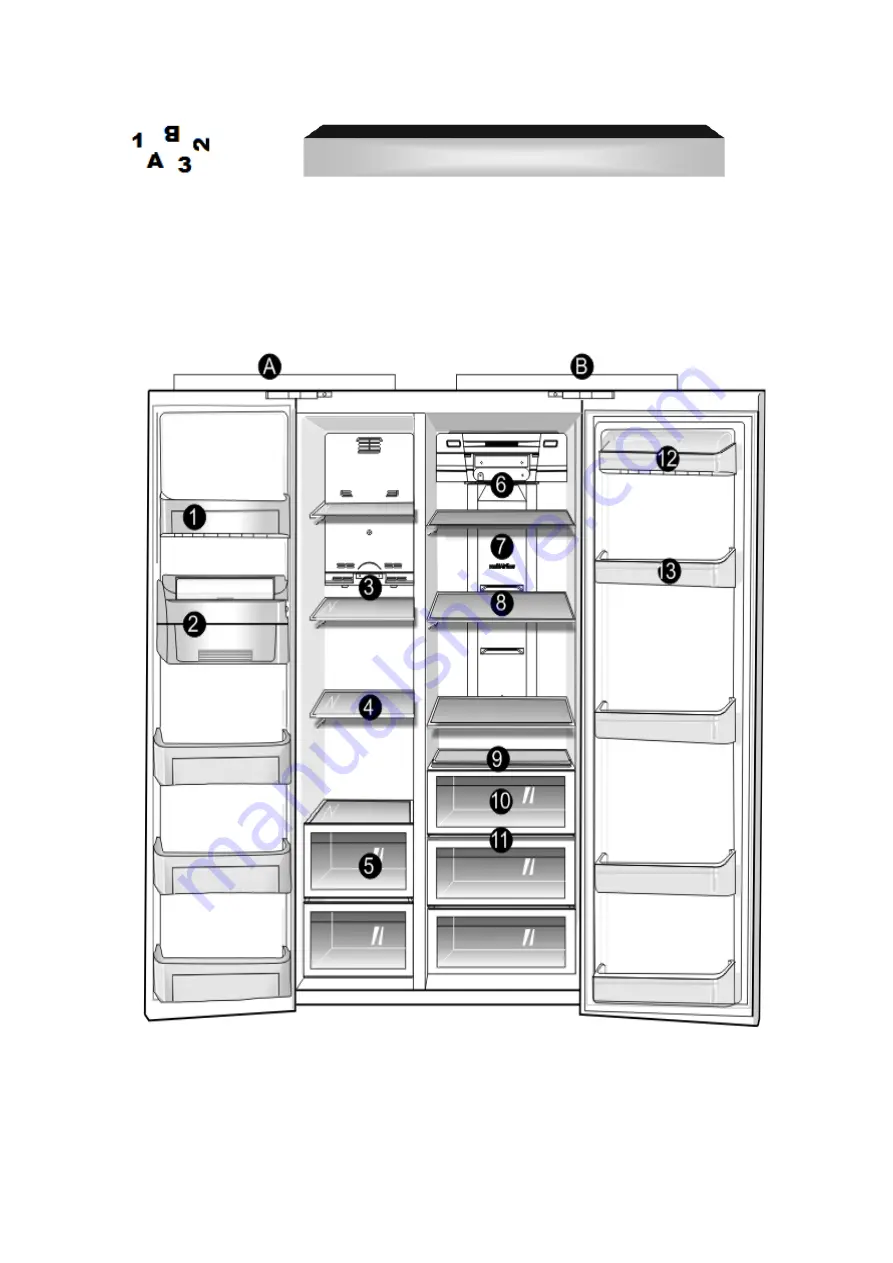
Diese Bedienungsanleitung ist für verschiedene Modelle ausgelegt, so dass sich die Abbildung 
sich möglicherweise von Ihrem Gerät unterscheidet. Einige Eigenschaften und Bestandteile 
Ihres Geräts entsprechen somit vielleicht nicht genau der Legende. 


Gerät - Bestandteile 

Summary of Contents for SBS 602.4 A+NF

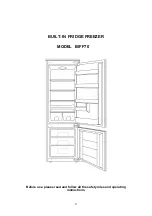
Page 1: ...Illustration similar Lesen Sie diese Bedienungsanleitung bevor Sie das Ger t erstmalig in Betrieb nehmen Verwahren Sie diese Bedienungsanleitung zur zuk nftigen Verwendung an einem sicheren Ort Please...

Page 2: ...dieser Bedienungsanleitung aufgef hrten Pr fungen selbst beheben konnten Aktualisierte Informationen zu unserem Kundendienst unter www pkm online de Operatec Service GmbH Telefon Nummer 02841 9994972...

Page 3: ...16 8 Beschreibung des Ger ts 17 9 Bedientafel 23 10 Reinigung und Pflege 27 11 Hilfreiche Ratschl ge Energiesparen 29 12 Au erbetriebnahme 31 13 Problembehandlung 33 14 Entsorgung 35 15 Technische Dat...

Page 4: ...und M glichkeiten Ihres neuen Ger ts optimal nutzen zu k nnen Beachten Sie bitte auch alle Sicherheits und Warnhinweise damit Sie ber einen langen Zeitraum viel Freude an Ihrem neuen Ger t haben Der H...

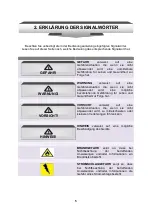
Page 5: ...m gliche bevorstehende Gef hrdung f r Leben und Gesundheit zur Folge hat VORSICHT verweist auf eine Gefahrensituation die wenn sie nicht abgewendet wird zu mittelschweren oder kleineren Verletzungen f...

Page 6: ...Dieses Ger t ist ausschlie lich zur Verwendung in einem privaten Haushalt bestimmt Der Hersteller beh lt sich das Recht vor solche nderungen vorzunehmen die keinen Einfluss auf die Funktionsweise dies...

Page 7: ...sen N ST gew hrt eine zuverl ssige Funktion Ihres Ger ts bei einer Raumtemperatur von 160 C bis 380 C Ihr Ger t wird mit dem umweltfreundlichen K ltemittel R600a betrieben Das K ltemittel R600a ist br...

Page 8: ...die Stromversorgung anschlie en um sicher zu gehen dass das l in den Kompressor zur ck geflossen ist 5 Entfernen Sie s mtliches Wasser aus der Ablaufrinne bevor Sie das Ger t bewegen 6 Die Ablaufr hr...

Page 9: ...inal Ersatzteile 8 Benutzen Sie keine elektrischen Ger te im Inneren des Ger ts es sei denn diese werden vom Hersteller Ihres K hlger ts empfohlenen 9 Stellen oder legen Sie keine w rme abstrahlende e...

Page 10: ...r Bedienungsanleitung aufgef hrten Anweisungen durchgef hrt wird Eine unzureichende Bel ftung beeintr chtigt den ordnungsgem en Betrieb des Ger ts und besch digt das Ger t 3 Blockieren Sie nicht den L...

Page 11: ...chen Verkehrsmitteln benutzt werden 6 Dieses Ger t darf nur in geschlossenen R umen benutzt werden 1 Ziehen Sie den Stromstecker aus der Steckdose 2 Schneiden Sie das Stromkabel am Ger t ab 3 Entferne...

Page 12: ...tellen Sie das Ger t nicht in der N he von W rmequellen wie Radiatoren fen usw auf 11 Stellen Sie das Ger t nicht an einem Ort auf an dem es mit Wasser oder Regen in Kontakt kommen kann damit die Isol...

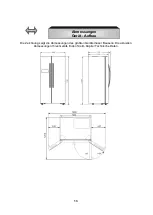
Page 13: ...13 Die Zeichnung zeigt die Abmessungen des gr ten Ger ts dieser Bauserie Die aktuellen Abmessungen Ihres Ger ts finden Sie im Kapitel Technische Daten Abmessungen Ger t Aufbau...

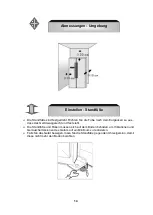
Page 14: ...fest steht Die Standf e und Rollen m ssen sich auf dem Boden befinden um Vibrationen und Ger uschemissionen des Ger ts auf ein Minimum zu reduzieren Falls Sie das Ger t bewegen l sen Sie die Standf e...

Page 15: ...s darstellt Betreiben Sie das Ger t nur mit 220V 240V 50Hz Wechselstrom Verwenden Sie ausschlie lich eine daf r geeignete Steckdose die sich nahe an Ihrem Ger t befinden muss Zu Ihrer eigenen Sicherhe...

Page 16: ...Ber hren Sie die gek hlten Oberfl chen nicht w hrend das Ger t in Betrieb ist Ihre Haut kann an den gek hlten Oberfl chen festkleben Frieren Sie keine Flaschen ein die Fl ssigkeiten enthalten ins bes...

Page 17: ...ger als eine Minute ge ffnet ist erinnert Sie das Alarmsystem daran diese zu schlie en Kompressor Verdichtungseinheit Die Kompressor Verdichtungseinheit die Ventilationsk hlung und der K hlungs Effekt...

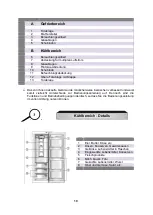
Page 18: ...r verschiedene Modelle ausgelegt so dass sich die Abbildung sich m glicherweise von Ihrem Ger t unterscheidet Einige Eigenschaften und Bestandteile Ihres Ger ts entsprechen somit vielleicht nicht gen...

Page 19: ...en gekaufte Ger t wurde m glicherweise inzwischen verbessert und weist somit vielleicht Unterschiede zur Bedienungsanleitung auf Dennoch sind die Funktionen und Betriebsbedingungen identisch sodass Si...

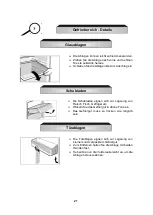
Page 20: ...vorne und nehmen Sie sie seitw rts heraus Schieben Sie die Ablagen bis zum Anschlag ein Zum Entfernen halten Sie die Ablage mit beiden H nden fest Heben Sie nun die Vorderseite leicht an um die Ablag...

Page 21: ...gerung von Fleisch Fisch Gefl gel etc Wickeln Sie das Gefriergut in d nne Folie ein Das Gefriergut muss so trocken wie m glich sein Die T rablagen eignen sich zur Lagerung von kleinem und verpacktem G...

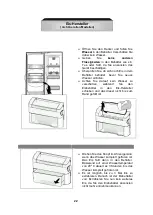
Page 22: ...ten w hrend Sie den Eisbeh lter in den Eis Hersteller schieben und das dieser nicht bis zum Rand gef llt ist Drehen Sie den Knopf im Uhrzeigersinn wenn das Wasser komplett gefroren ist Das Eis f llt d...

Page 23: ...ie bersetzung in die deutschsprachigen Begriffe die in dieser Bedienungsanleitung verwendet werden finden Sie in der folgenden Legende ENG DE Super Frz freeze Schnellgefrieren Freezer Gefrierbereich C...

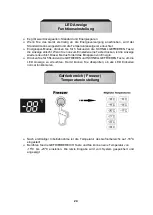
Page 24: ...erleuchtet Dieser Modus f rdert das Einsparen von Energie Dr cken Sie f r 5Skunden die GEFRIEREN und SCHNELLGEFRIEREN Taste um die LED Anzeige zu erleuchten Damit k nnen Sie berpr fen ob alle LED Ein...

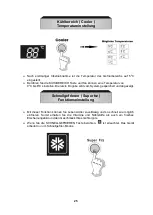
Page 25: ...chert und angezeigt Mit dieser Funktion k nnen Sie Lebensmittel zuverl ssig und so schnell wie m glich einfrieren Somit erhalten Sie die Vitamine und N hrstoffe als auch ein frisches Erscheinungsbild...

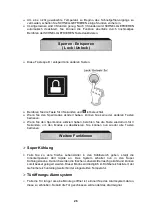
Page 26: ...aktiviert haben ber hren Sie die Taste wiederrum f r 3 Sekunden um den Modus zu deaktivieren Sie k nnen nun wieder alle Tasten bedienen Super K hlung Falls Sie zu viele frische Lebensmittel in den K...

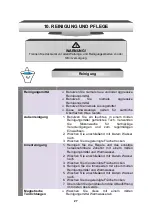
Page 27: ...trocken Innenreinigung 1 Reinigen Sie die Regale und das sonstige herausnehmbare Zubeh r mit einem milden Reinigungsmittel und Warmwasser 2 Wischen Sie anschlie end mit klarem Wasser nach 3 Wischen S...

Page 28: ...Auffangen des Tauwassers geeignetes Gef auf 3 Schalten Sie das Ger t ab indem Sie den Thermostatschalter auf 0 AUS OFF stellen und anschlie end den Netzstecker aus der Steckdose ziehen 4 Legen Sie das...

Page 29: ...einwickeln in geeignete Frischhaltebeutel geben oder luftdichte Beh lter verwenden Gew hren Sie den Lebensmitteln einen angemessenen Lagerungsbereich berf llen Sie das Ger t nicht Wickeln Sie einzulag...

Page 30: ...ratur sobald wie m glich von einer hohen auf eine niedrige Einstellung abh ngig davon wie beladen das Ger t ist und wie hoch die Umgebungstemperatur ist Bevor Sie Lebensmittel in das Ger t geben lasse...

Page 31: ...n K hlbereich c lagern Sie alle daf r geeigneten Lebensmittel im Gefrierbereich Wenn Sie das Ger t bewegen wollen 1 Sichern Sie alle herausnehmbaren Teile und den Inhalt des Ger ts Verpacken Sie diese...

Page 32: ...en Sie alle Regale des Ger ts an ihrem Platz damit Kinder nicht leicht in das Ger t hinein gelangen k nnen 5 Beachten Sie die Hinweise zur Entsorgung im entsprechenden Kapitel dieser Bedienungsanleitu...

Page 33: ...rmaler Vorgang w hrend des Abtau Modus berpr fen Sie den Status der Energieversorgung Der Kompressor l uft zu lange Das Ger t war k rzlich f r eine Zeit ausgeschaltet Zu viele oder zu hei e Lebensmitt...

Page 34: ...aber nicht behoben werden konnte kontaktieren Sie den Kundendienst Wichtiger Hinweis Die folgenden Betriebsvorg nge sind normal und kein Anzeichen einer Fehlfunktion Die K hlfl ssigkeit erzeugt ein G...

Page 35: ...r und mit entsprechenden Informationen versehen Indem Sie Ihr altes Ger t oder dessen Materialien wie auch die Verpackung sachgerecht entsorgen tragen Sie erheblich zum Schutz unserer Umwelt bei Das V...

Page 36: ...he Ger te nicht als unsortierten Hausm ll Nutzen Sie die zur getrennten Entsorgung vorgesehenen rtlichen Sammeleinrichtungen Wenn elektrische Ger te auf M lldeponien oder M llhalden entsorgt werden k...

Page 37: ...nsunt chtig Das bedeutet immer den Netzstecker erst herausziehen und danach das Anschlusskabel durchtrennen und direkt mit dem Netzstecker entfernen und entsorgen Demontieren Sie immer die komplette T...

Page 38: ...el R600a Kabell nge in m 2 Externer Griff ja Rollen H henverstellbare F e ja Kontrollleuchten Betrieb Schnellgefrieren ja ja LED Anzeige Temp K hlen Gefrieren ja ja Abtauverfahren K hlen Gefrieren NoF...

Page 39: ...nehmer zu melden F r unsere Ger te leisten wir Garantie gem nachstehenden Bedingungen M ngel am Ger t die nachweislich auf einem Material oder Herstellungsfehler beruhen werden durch unseren Kundendie...

Page 40: ...die nicht ihrem vorgesehenen Zweck entsprechend verwendet werden 7 Sch den durch h here Gewalt oder Naturkatastrophen insbesondere aber nicht abschlie end bei Brand oder Explosion Garantieleistungen...

Page 41: ...ual 3 Operatec Service GmbH Telephone number 02841 9994972 14 Cent Min using German land line mobile phone charges may be different web www profectis de After sales service information regularly updat...

Page 42: ...e 55 8 Description of the appliance 56 9 Control panel 62 10 Cleaning and maintenance 66 11 Useful hints energy saving 68 12 Decommissioning 69 13 Trouble shooting 71 14 Waste management 73 15 Technic...

Page 43: ...so you will enjoy your appliance for a long period of time Please dispose of the packing with respect to your current local and municipal regulations Any modifications which do not influence the funct...

Page 44: ...rious injury CAUTION indicates a hazardous situation which if not avoided may result in minor or moderate injury NOTICE indicates possible damage to the appliance RISK OF FIRE indicates a possible ris...

Page 45: ...appliance in a private household Modifications of the appliance which do not influence its main functions shall remain reserved by the manufacturer Important addendum Please pay attention to the foll...

Page 46: ...oor use only Climatic class N ST appliances can be used in rooms with a room temperature of 160 C to 380 C This appliance is equipped with the environmental friendly refrigerant R600a The refrigerant...

Page 47: ...l has flowed back into the compressor 5 Remove any water in the drain tray before you move your appliance 6 The defrost water pipe at the back of the appliance should be properly fixed on the plastic...

Page 48: ...appliances inside the food storage compartment of your appliance unless they are recommended by the manufacturer of your refrigerator 9 Do not put any heat radiating appliances onto your appliance 10...

Page 49: ...e air circulation will not properly work 1 EXPLOSION HAZARD Do not store any explosive materials or sprays which contain flammable propellants in your appliance Explosive mixtures can explode there 2...

Page 50: ...appliance 4 Leave all shelves in their position so that children are not able to get into the appliance This appliance is not intended to be run by persons including children with reduced physical sen...

Page 51: ...ay come in contact with water or rain in order that the insulation of the electrical components would not be damaged 10 The appliance is designed for indoor use only 11 Protect the appliance from dire...

Page 52: ...The installation diagram shows the dimensions of the biggest appliance which may differ from the appliance you bought For current dimensions look at chap Technical Data Dimensions appliance installati...

Page 53: ...on of the appliance The feet and rolls must properly contact the floor to reduce the vibrations and noise of the appliance If you want to move the appliance unloose the feet in an anticlockwise direct...

Page 54: ...ign of your handle An electrical supply of 220 240V AC 50 Hz is required Only use a suitable and properly grounded socket near the appliance For your personal safety the appliance must be grounded The...

Page 55: ...e in chapter 8 The appliance must be correctly connected to the mains Do not use an extension cord Do not touch the cooled surfaces while the appliance is running Your skin can stick to these surfaces...

Page 56: ...f you leave the door open for more than 1 minute the alert system reminds you to close it Compressor condensing unit The compressor condensing unit fan cooling and refrigeration effect will prolong th...

Page 57: ...nstruction manual is made for different models so that the figure below may differ from your appliance Therefore some features and components of your appliance may not exactly meet the key Appliance c...

Page 58: ...r tray The appliance you have purchased may be an enhanced version of the unit this manual was printed for Nevertheless the functions and operating conditions are identical This manual is therefore st...

Page 59: ...es can easily be taken out Pull the shelf forwards and swing it out to the side Push the shelf back as far as possible Hold the tray with both hands to remove it Now slightly lift the front side to pu...

Page 60: ...s are suitable to store meat fish poultry etc in Wrap the food in thin foil first The food should be as dry as possible The door trays are suitable to store wrapped and small sized food in Hold the tr...

Page 61: ...e pushing the ice tray into the container Do not fill it completely Turn the knob clockwise when the water is completely frozen The ice drops into the ice tray It takes about 3 hours until the water i...

Page 62: ...ck if all LED elements work well Energy saving mode touch SUPERFREEZE for 5 seconds and the display goes of When you touch a sensor for adjusting the display goes on This mode saves energy When you ha...

Page 63: ...150 C to 230 C The last setting is saved and displayed by the system When you have connected the appliance to the mains for the first time the temperature is set to 50 C Touch COOLER to adjust a tempe...

Page 64: ...he appliance now runs in the super freeze mode To avoid a not desired temperature at the beginning of super freezing food start the function a few ho As a rule 3 hours are enough SUPERFREEZE automatic...

Page 65: ...r K hlungsmodus Dadurch werden die frischen Lebensmittel rasch gek hlt und k nnen somit If you put too much fresh food in refrigerator compartment the temperature of the refrigerator compartment rises...

Page 66: ...n acrid detergent 2 Use clear water to rinse 3 Dry the cleaned surfaces with a cloth 4 Clean the interior with baking soda 3 tablespoons per litre of water or with water and a mild non acrid detergent...

Page 67: ...ect it from the mains 3 When the encrusted ice melts put some dry cloths into the freezer compartment to hold the water back 4 Remove the big pieces of ice first 5 Afterwards remove the small pieces o...

Page 68: ...ble paper and place each kind of foodstuff in a particular location in your appliance This will prevent any contamination a loss of water and a mingling of odours Let warm or hot foodstuff cool down t...

Page 69: ...oling compartment of you appliance Occasionally clean the rear of your appliance with a brush or a vacuum cleaner to avoid an increased energy consumption If the appliance is not used for a longer per...

Page 70: ...ance in an upright position only All other positions can cause damage to the compressor 3 Do not damage the feet of the appliance 1 Draw the plug out of the socket 2 Cut off the power cord at the appl...

Page 71: ...in the appliance Doors too often or too long opened The appliance needs some time too reach the preset temperature Remove any hot food Do not open the door too often or too long Unsatisfactory coolin...

Page 72: ...ircuit of the appliance is running Noise when you run the appliance for the first time or the cooling temperature falls below a certain level it will operate with high power to reach the preset temper...

Page 73: ...yclable The recommended modus operandi is Dispose of any paper and cardboard into the corresponding containers Dispose of any plastics into the corresponding containers If such a suitable container is...

Page 74: ...If electric appliances are disposed of at landfills substances which are dangerous to one s health can get into the ground water Such substances will become part of the food chain and cause damage to...

Page 75: ...he appliance Dispose of the power cord with the plug immediately Remove the door completely so that children are not able to get into the appliance this causes mortal danger Refrigerators and freezers...

Page 76: ...00a Length of power cord in m 3 External handle Yes Rollers Adjustable feet Yes Signal light operation Super freeze Yes Yes LED display temp cooling freezing Yes Yes Defrosting cooling freezing NoFros...

Page 77: ...d within 24 months after the delivery to the first ultimate vendee The guarantee for our appliances is valid under the following conditions Defects of the appliance which are verifiably caused by mate...

Page 78: ...or the start up is performed inappropriately 5 the maintenance is inadequately or incorrectly performed 6 the appliance is not used for its intended purpose 7 the appliance is damaged by force majeur...

Page 79: ...79 17 NOTIZEN NOTES Edition und bersetzung Fangnetz Xanten 46509 Xanten fangnetz t online de...

Page 80: ...80 TECHNOLOGIE F R DEN HAUSHALT TECHNOLOGY FOR DOMESTIC USE www pkm online de Stand 25 07 2012 Updated 07 25 2012...

Reviews: