background image

  7

PRECAUTIONS


1.

  Unplug the monitor from the power source when you clean the monitor. Do 

not use liquid cleaners or aerosol cleaners. Use a cloth to clean it. If that 
doesn’t do, please use LCD screen cleaners. 

2.

  Do not use attachments not recommended as they may cause hazards. 

3.

  Please grasp the plug to unplug the connector from the wall outlet. Do not pull 

the power cord to unplug it. 

4.

  Do not place anything on the power cord or step on it 

5.

  Do not place the monitor near water such as bathtub, washbowl, sink, laundry 

tub, swimming pool etc. 

6.

  The slots are designed for ventilation they keep the monitor both workable 

and protect it from overheating. For the same reason, please do not place the 
monitor on a bed, sofa, carpets or other similar surface. Do not place the 
monitor near or over a heat source, or place in a enclosed structure/area. 

7.

  Keep the monitor at least 2 inches (5 cm) away from the wall or other goods. 

8.

  This monitor can only use the power source indicated on the label. If you 

have questions, please consult your dealer. 

9.

  As a safety measure, this monitor is equipped with a three-wire ground style 

plug. If you can not insert the plug into outlet, contact your electrician to install 
the correct outlet, or use an adapter to ground the appliance safely. Do not 
bypass the safety purpose of the grounding-type plug. 

10.

 Please make sure that the outlet and power cord can support the total 

electricity use of the products. 

11.

  Place the monitor in safe place where the cord will not be easily tripped over. 

12.

  Follow all the warnings and instructions illustrated in the manual. 

13.

  Don’t overload the wall outlets and extension cords as this can result in fire or 

electric shocks. 

14.

 Do not remove or open the cover to service this monitor yourself. It may 

expose you to dangerous voltage or other hazards. Please refer all servicing 
to qualified service personnel. 

15.

 Unplug this monitor from the outlet and refer servicing to qualified service 

personnel under the following conditions.   

A. 

The power cord is frayed or damaged. 

B. 

The monitor has been dropped or the cabinet has been damaged 

C.  When the monitor displays a distinct change in performance, this 

indicates a need for service.   

16.

  The power cord is the main device to disconnect the power. 

17.

  Unplug the power cord when you do not use the monitor for a long time. 

18.

 Place the monitor in a well ventilated area and protect it from strong light, 

overheating and moisture. 

19.

  This monitor must be stored in a room in between the temperature of –20°C ~ 

+55°C. Storing outside this range may cause permanent damage. 

Summary of Contents for GT190M

Page 1: ...USER S GUIDE GT190M LCD Monitor...

Page 2: ...2...

Page 3: ...ghts are reserved No part of this document may be reproduced translated to another language or stored in a retrieval system or transmitted by any means electronic mechanical photocopying recording or...

Page 4: ...4...

Page 5: ...stallation 9 2 1 Installing the base 2 2 Installing the monitor 2 3 Self test pattern 2 4 Adjusting picture 3 Operation of the monitor 11 3 1 Power on off switch 3 2 Power LED indicator 3 3 OSD contro...

Page 6: ...or relocate the receiving antenna 2 Increase the separation between the equipment and receiver 3 Connect the equipment into an outlet on a circuit different from that to which the receiver is connect...

Page 7: ...ian to install the correct outlet or use an adapter to ground the appliance safely Do not bypass the safety purpose of the grounding type plug 10 Please make sure that the outlet and power cord can su...

Page 8: ...Features LCD TFT 19 monitor Built in multimedia speakers Multi language OSD interface Auto adjusting imaging White and black reference voltage auto calibration Compliant with EPA energy star VESA DPM...

Page 9: ...cable into computer and lock the two bolts Then plug the other end into the monitor and lock the two bolts Make sure connections are secure 2 Power cord connection connect the AC adapter with the DC p...

Page 10: ...signal input After a few seconds the monitor will enter into waiting and saving power mode The LED will be red and flashing Once the monitor receives the video signal it will return to normal mode 2...

Page 11: ...ty you should unplug the power adapter when you don t use the monitor for an extended period of time 3 3 OSD Control Keys 3 3 1 Auto Key This key is used to complete auto adjusting function in VGA mod...

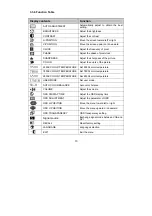
Page 12: ...ustment 22 Planar LOGO 3 3 5 Meaning of the Menu in DVI Mode 1 Brightness 2 Contrast 3 Sharpness 4 Volume 5 OSD menu display time 6 Transparency 7 OSD position 8 Signal source 9 9300k 10 7800k 11 6500...

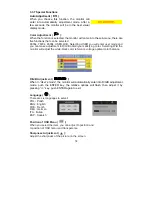
Page 13: ...f the picture 9300K COLOR TEMPERATURE Set 9300k color temperature 7800K COLOR TEMPERATURE Set 7800k color temperature 6500K COLOR TEMPERATURE Set 6500k color temperature USER MODE Set user mode AUTO C...

Page 14: ...B obtain your satisfying color Selecting W B the monitor will adjust the white black color reference voltage optimal color balance R G B Adjustment When in User s mode the monitor will automatically e...

Page 15: ...d reset the frequency range 3 5 Timing guide No Mode Resolution V Frequency Hz H Frequency KHz Available Input Signal 1 60 31 5 Analog RGB Digital DVI 2 72 37 9 Analog RGB 3 VGA 640 x 480 75 37 5 Anal...

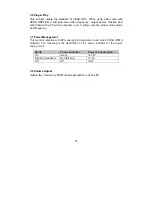
Page 16: ...will go into the proper video mode and frequency 3 7 Power Management This monitor complies with EPA energy star requirement and meets VESA DPMS standard The following is the description of the power...

Page 17: ...o input Built in speakers 2 x 2 W Power input connector Power jack Maximum power cons 45 W Stand by power cons 5 W Off mode power cons 2 W Power supply for adapter 100 V 240 VAC 50 60Hz Power supply f...

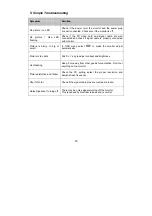
Page 18: ...o big or small In OSD menu select to make the monitor adjust automatically Picture is too dark Push key to adjust contrast and brightness Overheating Keep 5 cm away from other goods for ventilation Do...

Reviews: