background image

COMMUNIQUE D’AVERTISSEMENT DE LA FCC CONCERNANT LES INTERFERENCE DE 
FREQUENCE RADIO: (SEULEMENT POUR MODELES CERTIFIE PAR LA FCC)


Ce moniteur a été testé et à été trouvé conforme aux limites pour un appareil numérique de 
Classe B, suivant la partie 15 des règlements de la FCC. Ces limites ont été développées pour 
offrir une protection satisfaisante contre les interférences nuisibles dans une installation 
résidentielle. Ce moniteur génère, utilise et peut radier de l’énergie de fréquence radio. Ceci 
peut causer des interférences nuisibles à des communication radio si l’appareil n’est pas 
convenablement installé et utilisé. Il n’y à néanmoins aucune garantie que des interférences 
n’apparaîtront pas dans une installation particulière. Si ce moniteur cause de sérieuses 
interférences à la réception de signaux radios ou télévisées, une possibilité est de réinitialiser le 
moniteur. Les usagers sont aussi encouragés à corriger les interférences en appliquant une ou 
plusieurs des démarches suivantes: 


z


Réorientez ou déplacez l’antenne de réception. 

z


Placez le moniteur et le récepteur plus loin l’un de l’autre. 

z


Connectez le moniteur à une prise différente de celle à laquelle le récepteur est connecté.


z


Consultez votre revendeur local ou un technicien qualifié.


Avertissement de la FCC: 

Pour assurez une conformité continue au règlements de la FCC, l’utilisateur doit utiliser un 
cordon d’alimentation mis à terre et le câble d’interface vidéo protégé avec noyaux en ferrite, 
fourni avec l’appareil. Chaque modification ou changement non-autorisé appliqué à ce moniteur 
peut faire perdre à l’utilisateur sont droit d’opération de cet appareil. 

 
Note: 

Si nécessaire, des câbles d’interface protégés et un cordon d’alimentation alternante 

doivent être utilisé pour être conforme aux limites d’émission.


 2

Summary of Contents for IX2790

Page 1: ...www planar com USER S GUIDE LED LCD Monitor IX2790...

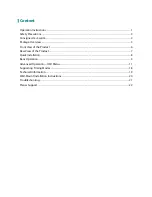
Page 2: ...4 Package Overview 5 Front View of the Product 6 Rear View of the Product 7 Quick Installation 8 Basic Operation 9 Advanced Operation OSD Menu 11 Supporting Timing Modes 18 Technical Information 19 Wa...

Page 3: ...to which the receiver is connected z Consult your local dealer or a qualified technician FCC Warning To assure a continued FCC compliance a user must use a grounded power supply cord and the provided...

Page 4: ...n de signaux radios ou t l vis es une possibilit est de r initialiser le moniteur Les usagers sont aussi encourag s corriger les interf rences en appliquant une ou plusieurs des d marches suivantes z...

Page 5: ...leaners waxes or solvents for your cleaning z Do not operate the product under the following conditions o Over 16 hours per day o Extremely hot cold or humid environment o Areas susceptible to excessi...

Page 6: ...ifs de la cire ou des solvants pour le nettoyage z N utilisez pas le produit dans les conditions suivantes o Plus de 16 heures par jour o Environnement extr mement chaud froid ou humide o Endroits pou...

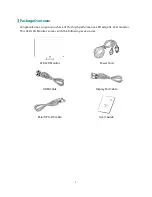
Page 7: ...lations on your purchase of this high performance LED edge lit LCD monitor This LED LCD Monitor comes with the following accessories LED LCD Monitor Power Cord HDMI Cable Display Port Cable Mini DP to...

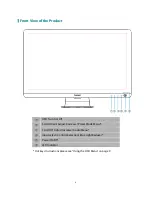
Page 8: ...rn On Off Scroll Down Adjust Decrease Preset Mode Menu Scroll UP Adjust Increase Audio Menu Input select Confirm Selection Blue Light Reducer Power On Off LED Indicator Hot keys Instructions please se...

Page 9: ...View of the Product Power Input HDMI 1 input HDMI 19 pin HDMI 2 input HDMI 19 pin HDMI 3 input HDMI 19 pin Display Port 1 Input Display Port 20 pin Display Port 2 Input Display Port 20 pin Headphone J...

Page 10: ...supplier 3 Connect power cord to a properly grounded AC outlet and then to the monitor 4 Power ON computer and then POWER ON the monitor 5 Set the timing mode on your computer Recommended resolution...

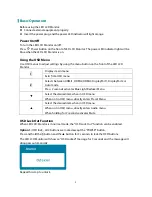
Page 11: ...MI2 HDMI3 DisplayPort1 DisplayPort2 or Auto mode Press 2 seconds activates Blue Light Reducer Menu Select the desired item when in OSD menu When not in OSD menu directly enters Preset Menu Select the...

Page 12: ...the POWER button are locked Press and hold the 1 button and the button for 3 seconds to lock all 5 buttons The LED LCD Monitor will show a Power Button Locked message for 3 seconds and the message wil...

Page 13: ...or Press the 1 button to display the OSD Menu and use or to select the desired OSD menu Press 2 to confirm or reach the next sub menu To exit press 1 Short Cuts Function from the button s Input When I...

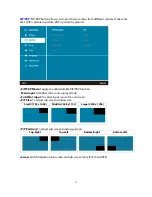
Page 14: ...trast Sharpness To adjust the clarity of a non UHD Resolution 5120 x 2880 signal with or button Overdrive Allows the user to change the Over Drive strength to improve the quality of motion pictures Pr...

Page 15: ...ble PiP PbP function Main Input Identifies main source greyed out Sub Win1 Input To select input source for sub screen PiP Size To adjust sub screen window size Small 1792 x 1008 Middle 2048 x 1152 La...

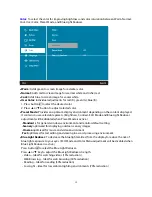
Page 16: ...is a custom resolution Check your video card to see if custom resolution is supported If not supported black bars on top and bottom will result Audio Adjust To adjust the audio functions Volume To adj...

Page 17: ...r adjustment will be disabled when Preset Mode is active Standard is for general windows environment and monitor default setting Scenery optimized for displaying outdoor scenery images Cinema optimize...

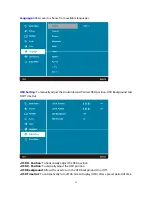
Page 18: ...OSD position OSD Background and OSD Time Out OSD H Position To horizontally adjust the OSD position OSD V Position To vertically adjust the OSD position OSD Background Allows the user to turn the OSD...

Page 19: ...lution is 3840x2160 30Hz LED Allows the user to turn the LED Indicator On or Off Information To display the information regarding the current input signal coming from the graphic card in your computer...

Page 20: ...624 75Hz CVT 3840 x 2160 24Hz VESA 1024 x 768 60Hz CVT 3840 x 2160 25Hz VESA 1024 x 768 70Hz CVT 3840 x 2160 30Hz VESA 1024 x 768 75Hz CVT 3840 x 2160 60Hz MAC 1152 x 870 75Hz CVT only DP 5120 x 2880...

Page 21: ...y 60Hz max Compatibility PC HDMI Support up to 3840 x 2160 DP support up to 5120 x 2880 non interlaced Mac HDMI Support up to 3840 x 2160 DP Support up to 5120 x 2880 Pixel Dimension 0 11625 x 0 11625...

Page 22: ...ve the stand Attaching The Optional Wall Mount Arm not supplied 100mm x 100mm Screw Mounting Options Follow these steps to finish installing the wall mounting arm 1 Place the wall mounting arm onto th...

Page 23: ...tly secured to the video output port on back of the computer If not tightly secure it z Adjust brightness Wrong or abnormal colors z If any colors red green blue are missing check the video cable to m...

Page 24: ...http www planar com support for operations manuals touchscreen drivers warranty information and access to Planar s Technical Library for online trouble shooting To speak with Planar Customer Support...

Page 25: ...ar is a registered trademark of Planar a Leyard company Other brands and names are the property of their respective owners Technical information in this document is subject to change without notice Pl...

Reviews: