background image

How to Use the OSD Menus


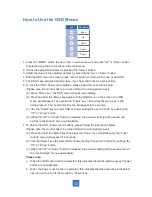
Icon

Key Name

Menu

Up

Down

Select

Power

1. Press the “MENU” button to pop up the “on-screen menu” and press “Up” or “Down” button 
    to select among the 

fi

 ve functions in the main menu.

2. Choose the adjustment items by pressing the “Select” button.
3. Adjust the value of the adjustment items by pressing the “Up” or “Down” button.
4. With the OSD menu on screen, press “ Menu” button to return main menu or exit OSD.
5. The OSD menu will automatically close, if you have left it idle for a pre-set time.
6. To Lock the OSD / Power menu buttons, please follow the instructions below.
    (Please note: the monitor has to be turned ON with a valid signal pre-set)
    (a.) Press “Menu” key , the OSD menu will pops upon display.
    (b.) Press and hold the “Menu” key again with the OSD menu on the screen, the OSD  
          menu will disappear. Then press the “Power” key 1 time while the menu key is still 
          being pressed. The “Lock/Unlock” menu will appear for 3 seconds.
    (c.) Use the “Select” key to select OSD or Power setting then set at “Lock” by pushing the
          “UP” or “Down” button.
    (d.) When the “UP” or “Down” button is released, the previous setting will be saved and
          exit the “Lock/Unlock” menu automatically.
7. To Unlock the OSD / Power menu buttons, please follow the instructions below.
    (Please note: the monitor has to be turned ON with a valid signal pre-set)
    (a.) Press and hold the “Menu” key then press the “Power” key simultaneously, the “Lock/
          Unlock” menu will appear for 3 seconds.
    (b.) Use the “Select” key to select OSD or Power setting then set at “Unlock” by pushing the 
          “UP” or “Down” button.
    (c.) When the “UP” or “Down” button is released, the previous setting will be saved and exit
          the “Lock/Unlock” menu automatically.

    Please note:

    a.   When the OSD Lock function is selected, this indicates that all the buttons except “power”
          button are now disabled.
    b.   When the Power Lock function is selected, this indicates that the power key is disabled;
          user can not to turn off the monitor by “Power” key.

12

Summary of Contents for LA2250RTPW

Page 1: ...LA2250RTPW Touch Screen LCD Monitor USER S GUIDE www planar com...

Page 2: ...meets the FCC rules Those limits are set to protect residential areas from the devices with harmful emission This device will produce use and radiate radio frequency energy In addition failure to foll...

Page 3: ...VESA Mount for Your Monitor 8 Connecting the Display Figure 10 1 9 Figure 10 1 10 User Controls Back Panel Controls 11 How to Use the OSD Menus 12 On Screen Display Menus 13 Appendix Troubleshooting...

Page 4: ...mercial cleaners or 50 50 mixture of water and isopropyl alcohol Use a soft cloth moistened with mild detergent to clean the display housing Use only high quality and safety approved AC DC adapter Dis...

Page 5: ...1 5 viewable display area 16 9 aspect ratio 31 47 82 3 KHz horizontal scan 56 75 Hz high refresh rate 0 24825mm x 0 24825mm pixel pitch Auto adjustment function Multilingual OSD user control 100 mm VE...

Page 6: ...3 Package Overview LCD Display Power Cord VGA Signal Cable DVI D Cable USB Cable A to B DC Power Supply Landing Strip Bracket Screws Quantity 8 Side Brackets...

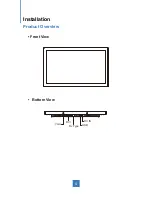
Page 7: ...4 Installation Product Overview Front View Bottom View VGA USB DC IN DVI RJ Type...

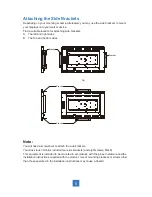
Page 8: ...nd bottom sides Note You will need a screwdriver to attach the side brackets Your kiosk touch monitor included four side brackets and eight screws M4x6 This equipment is intended to be mounted in acco...

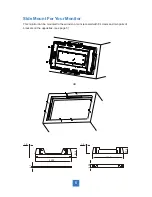
Page 9: ...Side Mount For Your Monitor This monitor can be mounted to the wooden or concrete wall with 8 screws and two pairs of brackets on the opposites see page 5 6 OR 186 0 20 0 1 0 37 4 1 0 220 0 4 1 51 6...

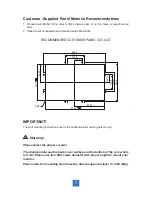
Page 10: ...for the qualified wall mounting person only Warning Please select the proper screws The distance between the back cover surface and the bottom of the screw hole is 8 mm Please use four M4 screws diam...

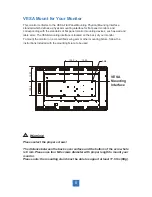
Page 11: ...is located on the back of your monitor To mount the monitor on a UL certified swing arm or other mounting fixture follow the instructions included with the mounting fixture to be used Warning Please...

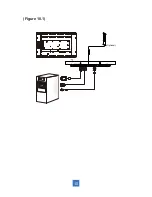
Page 12: ...the USB port of your display to the USB port 10 1 of your computer 5 Configure the touch screen Refer to the Touch Screen Driver Installation section on page 18 6 Once the touch screen is configured t...

Page 13: ...Figure 10 1 10 Optional...

Page 14: ...u off status Menu on status Menu appear Menu disappear return to main item Brightness Main item select up Adjust up Contrast Main item select down Adjust down Enter Select sub item function Power On O...

Page 15: ...still being pressed The Lock Unlock menu will appear for 3 seconds c Use the Select key to select OSD or Power setting then set at Lock by pushing the UP or Down button d When the UP or Down button i...

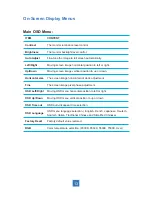
Page 16: ...wn Horizontal size The screen image horizontal dot clock adjustment Fine The screen image pixel phase adjustment OSD Left Right Moving OSD menu horizontal position to left or right OSD Up Down Moving...

Page 17: ...the resolution of your computer to make it less than or equal to 1920 x 1080 Problem Image has vertical flickering line bars Use Horizontal size to make an adjustment Check and reconfigure the displa...

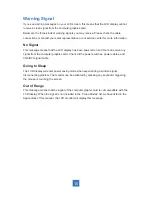
Page 18: ...it cannot receive any signal from the computer graphics card Check all the power switches power cables and VGA DVI signal cable Going to Sleep The LCD display will enter power saving mode when experie...

Page 19: ...Product Dimensions 16 517 4 mm 313 3 mm 100 0 mm 100 0 mm 100 0 mm 106 7 mm 46 0 mm Front View Side View Back View...

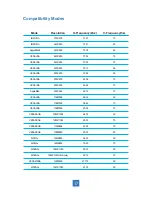
Page 20: ...88 60 VESA VGA 800X600 48 08 72 VESA VGA 800X600 46 88 75 Apple Mac 832X624 49 72 75 VESA XGA 1024X768 48 36 60 VESA XGA 1024X768 56 48 70 VESA XGA 1024X768 60 02 75 VESA SXGA 1280X1024 64 00 60 VESA...

Page 21: ...only Linux Apple Mac OS Please Note 1 The LA2250RTPW is Microsoft Windows HID Human Interface Device compatible if you use the USB touch screen interface No additional software driver is required for...

Page 22: ...ton Control Panel and then Hardware and Sound 2 Under Tablet PC Settings tap Calibrate the screen for pen or touch input 3 On the Display tab under Display options tap Calibrate and then Yes to allow...

Page 23: ...20...

Page 24: ...that the USB cable is connected to the computer 3 Be sure that your EWF is disabled If your EWF is enabled please disable the EWF by using the EWF Manager command 4 Once the EWF is disabled download t...

Page 25: ...http www planar com support for operations manuals touchscreen drivers warranty information and access to Planar s Technical Library for online trouble shooting To speak with Planar Customer Support p...

Page 26: ...866 PLANAR1 866 752 6271 or 1 503 748 5799 outside the United States Hours 24 hours a day 7 days a week 2013 Planar Systems Inc 3 13 Planar is a registered trademark of Planar Systems Inc Other brands...

Reviews: