background image


  LB2650W User’s Guide  

(020-0973-00 Rev. A)

 13

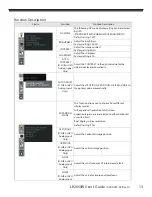
Function Description 

Figure 

Function 

Function Description 


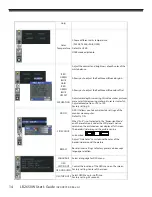
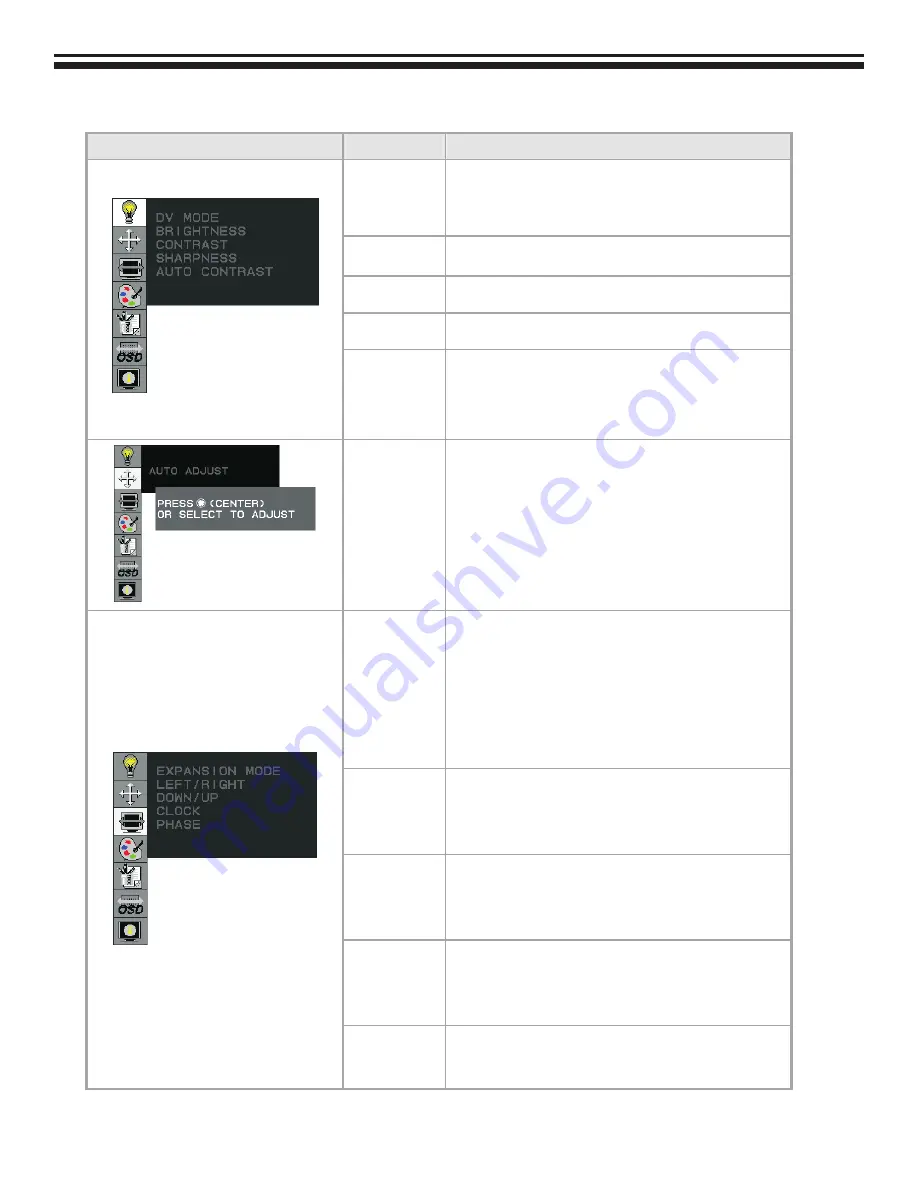
DV MODE 

The following DV mode display setting can be selected 
by OSD 
(STANDARD/TEXT/sRGB/MOVIE/GAMING/PHOTO) 
Default setting: TEXT 

BRIGHTNESS 

Adjust the brightness. 
Factory setting: 100.0% 

CONTRAST 

Adjust the image contrast. 
Factory setting:50.0% 

SHARPNESS 

Adjust the sharpness. 
Factory setting: 50% 

AUTO 

CONTRAST 

(D-SUB or DVI-I 

Analog signal 

Only) 

Adjust the CONTRAST to the optimal value for the 
video-input level automatically. 


AUTO ADJUST 

(D-SUB or DVI-I 

Analog Input 

Only) 

Adjust the H.POSITION, V.POSITION, H-SIZE and FINE to 
the optimal value automatically. 


EXPANSION 

MODE 

This function allows you to choose from different 
display modes: 

Full: expands all resolution to full screen. 

Aspect: enlarges native resolution to either horizontal 
or vertical limit. 

Real: displays native resolution. 

Default setting: FULL 

LEFT/RIGHT 

(D-SUB or DVI-I 

Analog Input 

Only) 

Adjust the horizontal image position. 

DOWN/UP 

(D-SUB or DVI-I 

Analog Input 

Only) 

Adjust the vertical image position. 

CLOCK 

(D-SUB or DVI-I 

Analog Input 

Only) 

Adjust the sync frequency of internal pixel clock. 

PHASE 

(D-SUB or DVI-I 

Analog Input 

Adjust the value for improve display focus. 

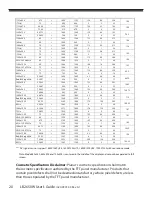
Summary of Contents for LB2650W

Page 1: ...LB2650W USER S GUIDE www planar com...

Page 2: ...estricts the use of six hazardous substances including lead Pb The Directive states that all new products within its scope placed on the European market after July 1 2006 must be compliant with its re...

Page 3: ...Overview 6 Installation Dimensional Drawings Product Overview 7 User Controls Front Panel Controls 10 How to Use the OSD Menus 11 Adjusting the Monitor s Display 12 Function Description 13 OSD Lock Ou...

Page 4: ...with your monitor Disconnect the power plug from AC outlet if the product is not used for an extended period of time Don t Do not touch the LCD display screen surface with sharp or hard objects Do not...

Page 5: ...ion User controls Power saving The LB2650W monitor has been designed to assist OEM customers with forward compatibility concerns This product is designed to provide consistent X Y and Z mounting point...

Page 6: ...650W User s Guide 020 0973 00 Rev A Package Overview LCD Display VGA Signal Cable HDMI to DVI Signal Cables North American Power Cord Please order p n 903 0467 00 for European style cord Quick Start G...

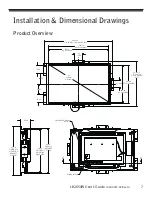
Page 7: ...v A 7 Installation Dimensional Drawings Product Overview 216 5 1 21752 877216 32 5 6 7 8 6 6 2 72 17 5 2 02817 1 6 27 72 17 5 2 02817 1 6 27 7 9 5 23 1 1 PP 12 7 9 5 23 1 1 216 5 76 678 6 7 5 1 6 2 28...

Page 8: ...cable 3 from display VGA input connector to the 15 pin connector of your host computer and tighten the screws 2 For DVI or HDMI output connect DVI cable from display to the PC 4 Turn on your computer...

Page 9: ...LB2650W User s Guide 020 0973 00 Rev A 9 Figure 1 1 DVI Cable on future models DVI HDMI...

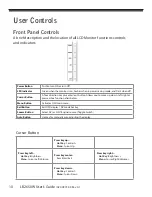
Page 10: ...exit button Allows you to move up down left right or pressed See function chart below Menu Button Activates OSD main menu Exit Button Exit OSD display DV mode hot key Source Button Select DVI or D SUB...

Page 11: ...pop up the on screen menu and to select between the four main menus 2 Choose the adjustment items by pressing the Select Auto button 3 Adjust the value of the adjustment items by pressing the button...

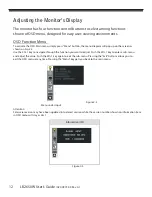
Page 12: ...as shown on Fig 2 2 Use the 4D 1 key to navigate through the function you want to adjust Push the 4D 1 key to enter a sub menu and adjust the value Push the 4D 1 key again to exit the sub menu Pressin...

Page 13: ...atically AUTO ADJUST D SUB or DVI I Analog Input Only Adjust the H POSITION V POSITION H SIZE and FINE to the optimal value automatically EXPANSION MODE This function allows you to choose from differe...

Page 14: ...100 Factory setting 0 DDC CI DDC CI allows you to control certain settings of the monitor via computer Default is ON SIDE COLOR When Full is not selected in the Expansion Mode and the resolution is u...

Page 15: ...er the current signal that is displayed This OSD will automatically turn off after 2 seconds or by pressing the Exit key OSD Warnings NO SIGNAL This OSD gives a warning when the selected input signal...

Page 16: ...ot at the proper timing when the monitor powers on or input signal is changed this message opens and it disappears after 45 seconds or by EXIT key Auto Adjust Analog Input Only When the monitor is dis...

Page 17: ...Menu Key Soft power key at same time The monitor will show an OSD Lock Out message showing time as OSD TURN OFF setting and the message be show again by any button also any button exit this message bu...

Page 18: ...Monitor please perform the following steps 1 Make sure the power indicator on the LCD Monitor is ON all connections are secured and the system is running on the correct timing Refer to Chapter 3 for i...

Page 19: ...37 60 720x400 31 469 900 720 108 18 54 28 322 VGA 400 TEXT 70 087 449 400 2 12 35 832x624 49 725 1152 832 64 32 224 57 2832 APPLE MAC 800 74 55 667 624 3 1 39 800x600 35 156 1024 800 72 24 128 36 SVG...

Page 20: ...80 119 Red BLKing 60Hz 59 883 1080 1050 6 3 21 1680x1050 65 29 2240 1680 176 104 280 146 25 60Hz 59 954 1089 1050 6 3 30 1680x1050 82 306 2272 1680 176 120 296 187 75Hz 74 892 1099 1050 6 3 40 1600x1...

Page 21: ...wings touch screen drivers warranty information and access to Planar s Technical Library for online troubleshooting To speak with Planar Customer Support please have your model and serial number avail...

Page 22: ...8pm Eastern Time M F 5am 5pm Pacific Time Europe and Asia Pacific Support Tel 358 9 420 01 Hours M F 7 00am 4pm CET 2009 Planar Systems Inc 01 09 Planar is a registered trademark of Planar Systems In...

Reviews: