m52L Installation Guide
105
Note:
Minimal screw penetration is 10mm and maximum is 15mm.
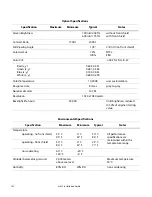
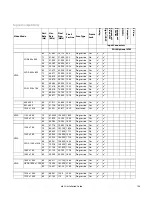
Minimum Sync and Blanking Specifications
Parameter
Symbol
Minimum
Horizontal Setting
Maximum
Horizontal Setting
Sync pulse width
Tsy
2 pixels
2 lines
Sync back porch width
Tbp
20 pixels
64 (tri-level sync)
3 lines
Sync front porch width
Tfp
1% of HRes
1 line
Note:
The following illustration shows the timing characteristics for the Input Sync, Front
Porch and Back Porch.
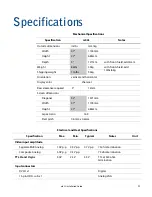
Mounting Specifications
Specification
End to End, Longer
Side of Display
End to End, Shorter
Side of Display
Screw Size
VESA MIS-F
600mm
200mm
M8
Summary of Contents for m52L
Page 1: ...m52L Installation Guide ...
Page 2: ......
Page 4: ...iv m52L Installation Guide ...
Page 10: ...Table of Contents vi m52L Installation Guide ...
Page 20: ...Tools and Other Things You May Need 10 m52L Installation Guide ...
Page 28: ...Lining Up Screen Brackets 18 m52L Installation Guide ...
Page 32: ...About UPS Supplies 22 m52L Installation Guide ...
Page 58: ...Sharpness Settings 48 m52L Installation Guide ...
Page 60: ...Picture Position 50 m52L Installation Guide ...
Page 64: ...Using Planar s Big PictureTM 54 m52L Installation Guide ...
Page 68: ...Viewport Adjustment 58 m52L Installation Guide ...
Page 74: ...Tips for Color Balancing 64 m52L Installation Guide ...
Page 88: ...Turn Backlight Off With No Source and DPMS Delay 78 m52L Installation Guide ...
Page 92: ...Controlling With RS232 Commands 82 m52L Installation Guide ...
Page 102: ...Deleting a Configuration 92 m52L Installation Guide ...
Page 106: ...Where to Go From Here 96 m52L Installation Guide ...
Page 116: ...106 m52L Installation Guide ...
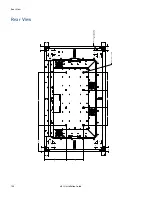
Page 118: ...Rear View 108 m52L Installation Guide Rear View 0 3 0 7 5 7 2 7 21 0 00 3 ...
Page 120: ...110 m52L Installation Guide ...

