Installing the Video Input Module (VIM)
m52L Installation Guide
13
Installing the Video Input Module (VIM)
If you receive the optional Video Input Module (VIM) separately, use the following
instructions to install it.
Your VIM shipment should include the following items:
• VIM board
• New VIM cover
• Mounting screws
• Washers/nuts
• Ground strap
1
Attach the ground strap to your wrist and the chassis.
2
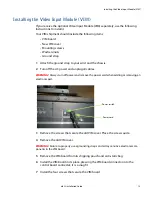
Turn off the AC power and unplug all cables.
WARNING!
Always turn off power and remove the power cord when adding or removing an
electronic part.
3
Remove the screws that secure the old VIM cover. Place the screws aside.
4
Remove the old VIM cover.
WARNING!
Failure to properly use a grounding strap can destroy sensitive electronic com-
ponents in the VIM board.
5
Remove the VIM board from its shipping pouch and anti-static bag.
6
Install the VIM board in its place, pressing the VIM board connector into the
control board connector; it is a snug fit.
7
Install the four screws that secure the VIM board.
Power switch
Power cord
Summary of Contents for m52L
Page 1: ...m52L Installation Guide ...
Page 2: ......
Page 4: ...iv m52L Installation Guide ...
Page 10: ...Table of Contents vi m52L Installation Guide ...
Page 20: ...Tools and Other Things You May Need 10 m52L Installation Guide ...
Page 28: ...Lining Up Screen Brackets 18 m52L Installation Guide ...
Page 32: ...About UPS Supplies 22 m52L Installation Guide ...
Page 58: ...Sharpness Settings 48 m52L Installation Guide ...
Page 60: ...Picture Position 50 m52L Installation Guide ...
Page 64: ...Using Planar s Big PictureTM 54 m52L Installation Guide ...
Page 68: ...Viewport Adjustment 58 m52L Installation Guide ...
Page 74: ...Tips for Color Balancing 64 m52L Installation Guide ...
Page 88: ...Turn Backlight Off With No Source and DPMS Delay 78 m52L Installation Guide ...
Page 92: ...Controlling With RS232 Commands 82 m52L Installation Guide ...
Page 102: ...Deleting a Configuration 92 m52L Installation Guide ...
Page 106: ...Where to Go From Here 96 m52L Installation Guide ...
Page 116: ...106 m52L Installation Guide ...
Page 118: ...Rear View 108 m52L Installation Guide Rear View 0 3 0 7 5 7 2 7 21 0 00 3 ...
Page 120: ...110 m52L Installation Guide ...


