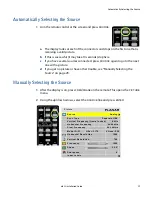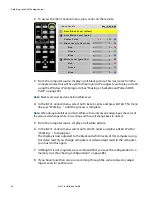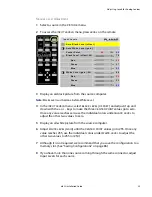
RS232 Communication
m52L Installation Guide
23
RS232 Communication
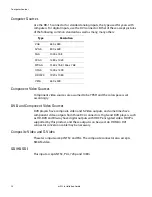
RS232 control is not necessary for operation, but is a convenient way to control
displays from a computer at a distance. If your installation will not use RS232 control,
skip this section.
Everything you can do with the remote, you can do with RS232 commands. Plus, you
can send inquiries to the displays and find out the current settings and values.
RS232 connections are made with cables like Ethernet straight-through cables. This is
the common type of LAN connection cable sometimes called a Cat-5 cable.
Note:
It is important that the RJ45 cable has “straight through” connections. To see if your
cable is correct, hold the two connectors side by side with the ends pointing in the same
direction. Look at the sides of the connectors that do not have the locking tab. If the colors of
the wires inside the connectors are the same left to right for both connectors, this is the
correct cable. If the colors are mirror reflections of each other, it is the wrong type.
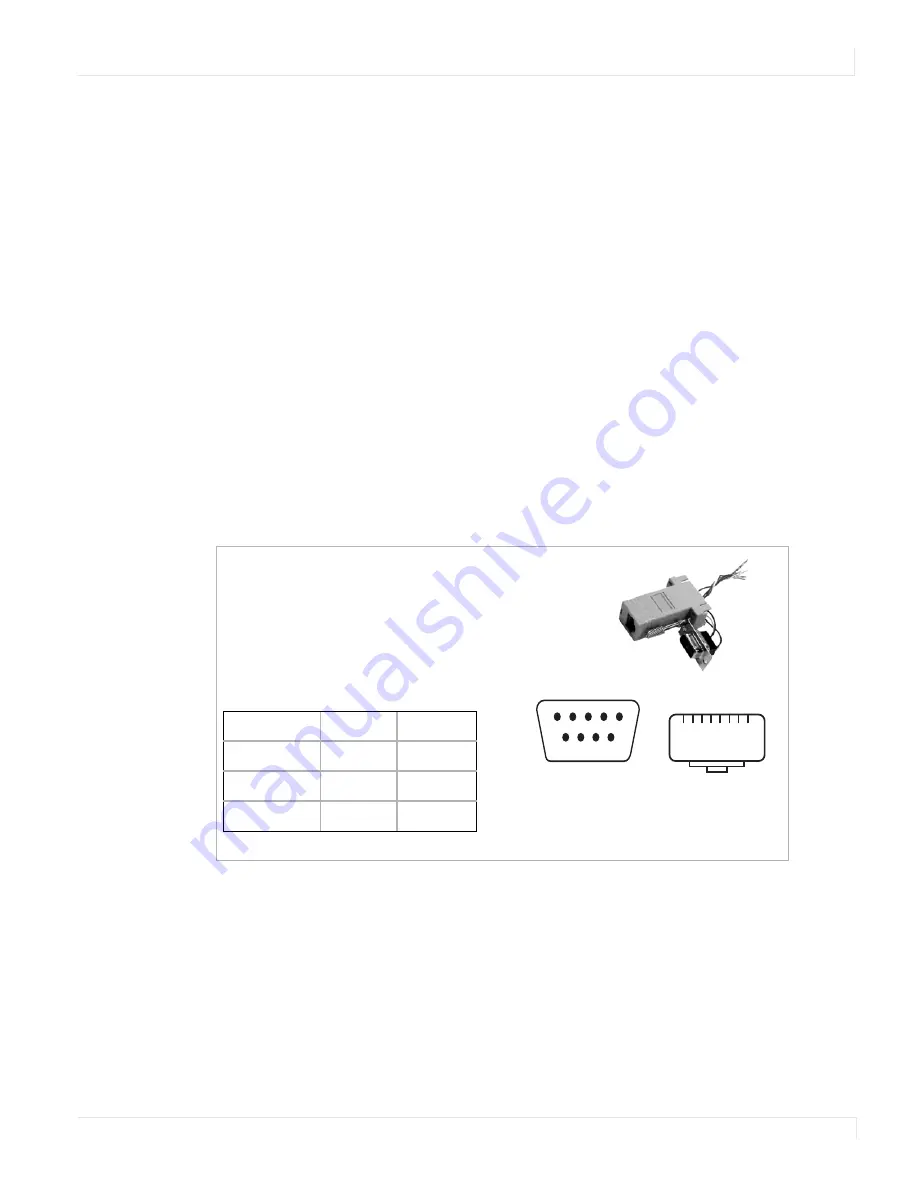
You need an adapter to go from the computer’s 9-pin serial output connector to an
RJ45 connector. Adapters of this type are readily available at computer and
electronic supply stores. The adapter is not pre-wired. You will make three
connections inside the adapter, as described below.
5
4
3
2
1
6
7
8
9
1
8
Wiring the adapter
To go from 9-pin D-sub serial connector on
the back of the computer to an RJ45
connector, use a standard RJ45-to-9-pin
adapter. Wire it internally as shown. The
wiring shown for this adapter is correct for
straight-through
cables. Straight-through
cables are wired 1-to-1, 2-to-2, etc.
RJ45
9-pin
Yellow wire
6
3
Black wire
3
2
Green wire
5
5
RJ45 looking into
the socket
Summary of Contents for m52L
Page 1: ...m52L Installation Guide ...
Page 2: ......
Page 4: ...iv m52L Installation Guide ...
Page 10: ...Table of Contents vi m52L Installation Guide ...
Page 20: ...Tools and Other Things You May Need 10 m52L Installation Guide ...
Page 28: ...Lining Up Screen Brackets 18 m52L Installation Guide ...
Page 32: ...About UPS Supplies 22 m52L Installation Guide ...
Page 58: ...Sharpness Settings 48 m52L Installation Guide ...
Page 60: ...Picture Position 50 m52L Installation Guide ...
Page 64: ...Using Planar s Big PictureTM 54 m52L Installation Guide ...
Page 68: ...Viewport Adjustment 58 m52L Installation Guide ...
Page 74: ...Tips for Color Balancing 64 m52L Installation Guide ...
Page 88: ...Turn Backlight Off With No Source and DPMS Delay 78 m52L Installation Guide ...
Page 92: ...Controlling With RS232 Commands 82 m52L Installation Guide ...
Page 102: ...Deleting a Configuration 92 m52L Installation Guide ...
Page 106: ...Where to Go From Here 96 m52L Installation Guide ...
Page 116: ...106 m52L Installation Guide ...
Page 118: ...Rear View 108 m52L Installation Guide Rear View 0 3 0 7 5 7 2 7 21 0 00 3 ...
Page 120: ...110 m52L Installation Guide ...


