Scale Mode Settings
m52L Installation Guide
43
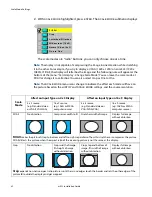
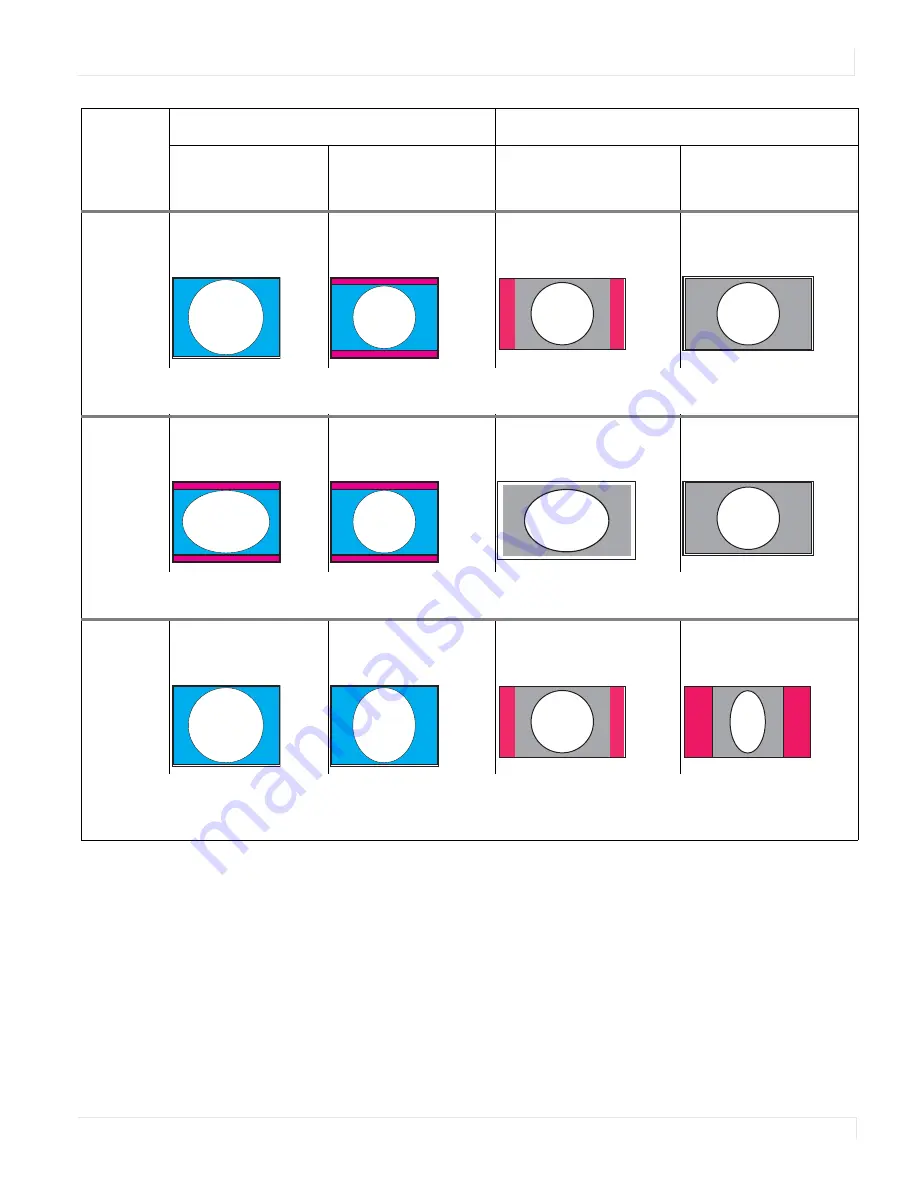
Letterbox/
Pillarbox
No distortion
Fits width of image
without distortion; fills
height with border
Fits height of image
without distortion; fills
width with border
Displays full image
without distortion
Letterbox/Pillarbox
expands the picture until the first edges (top-bottom or left-right) touch the border of the
display, and then fills in the other sides with a solid color.
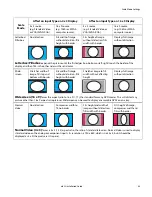
Wide-
screen
Stretches width of
image; fills top and
bottom with border
Fits width of image
without distortion; fills
height with border
Stretches image to fill
width without affecting
height
Displays full image
without distortion
Widescreen (16 x 9)
forces the aspect ratio to 16 x 9 (1.77), the standard for many DVD movies. This will distort any
picture other than 16 x 9 aspect ratio pictures. Widescreen can be used to display anamorphic DVDs on an array.
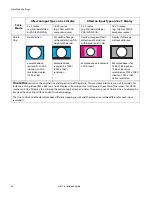
Normal
Video
No distortion
Compresses width to
fit, no border
Fits height and width of
image without distortion;
fills width with border
Fits height of image,
compresses width and
fills with border
.
Normal Video (4 x 3)
forces a 4 x 3 (1.33) aspect ratio, the ratio of standard television. Normal Video is used to display
standard video on the analog or component inputs. Its resolution is 720 x 640, which is not 4 x 3, but it should be
displayed as 4 x 3 (the pixels aren't square).
Scale
Mode
Affect on Input Type on 4 x 3 Display
Affect on Input Type on 16 x 9 Display
4 x 3 source
(e.g. Standard Video
or VGA/SVGA/XGA)
16 x 9 source
(e.g. 1080i or WXGA
computer source)
4 x 3 source
(e.g. Standard Video or
VGA/SVGA/XGA)
16 x 9 source
(e.g. 1080i or WXGA
computer source)
Summary of Contents for m52L
Page 1: ...m52L Installation Guide ...
Page 2: ......
Page 4: ...iv m52L Installation Guide ...
Page 10: ...Table of Contents vi m52L Installation Guide ...
Page 20: ...Tools and Other Things You May Need 10 m52L Installation Guide ...
Page 28: ...Lining Up Screen Brackets 18 m52L Installation Guide ...
Page 32: ...About UPS Supplies 22 m52L Installation Guide ...
Page 58: ...Sharpness Settings 48 m52L Installation Guide ...
Page 60: ...Picture Position 50 m52L Installation Guide ...
Page 64: ...Using Planar s Big PictureTM 54 m52L Installation Guide ...
Page 68: ...Viewport Adjustment 58 m52L Installation Guide ...
Page 74: ...Tips for Color Balancing 64 m52L Installation Guide ...
Page 88: ...Turn Backlight Off With No Source and DPMS Delay 78 m52L Installation Guide ...
Page 92: ...Controlling With RS232 Commands 82 m52L Installation Guide ...
Page 102: ...Deleting a Configuration 92 m52L Installation Guide ...
Page 106: ...Where to Go From Here 96 m52L Installation Guide ...
Page 116: ...106 m52L Installation Guide ...
Page 118: ...Rear View 108 m52L Installation Guide Rear View 0 3 0 7 5 7 2 7 21 0 00 3 ...
Page 120: ...110 m52L Installation Guide ...

