Changing the Name of the Memory Slot
m52L Installation Guide
87
Note:
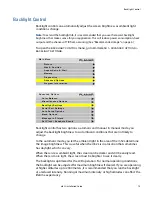
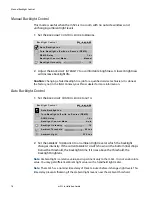
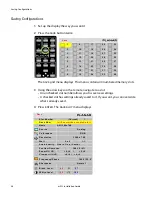
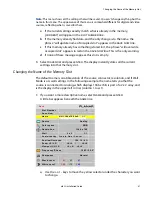
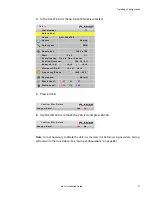
This menu shows all the settings that will be saved. You can’t change anything but the
name in this menu. The appearance of this menu is somewhat different for digital and video
sources, reflecting what is saved for them.
a
If the current settings exactly match what is already in the memory,
(
CURRENT
)
will appear in the
SLOT
NUMBER
line.
b
If the memory already had data, and the only change is to the name, the
phrase “will update name of occupied slot” appears in the
SAVE
NOW
line.
c
If this memory already has something stored in it, the phrase “will overwrite
occupied slot” appears in red on the
SAVE
NOW
line. This is the only warning.
d
If none of these messages appear, this slot is empty.
5
Select
SAVE
NOW
and press
ENTER
. The display instantly stores all the current
settings into that memory slot.
Changing the Name of the Memory Slot
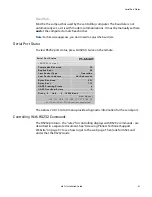
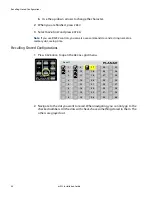
The default name is an abbreviation of the source connector, resolution, and if Wall
Mode is on, wall settings. In the following example, the name tells you that the
source is connected to Analog, which displays 1366 x 768, is part of a 2 x 2 array, and
is the display in the upper left corner (column 1, row 1).
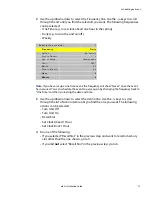
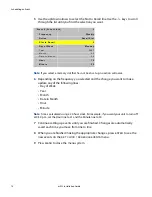
1
If you want a more descriptive name, select
NAME
and press
ENTER
.
A little bar appears beneath the
NAME
line.
a
Use the + or - keys to move the yellow selector under the character you want
to change.
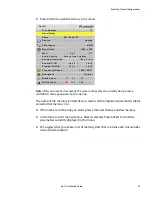
S a v e
S l o t N u m b e r
1
S a v e N o w
N a m e
A N 1 3 6 6 x 7 6 8 2 x 2
1 : 1
S o u r c e
A n a l o g
C o l o r s pa c e
R G B
R e s o l u t i o n
1 3 6 6 x 7 6 8
Wa l l
2 x 2
1 : 1
S c a l e / J u s t i f y
O n e t o O n e / C e n t e r
P o s t i o n / O v e r s c a n
1 6 8 , 1 9 / 0 %
Z o o m U L / L R
+ 0 , + 0
/ + 0 , + 0
Vi e w p o r t U L / L R
+ 0 , + 0 / + 0 , + 0
F r e q u e n c y / P h a s e
1 6 0 2 / 2 2 . 5 °
S h a r p n e s s
N o r m a l
B l a c k L e v e l
6 3
5 5
5 7
W h i t e L e v e l
1 6 6
1 7 0
1 6 9
Summary of Contents for m52L
Page 1: ...m52L Installation Guide ...
Page 2: ......
Page 4: ...iv m52L Installation Guide ...
Page 10: ...Table of Contents vi m52L Installation Guide ...
Page 20: ...Tools and Other Things You May Need 10 m52L Installation Guide ...
Page 28: ...Lining Up Screen Brackets 18 m52L Installation Guide ...
Page 32: ...About UPS Supplies 22 m52L Installation Guide ...
Page 58: ...Sharpness Settings 48 m52L Installation Guide ...
Page 60: ...Picture Position 50 m52L Installation Guide ...
Page 64: ...Using Planar s Big PictureTM 54 m52L Installation Guide ...
Page 68: ...Viewport Adjustment 58 m52L Installation Guide ...
Page 74: ...Tips for Color Balancing 64 m52L Installation Guide ...
Page 88: ...Turn Backlight Off With No Source and DPMS Delay 78 m52L Installation Guide ...
Page 92: ...Controlling With RS232 Commands 82 m52L Installation Guide ...
Page 102: ...Deleting a Configuration 92 m52L Installation Guide ...
Page 106: ...Where to Go From Here 96 m52L Installation Guide ...
Page 116: ...106 m52L Installation Guide ...
Page 118: ...Rear View 108 m52L Installation Guide Rear View 0 3 0 7 5 7 2 7 21 0 00 3 ...
Page 120: ...110 m52L Installation Guide ...

