background image


Planar Plasma


Product Features 


  42 inch Plasma Display:

 With 720p native resolution (1024 x 768).


 D-Sub 15 VGA Input: 

Allow user to connect computer to the plasma and use the 

plasma as computer monitor.


 Input Signals 


Component Video (YCbCr/ YPbPr)   


Composite Video 


S-Video 


RGB (D-Sub 15pin) 


Digital DVI 


RS232 Communication Port (D-Sub 9pin) 


TV Tuner Built-in   

 16:9  Enhancement: 

Widescreen technology that maximizes picture quality when 

playing widescreen enhanced video. 

 Channel Memory:

 Allow user to add and remove channel according to the personal 

preference.  

 Picture in Picture: 

User may simultaneously watch two images from different video 

sources 

 Parental Control:

 V-Chip technology allows parents to block unsuitable programming 

for under age viewers. 

  Digital Visual Interface (DVI):

 To accommodate a DVI-D interfaces. 

  3-D Digital Comb Filter:

 Enhances color purity of Composite Video and S-video input 

sources, reducing cross-color artifacts like dot crawl and moiré. 

 Color Temperature:

 With 3 options of user selectable color temperature allowing user 

to optimize the image.   

 TV Tuner Built-in:

 Built-in NTSC tuner to receive conventional analog broadcasts; 

de-interlacing circuit with 3:2 pull down converts interlaced analog sources to 
progressive-scan display, significantly improving picture quality 

  Wide Viewing Angle: 

Over 160 degrees (horizontal and vertical) viewing angle. 

  Built-in TV and TV Audio Out:

 Outputs TV video/audio signal to other device. 

 Built-in Speakers: 

Stereo speakers built-in with 2 watts per channel. 

 Built-in Screen Move: 

Screen move feature to decease chances of screen burn.   


(1)


an optional set-top HDTV receiver box is required to receive digital signals 

Package Content 


Summary of Contents for PDP42HD

Page 1: ......

Page 2: ...n programs may also be copyrighted and any unauthorized recording in whole or in part may be in violation of these rights FCC Information The FCC Radio Interface Statement includes the following warning This equipment has been tested and found to comply with the limits for a Class B digital device pursuant to part 15 of the FCC rules These limits are designed to provide reasonable protection again...

Page 3: ... outlet 10 Protect the power cord from being walked on or pinched particularly at plugs convenience receptacles and the point where they exit from the apparatus 11 Only use attachments accessories specified by the manufacturer 12 Use only with a cart stand tripod bracket or table sprecified by the manufacturer or sold with the apparatus When a cart is used use caution when moving the cart apparatu...

Page 4: ...Audio Connection 11 External Speaker 12 Other Connections 13 Front Panel Controls 14 Remote Control 15 Overview 15 Inserting Batteries 16 Precaution 16 Using the Remote Control 17 OSD Functions 19 OSD Menu Overview 19 OSD Menu Operation 20 Parental Control 25 V Chip Setup 25 Change Password 28 Close Caption 29 Using Close Caption 29 Specification 30 Factory Setting 31 Troubleshooting 32 Care and M...

Page 5: ...ewers Digital Visual Interface DVI To accommodate a DVI D interfaces 3 D Digital Comb Filter Enhances color purity of Composite Video and S video input sources reducing cross color artifacts like dot crawl and moiré Color Temperature With 3 options of user selectable color temperature allowing user to optimize the image TV Tuner Built in Built in NTSC tuner to receive conventional analog broadcast...

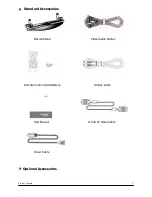
Page 6: ...Planar Plasma 5 Standard Accessories Plasma Stand Video Audio Cables Remote Control AAA Battery S Video cable User Manual D Sub 15 Video Cable Power Cable Optional Accessories ...

Page 7: ...6 Planar Plasma Speakers Speaker Stand Wallmount ...

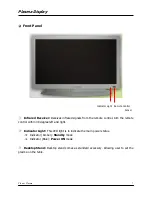
Page 8: ...ed signals from the remote control Aim the remote control within 30 degree left and right Indicator Light This LED light is to indicate the main power status Indicator Amber Standby mode Indicator Blue Power ON mode Desktop Stand Desktop stand comes as standard accessory Allowing user to set the plasma on the table ...

Page 9: ...er and Video Audio Out Main Power Switch Master power switch to switch the plasma between Power Off mode and Standby mode Power Input Jack Power source for the plasma External Speaker Line Out Allow user to connect external speakers to the plasma Video Audio Connection Interface Power Input Jack External Speaker Line Out Main Power Switch ...

Page 10: ... switch power supply accepts input of 110 V 240 V Use only UL approved power cord with proper grounding Main Power Switch Turn the switch to on position before initial use of the plasma unit Indicate on and Ο indicate off When the switch is on the LED will turn to amber color ...

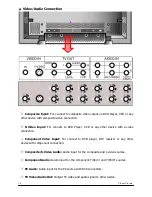
Page 11: ...ther device with s video connection Component Video Input For connect to DVD player DTV receiver or any other device with component connection Composite S Video Audio Audio input for the composite and s video sources Component Audio Audio input for the component Y Cb Cr and Y Pb Pr sources PC Audio Audio input for the PC source with RCA connectors TV Video Audio Out Output TV video and audio signa...

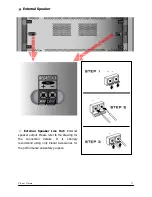
Page 12: ...1 External Speaker External Speaker Line Out External speaker output Please refer to the drawing for the connection details It is strongly recommend using only Planar Accessories for the performance and safety purpose ...

Page 13: ... for high quality PC Display D Sub Regular analog RGB connection for PC Use D Sub 15 VGA Cable RF RF inputs that connects to the antenna cable box or CATV cable Supports NTSC TV system with 125 channels receivable RS 232 D Sub 9 Serial port for communication between PC and plasma ...

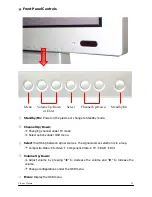
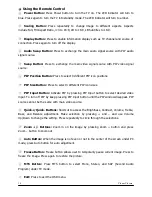
Page 14: ...enu Select Switching between signal sources The signal sources selection is in a loop Composite Video ÆS Video Æ Component VideoÆ TV Æ RGB Æ DVI Volume Up Down Adjust volume by pressing W to decrease the volume and X to increase the volume Change configurations under the OSD menu Menu Display the OSD menu Menu Volume Up Down or Enter Channel Up Down Standby On Select ...

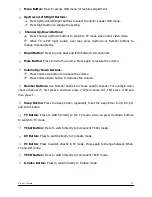
Page 15: ...y size 8 PIP Input Button Activate picture in picture and select picture in picture signal input source 9 Quick Quick Buttons Shortcut for access the plasma features 10 Zoom Buttons Zoom in and out on the image 11 Auto Button Auto adjusts 12 Freeze Button Pause the image 13 MTS Button Switch between Mono Stereo and SAP 14 Exit Button Exit the OSD menu or displayed information 15 Menu Button OSD me...

Page 16: ...e remote control Insert two AA batteries by matching and sign on both battery to the diagram inside the remote control battery compartment Replace the battery back cover Precaution Always make sure to have the batteries install correctly Incorrectly installation can cause damage to the remote control Always replace the batteries in pair Do not mix the old battery with new ones Be sure to use the s...

Page 17: ... select 3 different PIP icon sizes PIP Input Button Activate PIP by pressing PIP Input button to select desired video input To turn off PIP by keep pressing PIP Input button until the PIP window disappear PIP source cannot be the same with main video source Quick Quick Buttons Shortcut to access the Brightness Contrast Volume Treble Bass and Balance adjustment Make selection by pressing and and us...

Page 18: ... button to increase the volume Press Volume Down button to decrease the volume Number Buttons Use Number buttons to choose specific channel For example when choose channel 27 first press 2 and then press 7 When choose 101 first press 100 and then press 1 Sleep Button Press the sleep button repeatedly to set the sleep timer to 30 60 90 and 120 minutes TV Button Press to switch directly to the TV mo...

Page 19: ...log RGA Video Format PIP Set TV Channel Setup Audio Video Mode Display AV System Audio Language and Color Temperature OSD Information Video Format Reset Format AUTO Mute Language OSD Position Format Brightness NTSC M Volume Color Temperature OSD Timeout Advance Contrast NTSC Japan Treble Red OSD Background PIP Set Saturation PAL Bass Green System Reset TV Channel Setup Hue SECAM Balance Blue Sharp...

Page 20: ...tton repeatedly until correct icon is being selected To access the options simply press Up Down button until reaches the correct option and then use Right buttons to change the settings 2 Display PC Video The Reset function works the same under both PC mode and Video mode Use Reset function to recall factory setting When under PC mode user may adjust Brightness Contrast H V Position Phase Clock an...

Page 21: ...But it is recommend to set at Auto for auto detect When under Video mode user may choose different aspect ratios including Full Fill Aspect Ratio 4 3 to 16 9 LB to 16 9 LB Subtitles to 16 9 4 Audio PC Video Audio functions and selections are identical for both PC mode and Video mode User may adjust Mute Volume Treble Bass and Balance from this menu Most of the functions in this menu can also acces...

Page 22: ... German Italian Spanish Portuguese Netherlands Traditional Chinese Simplified Chinese and Japanese For the image color user may adjust the luminance of R G B colors and color temperature When selecting Warm for the Color Temperature R G B colors will be disabled 6 OSD Window Settings PC Video This menu is for adjusting the OSD menu window User may change OSD Position OSD Timeout OSD Background and...

Page 23: ...mode feature to protect the screen Under move screen mode user may select from 3 different types including off mode1 and mode2 For move screen time item user may adjust the length of time between the images from 5 to 255 sec 8 Video Information PC Video This menu will also allow user to enter advance mode and change DPMS setting When under Video mode user can set up V Chip and Closed Caption ...

Page 24: ...y PIP Video Source and PIP Video Format When under Video mode Signal Format will display Main Signal Source Main Signal Format and PIP Video Source 10 PIP Settings PC Video This menu is for changing setting of PIP mode for both PC and Video User may change setting for PIP Size Source Position Brightness Contrast and Saturation ...

Page 25: ...d channel including broadcast TV system and cable TV system After the channel being saved user may use the Up Down button on the remote to search through channel It also allow user add or erase channels according to the user preference To add or erase the channel select channel edit first and enter channel number by the Number Buttons After entering the number select Channel Add Erase and then use...

Page 26: ...ion page and then select V Chip Press Right button and then key in 111111 to enter the password change screen Enter new password and then exit out of the menu If you have forgotten your password you may use reminder code 123456 to go into Change Password Number screen After setting up the password go back into V Chip menu with the new password It will display the following items TV Guidelines MPAA...

Page 27: ...defined ratings for Television TV Y Young children TV Y7 Children 7 and over TV G General audience TV PG Parental guidance TV 14 Viewers 14 and over TV MA Mature audience TV Guidelines is for the younger ages When restricting the younger ages the elder ages will also have certain level of restrictions Setting LSV for TV PG the TV 14 and TV MA are also restrict to LSV or the system will automatical...

Page 28: ...tical encoding program To set up MPAA first to select MPAA Rating and then press Up Down button to select the rating to change Then choose either Show the rating or Block the rating To turn off all of the ratings just select MPAA NR No Rating press Right key to change to Rating Off Then all the ratings will set to Show G General audience no restrictions PG Parental guidance suggested PG 13 Parents...

Page 29: ...tal password in enter new password number And then confirm the password by enter same password again V Chip Lock When going into the restricted channel V Chip will activate and turn the screen into blurred and blank The message Excessive Rating will display on the screen For normally programming the user will need to press the Number button to go into other channels ...

Page 30: ...mily video types also serve for Close Caption function And similarly for business videotapes you can check cc mark on the box of video type Using Close Caption Select Closed Caption in the OSD Menu by pressing Menu key on remote and select video information page Use Up Down Button to Select Close Caption and then use Vol X button to choose between TV CC1 CC2 TT1 TT2 and XDS Use CC Background to ch...

Page 31: ...r freeze the image Screen Aspect Ratio Control 16 9 or 4 3 HDTV Signal Compatible Accepts HDTV signals up to 1080i when using external DTV receiver OSD Language 9 Languages TV Tuner NTSC TV System 125 Channel Receivable Supports Close Caption Supports V Chip TV Rating Function Interface AV Input S Video Composite Video Audio L R Component Video Y Cb Cr Y Pb Pr AV Output Composite Video Audio out P...

Page 32: ...75 00 31 50 VESA 4 640 480 37 86 72 81 31 50 VESA 5 800 600 35 16 56 25 36 00 VESA 6 800 600 37 90 60 32 40 00 VESA 7 800 600 46 90 75 00 49 50 VESA 8 800 600 48 08 72 19 50 00 VESA 9 1024 768 48 363 60 004 65 00 VESA 10 1024 768 56 476 70 069 75 00 VESA 11 1024 768 60 023 75 029 78 75 VESA 12 1280 1024 63 981 60 020 108 0 VESA When the input signal exceeds the unit s allowable range it will displ...

Page 33: ...d Make sure the AC adapter is properly inserted in the Power outlet Reception other than those of broadcasting stations can be considered Make sure the input mode is set to TV Make sure the main power switch of the main unit is on There is no picture from AV Make sure the BLACK LEVEL is properly adjusted Fluorescent lamp may have reached the end of service life Make sure the video I P terminal is ...

Page 34: ... the Brightness button Check PICTURE and BLACK LEVEL adjustment Fluorescent lamp may have reached the end of service life Remote control does not work Check the batteries of the remote controller Make sure the remote sensor window is not under strong fluorescent lighting Fluorescent lamp may have reached the end of service life The picture is not sharp The reception may be weak The state of the br...

Page 35: ...ted There may be interference from automobiles trains high voltage lines neon light etc There may be interference between the antenna cable and power cable Try possible them further apart There are stripes on the screen or colors fade Is the unit receiving interference from other devices Transmission antennas of radio broadcasting station and transmission antennas of amateur radio and cellular pho...

Page 36: ... PDP Cleaning for Cover and Remote Use soft cotton cloth When the dust gets on cover or remote control dipping cloth in diluted neutral detergent dry it to wipe out the dust do not let liquid goes inside of unit and then clean it with cloth Cleaning for Screen The surface of screen is fragile glass do not clean with sharp objects for fear of scraping glass Do not heavily press or slap glass to pre...

Reviews: