background image


 7

Adjusting the Monitor’s Display  

OSD Main Menu 

To access the OSD main menu, press the OSD Menu


button. Use the Function 

Select buttons to scroll between the OSD main menu options. The option that is 
currently selected is highlighted.  
Pressing the OSD Menu button causes the following screen to appear: 


Figure 2-2: The OSD Main Menu 

The Auto Adjust Option 

Choosing the Auto Adjust option lets the monitor determine and select the settings 
that are most appropriate for your system requirements.  


With the Auto Adjust icon selected, press the Adjustment control 
button to apply the monitor settings automatically. 

The Monitor-Control Option 

The Monitor-Control option allows you to adjust the LCD monitor’s display settings. 


Press Adjustment control button


to display the submenu. 


Summary of Contents for PE150M

Page 1: ......

Page 2: ... Upright Position and Adjusting Monitor Angle 4 Connecting AC Power Video and Audio Cable 5 Power Management System 5 CHAPTER 2 6 LCD Monitor Control Panel 6 Adjusting the Monitor s Display 7 OSD Main Menu 7 Hot Key Buttons for Quick Adjustment of Monitor Settings 11 APPENDIX A 12 TFT LCD Monitor Specifications 12 APPENDIX B 13 APPENDIX C 14 Troubleshooting Procedures 14 PREFACE 16 ...

Page 3: ......

Page 4: ... PE150M LCD monitor VGA Cable With 15 Pin D Sub VGA Connector Male Power cord User s Manual CD Manual Landing Strip 1 5M Stereo Jack audio cable If you find that any of these items are missing or appear damaged contact your dealer immediately Do not throw away the packing material or shipping carton in case you need to ship or store the LCD monitor in the future ...

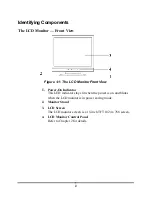
Page 5: ...ront View 1 Power On Indicator This LED indicator stays lit when the power is on and blinks when the LCD monitor is in power saving mode 2 Monitor Stand 3 LCD Screen The LCD monitor screen is a 15 inch TFT 1024 x 768 screen 4 LCD Monitor Control Panel Refer to Chapter 2 for details ...

Page 6: ...io Line in optional 2 AC Power Jack 3 VGA Cable With 15 Pin D Sub VGA Connector Male 4 VESA interface It can be mounted to VESA arm 75mm pitch Adjusting the Tilting Angle The LCD monitor s angle settings range from 5 to 25 See Figure 1 3 Figure 1 3 Tilting the Monitor ...

Page 7: ...4 Raising Your Monitor to an Upright Position and Adjusting Monitor Angle ...

Page 8: ...ur LCD monitor to the computer Figure 1 4 The AC Adapter Power Management System The LCD monitor complies with the VESA DPMS power management proposal When the LCD monitor is in power saving mode or detects an incorrect timing the monitor screen will be blank and the power LED indicator starts blinking ...

Page 9: ...button 2 Adjustment Control Buttons These two buttons allow you to adjust the selected control functions in the OSD 3 Function Select Buttons These two buttons allow you to select the control functions in the OSD Press either button to scroll through the main menu and submenu items 4 Power Switch Push the power switch to turn the monitor on and off This switch is also a hot key button to close the...

Page 10: ...reen to appear Figure 2 2 The OSD Main Menu The Auto Adjust Option Choosing the Auto Adjust option lets the monitor determine and select the settings that are most appropriate for your system requirements With the Auto Adjust icon selected press the Adjustment control button to apply the monitor settings automatically The Monitor Control Option The Monitor Control option allows you to adjust the L...

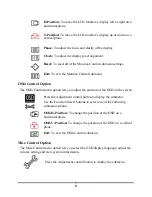
Page 11: ...trol menu option lets you adjust the position of the OSD on the screen Press the Adjustment control button to display the submenu Use the Function Select buttons to select one of the following submenu options OSD H Position To change the position of the OSD on a horizontal plane OSD V Position To change the position of the OSD on a vertical plane Exit To exit the OSD Control submenu Misc Control O...

Page 12: ...color of the LCD monitor s display Press the Adjustment control button to display the submenu Contrast To adjust the contrast level of the display screen Brightness To adjust the light level on the display screen Color To select the LCD monitor s color display The available options are 9300 6500 and User Selecting the user option lets you make individual adjustments to the R G and B items R G and ...

Page 13: ...d there is no Video signal received the following message will be displayed 2 Signal out of monitor s supported range Then the frequency range of the signal is out of the monitor s specifications the display will show messages in the following manner Case 1 The incoming frame rate is higher than 75Hz In this case the screen display may not be centered and a warning message appears Case 2 The incom...

Page 14: ... displayed 2 Contrast adjust hot key button Press the 1st adjustment control button to allow you to adjust the contrast of the display directly A small Contrast OSD is also displayed 3 Adjust volume hot key button Press 2nd adjustment control button to allow you to adjust the audio volume directly A small Audio Volume OSD is also displayed To close the small OSD windows press the power switch ...

Page 15: ...On Screen Display OSD OSD Exit Display Area mm 304 1 x 228 1 15 diagonal Display Colors 16 7M Video Interface VGA Compatible Analog RGB Composite Sync Scanning Frequency H V Hz 24 62K 50 75Hz Response Time TR TF typ 20ms 5ms Contrast Ratio 500 1 Brightness 300 cd m 2 Viewing Angle H V 140 130 Power Management Meets VESA DPMS Power Consumption ON OFF W 30 2 5Max Dimensions WxHxD mm 344x332x200 Net ...

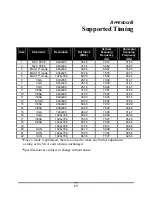
Page 16: ...A 640x480 31 50 72 81 37 86 10 VESA 640x480 31 50 75 00 37 50 11 VESA 800x600 36 00 56 25 35 16 12 SVGA 800x600 40 00 60 32 37 88 13 VESA 800x600 50 00 72 19 48 08 14 VESA 800x600 49 50 75 00 46 88 15 VGA 720x400 28 32 70 09 31 47 16 XGA 1024x768 65 00 60 00 48 36 17 VESA 1024x768 75 00 70 07 56 48 18 VESA 1024x768 78 75 75 03 60 02 19 1024x768 71 64 66 13 53 96 20 SUN 1024x768 64 13 59 98 48 29 2...

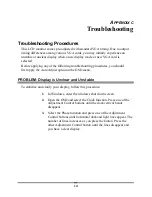
Page 17: ...to Adjust option in the OSD menu PROBLEM Display is Unclear and Unstable To stabilize and clarify your display follow this procedure 1 In Windows enter the windows shut down screen 2 Open the OSD and select the Clock function Press one of the Adjustment Control buttons until the dark vertical bands disappear 3 Select the Phase function and press one of the Adjustment Control buttons until horizont...

Page 18: ...ay press the other Adjustment Control button several times 3 If step 2 doesn t work connect your PC system to another external CRT If your PC system functions properly with a CRT monitor but it does not function with the LCD monitor and the LCD monitor s power LED is blinking the output timing of the PC s VGA card may be out of the LCD s synchronous range Change to one of the alternate modes liste...

Page 19: ...ipment generates uses and can radiate radio frequency energy and if not installed and used in accordance with the instructions may cause harmful inerference to radio communications However there is no guarantee that interference will not occur in a particular installation If this equipment does cause harmful interference to radio or television reception which can be determined by turning the equip...

Page 20: ... Interference Statement Warning This is a Class B product In a domestic environment this product may cause radio interference in which case the user may be required to take adequate measures Canadian Doc Notice For Class B Computing Devices This digital apparatus does not exceed the Class B limits for radio noise emissions from digital apparatus as set out in the Radio Interference Regulation of t...

Page 21: ... unit by yourself You may void the warranty Servicing of any nature should be performed only by an authorized technician 6 Safe storage of the LCD monitor is in a range of minus 20 to plus 60 degrees Celsius Storing your LCD monitor outside this range could result in permanent damage 7 Immediately unplug your monitor and call an authorized technician when The power or monitor to PC signal cord is ...

Page 22: ...6200506511 01 04 ...

Reviews: