background image

User’s Manual 

Connecting AC Power 

Please refer to the following instructions for connecting AC power to the 
LCD Monitor. 

Plug the female end of the power cable into the AC-adapter.  Plug 
the male end of the power cord into a wall socket.  The plug on the 
power cable will vary according to the electrical standard in your 
area.  Please refer to 

Figure 1-4


Figure 1-4: The AC Adapter 

Connect the power connector of the adapter into the jack of the LCD 
Monitor.  The AC power jack is located at the rear of the Monitor 
near the D-sub VGA connector.  Please refer to 

Figure 1-5


Figure 1-5: Connecting Power to the LCD Monitor 

Summary of Contents for PL120

Page 1: ...PL120 PT120 ...

Page 2: ......

Page 3: ...yright 2001 All Rights Reserved FCC Compliance Statement This device complies with part 15 of the FCC Rules Opeartion is subject to the following two conditions 1 this device may not cause harmful interference and 2 this device must accept any interference received including interference that may cause undesired operation FCC WARNING This equipment has been tested and found to comply with the limi...

Page 4: ...he dealer or an experienced radio TV technician for help Caution To comply with the limits for an FCC Class B computing device always use the shielded signal cord supplied with this unit The Federal Communications Commission warns that changes or modifications of the unit not expressly approved by the party responsible for compliance could void the user s authority to operate the equipment CE mark...

Page 5: ...refully This manual should be retained for future use 1 To clean the LCD Monitor screen first make sure the Monitor is in the power off mode Unplug the Monitor from its power source before cleaning it Do not spray liquid cleaners directly onto the unit Stand away from the LCD Monitor and spray cleaning solution onto a rag Without applying excessive pressure clean the screen with the slightly dampe...

Page 6: ...is range could result in permanent damage 7 If any of the following occurs immediately unplug your Monitor and call an authorized technician The power or Monitor to PC signal cord is frayed or damaged Liquid has been spilled onto the Monitor or it has been exposed to rain The Monitor has been dropped or the case has been damaged 8 Only with use of supplied adaptor in case of loss or replacement co...

Page 7: ...ew 4 Adjusting the Viewing Angle 5 Connecting AC Power 6 Connecting Video 7 Connecting the Optional Touch Screen 7 Power Management System 8 CHAPTER 2 9 The LCD Monitor s Display Controls 9 Adjusting the Monitor s Display 9 OSD Main Menu 9 APPENDIX A 13 TFT LCD Monitor Specifications 13 APPENDIX B 15 Timing for Model PL120 PT120 SVGA Resolution 15 APPENDIX C 16 Troubleshooting Procedures 16 ...
Page 8: ......

Page 9: ...s an LCD panel that produces a clear display with low radiation emission limiting health concerns With its low power consumption the LCD Monitor helps you reduce your power bill Unpacking Before you unpack your LCD Monitor prepare a suitable workspace for your LCD Monitor and computer You need a stable level and clean surface near a wall outlet Even though the LCD Monitor uses very little power yo...

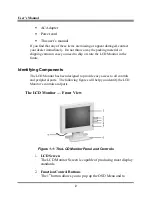
Page 10: ...onitor in the future Identifying Components The LCD Monitor has been designed to provide easy access to all controls and peripheral ports The following figures will help you identify the LCD Monitor s controls and ports The LCD Monitor Front View Figure 1 1 The LCD Monitor Panel and Controls 1 LCD Screen The LCD Monitor Screen is capable of producing most display standards 2 Function Control Butto...

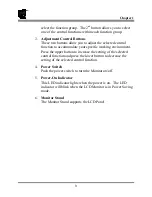
Page 11: ...cific working environment Press the upper button to increase the setting of the selected control function and press the lower button to decrease the setting of the selected control function 4 Power Switch Push the power switch to turn the Monitor on off 5 Power On Indicator This LED indicator lights when the power is on The LED indicator will blink when the LCD Monitor is in Power Saving mode 6 Mo...

Page 12: ...monitor to your PC s VGA card 2 DC Power Jack Connect the AC adapter cable to this jack 3 RS232 Connector for Optional Touch Screen Connect this RS232 connector to your PC s RS232 9 pin serial port connector to use the Optional Touch Screen A RS232 cable is provided with the Optional Touch Screen package To install the Optional Touch Screen driver please contact your local distributor ...

Page 13: ...etting range is from 5 to 25 Please see Figure 1 3 Figure 1 3 Angle Settings When positioning the equipment make sure that the main ports and sockets are easily accessible Do not place your LCD Monitor close to a heat source Do not place the LCD Monitor in direct sunlight or near a window Moisture and direct sunlight exposure can be seriously damaging ...

Page 14: ... power cord into a wall socket The plug on the power cable will vary according to the electrical standard in your area Please refer to Figure 1 4 Figure 1 4 The AC Adapter Connect the power connector of the adapter into the jack of the LCD Monitor The AC power jack is located at the rear of the Monitor near the D sub VGA connector Please refer to Figure 1 5 Figure 1 5 Connecting Power to the LCD M...

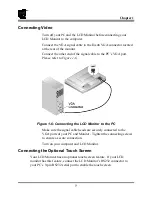
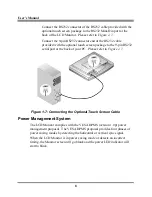
Page 15: ... Figure 1 6 Figure 1 6 Connecting the LCD Monitor to the PC Make sure the signal cable heads are securely connected to the VGA ports of your PC and Monitor Tighten the connecting screws to ensure a secure connection Turn on your computer and LCD Monitor Connecting the Optional Touch Screen Your LCD Monitor has an optional touch screen feature If your LCD monitor has this feature connect the LCD Mo...

Page 16: ...9 pin RS232 serial port at the back of your PC Please refer to Figure 1 7 Figure 1 7 Connecting the Optional Touch Screen Cable Power Management System The LCD Monitor complies with the VESA DPMS version 1 0p power management proposal The VESA DPMS proposal provides four phases of power saving modes by detecting the horizontal or vertical sync signal When the LCD Monitor is in power saving mode or...

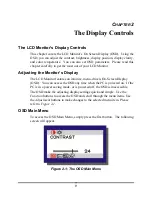
Page 17: ... The LCD Monitor features an intuitive menu driven On Screen Display OSD You can access the OSD any time when the PC is powered on If the PC is in a power saving mode or is powered off the OSD is inaccessible The OSD make the adjusting display settings quick and simple Use the Function buttons to access the OSD and scroll through the menu items Use the Adjustment buttons to make changes to the sel...

Page 18: ...ISCELLANEOUS To control OSD positions and to give the information of Display modes COLOR TEMP To control the display colors Basic Setting CONTRAST To adjust the contrast level of the display BRIGHTNESS To adjust the brightness level of the display POSITION AUTO ADJUST To automatically adjust the picture quality and alignment It is recommended that you use this function in the windows This function...

Page 19: ...R The OSD Menu display time can be set at 5 10 15 20 25 or 30 seconds INFORMATION Select this function to display the resolution and frame rate of the current screen display as well as the firmware version of the monitor LANGUAGE To set different Languages for the OSD Menu RESET To set the function parameters in the Miscellaneous Menu to the default Menu COLOR TEMP Menu COLOR TEMP Press the Adjust...

Page 20: ...dendum When the frequency range is out of the monitor s specifications the display will show the following message on two cases Case 1 The incoming resolution is lower than or equal to 800x600 In this case the screen display will not be centered and a warning message appears Case 2 The incoming resolution is higher than 800x600 In this case the video data will be turned off and a warning message a...

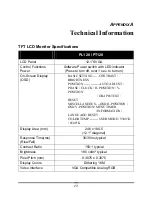
Page 21: ...ST BRIGHTNESS POSITION AUTO ADJUST PHASE CLOCK H POSITION V POSITION GRAPH TEXT RESET MISCELLANEOUS OSD H POSITION OSD V POSITION MENU TIMER INFORMATION LANGUAGE RESET COLOR TEMP USER MODE 9300 K 6500 K Display Area mm 246 x 184 5 12 1 diagonal Response Time ms Rise Fall 30 30ms typical Contrast Ratio 150 1 typical Brightness 180 cd m2 typical Pixel Pitch mm 0 3075 x 0 3075 Display Colors Ditherin...

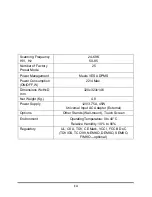
Page 22: ...F W 22 4 Max Dimensions WxHxD mm 320x323x146 Net Weight Kg 4 8 Power Supply 12V 3 75A 45W Universal Input AC Adapter External Options Other Stands Wall mount Touch Screen Environment Operating Temperature 0 to 40 C Relative Humidity 10 to 90 Regulatory UL CSA TÜV CE Mark VCCI FCC B DoC TÜV GS TCO 99 NEMKO DEMKO SEMKO FIMKO optional ...

Page 23: ... VGA 640x350 25 18 70 09 31 47 5 VESA 640x350 31 5 85 08 37 86 6 VGA 640x400 25 18 70 09 31 47 7 VESA 640x400 31 50 85 08 37 86 8 VGA 640x480 25 18 59 94 31 47 9 VESA 640x480 31 50 72 81 37 86 10 VESA 640x480 31 50 75 00 37 50 11 VESA 640x480 36 00 85 01 43 27 12 VESA 800x600 36 00 56 25 35 16 13 SVGA 800x600 40 00 60 32 37 88 14 VESA 800x600 50 00 72 19 48 08 15 VESA 800x600 49 50 75 00 46 88 16 ...

Page 24: ...wn screen After you have the wallpaper loaded open the OSD and select the Clock function Press the top or bottom Adjustment Control button and continue pressing the button until you see vertical dark and light lines across the screen When you can see distinct light and dark vertical bands stop pressing the Adjustment Control button Now press the opposite top or bottom Adjustment Control button The...

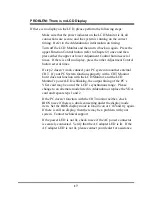
Page 25: ...ernal CRT If your PC System functions properly with a CRT Monitor but it does not function with the LCD Monitor and the LCD Monitor s power LED is blinking the output timing of the PC s VGA card may be out of the LCD s synchronous range Please change to an alternate mode listed in Addendum or replace the VGA card and repeat steps 1 and 2 If the PC doesn t function with the CRT monitor neither chec...

Page 26: ...6200506910 01 04 ...

Reviews: