background image


Contents 


Preface................................................................................................................ 2


Installation........................................................................................................... 4


Unpacking

............................................................................................................................................ 4


Connecting the LCD Monitor and Base

................................................................................................ 5


Viewing Angle Adjustment

.................................................................................................................. 5


Detaching LCD Monitor from Its Stand

................................................................................................ 5


Interface for Arm Applications

............................................................................................................. 5


Connecting the Display

........................................................................................................................ 5


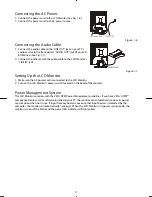
Connecting the AC Power

.................................................................................................................... 6


Connecting the Audio Cable

................................................................................................................ 6


Setting Up the LCD Monitor

................................................................................................................. 6


Power Management System

................................................................................................................ 6


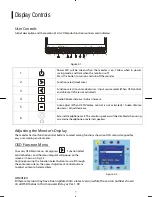
Display Controls.................................................................................................. 7


User Controls

........................................................................................................................................ 7


Adjusting the Monitor's Display

........................................................................................................... 7


Function Description

............................................................................................................................ 8


OSD Lock Out Function

........................................................................................................................ 9


Technical Information ....................................................................................... 10


Specifications

......................................................................................................................................10


Standard Timing Table

........................................................................................................................12


Troubleshooting................................................................................................ 12


Product Registration and Technical Support.................................................... 14


Summary of Contents for PL1910M

Page 1: ......

Page 2: ...Connecting the Display 5 Connecting the AC Power 6 Connecting the Audio Cable 6 Setting Up the LCD Monitor 6 Power Management System 6 Display Controls 7 User Controls 7 Adjusting the Monitor s Displ...

Page 3: ...rencewillnot occurinaparticularinstallation Ifthisequipmentdoescauseharmfulinterferencetoradioortelevisionreception whichcanbe determinedbyturningtheequipmentoffandon theuserisencouragedtotrytocorrect...

Page 4: ...or 4 140 F Storing the LCD Monitor outside this range could result in permanent damage 6 If any of the following occurs immediately unplug your monitor and call an authorized technician Monitor to PC...

Page 5: ...ent airflow Though the LCD Monitor uses very little power some ventilation is needed to ensure that the Monitor does not become too hot After you unpack the LCD Monitor make sure that the following it...

Page 6: ...ase Figure 1 3 Interface for Arm Applications Before installing to mounting device please refer to Fig 1 3 The rear of this LCD display has four integrated 4 mm 0 7 pitches threaded nuts as well as fo...

Page 7: ...ke sure the AC power cord is connected to the LCD Monitor 2 Turn on the LCD Monitor s power switch located on the bezel of the monitor Power Management System This LCD Monitor complies with the VESA D...

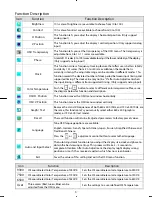
Page 8: ...se 6 External Headphone Jack The monitor speakers will be disabled when using an external headphone or external speakers Adjusting the Monitor s Display The monitor has four function control buttons t...

Page 9: ...on OSD H Position This function moves the OSD menu window horizontally OSD V Position This function moves the OSD menu window vertically Graph Text Because the H and V Frequencies of both 640 x 400 70...

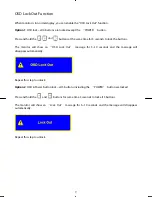
Page 10: ...he buttons The monitor will show an OSD Lock Out message for 5 10 seconds and the message will disappear automatically Repeat this step to unlock Option 2 OSD Power button lock all 5 buttons including...

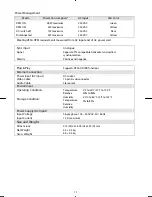
Page 11: ...Input Signal Input Impedance Polarity Amplitude Multi mode Supported Analogue RGB 0 7Vp p 75 Ohm 2 Positive Negative 0 0 7 0 05 Vp Horizontal Frequency 30 80 kHz Vertical Frequency 56 75 Hz Control P...

Page 12: ...zation Polarity Positive and negative Plug Play Supports VESA DDC2B functions External Connection Power Input AC input AC socket Video Cable 15 pin D sub connector Audio Cable Stereo Jack Environment...

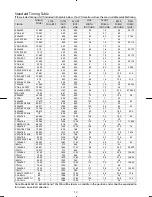
Page 13: ...GA 56 25 625 600 2 1 22 800x600 37 879 1056 800 128 40 88 40 VESA 600 60Hz 60 317 628 600 4 1 23 800x600 48 077 1040 800 120 56 64 50 VESA 600 72Hz 72 188 666 600 6 37 23 800x600 46 875 1056 800 80 16...

Page 14: ...is no picture on LCD Monitor If there s no picture on the LCD Monitor please perform the following steps 1 Make sure the power indicator on the LCD Monitor is ON all connections are secured and the s...

Page 15: ...nitor touch screen or other Planar products visit our online store at www PlanarOnline com or find other stores who carry Planar products at http www planar com howtobuy Technical Support Visit Planar...

Page 16: ......

Reviews: