background image


 19  

OPERATING INSTRUCTIONS (cont.) 


Analog  

N/A 

Select input signal 
from analog source 
(D-Sub)  


Input 
Select  


Digital  

N/A 

Select input signal 
from digital source 
(DVI)  


H. Position

Adjust the horizontal 
position of the OSD.

50 

V. Position

Adjust the 
verticalposition of the 
OSD. 

50 


OSD 

Setup 


OSD 
Timeout 

Adjust the OSD 
timeout. 

10 

English 

N/A 

Set OSD display 
language to English.

Deutsch 

N/A 

Set OSD display 
language to German.

Français 

N/A 

Set OSD display 
language to French.

Español 

N/A 

Set OSD display 
language to Spain. 

Italiano 

N/A 

Set OSD display 
language to Italian. 


Langua

ge 


体中文


N/A 

Set OSD display 
language to 
Simplified Chinese. 


Select the 
language you 
like 


Informat

ion 


Information

N/A 

Show the resolution, 
H/V frequency and 
input port of current 
iput timing. 

N/A 

Yes 

N/A 

Clear each old status 
of Auto-configuration.

N/A 


Reset 


No 

N/A 

Do not execute reset, 
return to main menu.

N/A 


Exit 


N/A N/A 

Exit 

OSD  N/A 

Summary of Contents for PL2010

Page 1: ...PL2010...

Page 2: ...1...

Page 3: ...ghts are reserved No part of this document may be reproduced translated to another language or stored in a retrieval system or transmitted by any means electronic mechanical photocopying recording or...

Page 4: ...3...

Page 5: ...ource 10 Connecting the cables 12 Tilt Adjustment 12 Attaching the optional wall mount arm not included 13 Preparing to install the optional sall mount arm not included 14 Operating Instructions Exter...

Page 6: ...or relocate the receiving antenna 2 Increase the separation between the equipment and receiver 3 Connect the equipment into an outlet on a circuit different from that to which the receiver is connect...

Page 7: ...source indicated on the label If you are not sure of the type of power supplied to your home consult your dealer or local power company z The monitor is equipped with a three pronged grounded plug a p...

Page 8: ...n below it s native resolution which may slightly degrage the display quality Therefore it is highly recommended to operate the monitor at it s native resolution of 1600 x 1200 60Hz OTHER NOTES The sc...

Page 9: ...lay capabilities The communication channel is defined in two levels DDC1 and DDC2B The DDC1 is a unidirectional data channel from the display to the host that continuously transmits EDID information T...

Page 10: ...ution 1600 X 1200 60Hz Ergonomic Design with Tilt Adjustable Stand Space Saving Compact Case Design The product package should include the following items Monitor Base Landing Strip User Manual Power...

Page 11: ...oride flexible cord according to IEC 60227 designation H05VV F 3G 0 75mm2 or H05VVH2 F2 3G 0 75mm2 shall be used As an alternate a flexible cord of synthetic rubber according to IEC 60245 designation...

Page 12: ...nd to a nearby AC outlet 2 Connect one end of the 15 pin D Sub cable to the back of the monitor and connect the other end to the computer s D Sub port 3 Optional Requires a video card with DVI port Co...

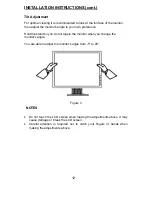
Page 13: ...preference Hold the stand so you do not topple the monitor when you change the monitor s angle You are able to adjust the monitor s angle from 5 to 20 Figure 3 NOTES Do not touch the LCD screen when...

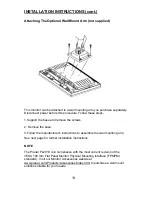
Page 14: ...screws 2 Remove the base 3 Follow the manufacturer s instructions to assemble the wall mounting arm See next page for further installation instructions NOTE The Planar PL2010 is in compliance with th...

Page 15: ...wall mounting arm 1 Place the wall mounting arm onto the back of the monitor Line up the holes of the arm with the holes in the back of the monitor 2 Insert the 4 screws into the holes and tighten 3...

Page 16: ...Exit 6 Power Indicator 3 Brightness 7 Power Button 4 Contrast Power Button Press this button to turn the monitor ON or OFF MENU ENTER Active OSD menu or function adjust confirm Brightness Adjust brigh...

Page 17: ...Adjustment function is used to set the HPos VPos Clock and Focus Power Indicator Green Power On mode Amber Standby mode Osd Lock Function Option 1 OSD lock all 5 buttons are locked except the POWER bu...

Page 18: ...ed press the MENU button to activate it If the function selected has a sub menu press or again to navigate through the sub menu functions Once the desired function is highlighted press MENU button to...

Page 19: ...to Config Image Setup Clock Adjust picture Clock to reduce Vertical Line noise Do Auto Config H Position Adjust the horizontal position of the picture Do Auto Config Image Position V Position Adjust t...

Page 20: ...nguage to English Deutsch N A Set OSD display language to German Fran ais N A Set OSD display language to French Espa ol N A Set OSD display language to Spain Italiano N A Set OSD display language to...

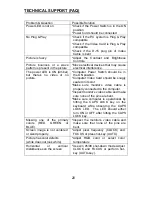
Page 21: ...Card should be snugly seated in its slot Make sure monitor s video cable is properly connected to the computer Inspect monitor s video cable and make sure none of the pins are bent Make sure computer...

Page 22: ...he picture has horizontal disturbances in light picture For FOCUS and CLOCK adjustment use dot pattern or win 95 98 shut down mode pattern CABLE NOT CONNECTED 1 Check that the signal cable is properly...

Page 23: ...MHz Max Resolution 1600 x 1200 60Hz Plug Play VESA DDC1 2BTM ON Mode 60 W EPA ENERGY STAR OFF Mode 2W D Sub 15pin Input Connector DVI 24pin Analog 0 7Vp p standard 75 OHM Positive Input Video Signal D...

Page 24: ...n External Controls Functions Contrast Brightness Focus Clock H Position V Position C1 Color C2 Color SRGB Color temperature User Input signal Selection OSD position OSD timeout Language Display infor...

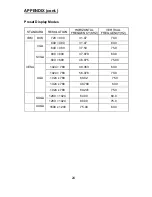
Page 25: ...M DOS 720 400 31 47 70 0 640 480 31 47 60 0 VGA 640 480 37 50 75 0 800 600 37 879 60 0 SVGA 800 600 46 875 75 00 1024 768 48 363 60 0 1024 768 56 476 70 0 1024 x 768 60 02 75 0 1024 x 768 48 780 60 0...

Page 26: ...DDC Serial clock 8 GND B 24 Pin Color Display Signal Cable PIN NO DESCRIPTION PI N NO DESCRIPTION 1 TMDS Data 2 13 TMDS Data 3 2 TMDS Data 2 14 5V Power 3 TMDS Data 2 4 Shield 15 Ground for 5V 4 TMDS...

Page 27: ...41G200N935 1C6275...

Reviews: