background image


16

Product Registration and Technical Support 


Register Your Planar Products Today 

Thank you choosing Planar. To assure you receive all the benefits of your Planar product 

and services, register your Planar product today. 

Visit our website to register your product at 

http://www.planar.com/support/product_registration.html 


Cables, Replacement Lamps, Accessories 

To find cables, replacement lamps and accessories for your Planar projector, LCD monitor, 

touch screen or other Planar products visit our online store at www.PlanarOnline.com or find 

other stores who carry Planar products at http://www.planar.com/howtobuy 


Technical Support 

Visit Planar at http://www.planar.com/support for product registration, operations manuals, 

touch screen drivers, warranty information and access to Planar's Technical Library for online 

troubleshooting. 

To speak with Planar Customer Support please have you model and serial number available 

and dial: 


Planar Support 

Tel: 1-866-PLANAR1 (866-752-6271) or +1 503-748-5799 outside the US. 

Hours: 24 hours a day, 7 days a week. 

Toll or long distance charges may apply.


Summary of Contents for PL2010MW

Page 1: ...PL2010MW...

Page 2: ...y 5 Connecting the AC Power 6 Connecting the Audio Cable 6 Connect the other end of the audio cable to the LCD Monitor s LINE IN jack 6 Setting Up the LCD Monitor 6 Power Management System 6 Display C...

Page 3: ...tion Ifthisequipmentdoescauseharmfulinterferencetoradioortelevisionreception whichcanbe determinedbyturningtheequipmentoffandon theuserisencouragedtotrytocorrecttheinterferencebyoneormoreof thefollowi...

Page 4: ...om with a room temperature of 20 60 C or 4 140 F Storing the LCD Monitor outside this range could result in permanent damage 6 If any of the following occurs immediately unplug your monitor and call a...

Page 5: ...ent airflow Though the LCD Monitor uses very little power some ventilation is needed to ensure that the Monitor does not become too hot After you unpack the LCD Monitor make sure that the following it...

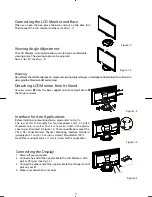
Page 6: ...the hinge to release 2 1 Figure 1 3 Interface for Arm Applications Before installing to mounting device please refer to Fig 1 3 The rear of this LCD display has four integrated 4 mm 0 7 pitch threade...

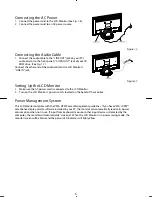
Page 7: ...sure the AC power cord is connected to the LCD Monitor 2 Turn on the LCD Monitor s power switch located on the bezel of the monitor Power Management System This LCD Monitor complies with the VESA DPM...

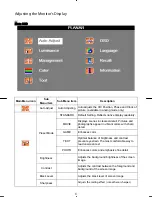
Page 8: ...de be dark when monitor in off mode 2 Power ON OFF switch Push to power on or power off Toggle switch 3 Menu Enter Shows main OSD menu Enter key in OSD menu Audio mute and unmute must activate Volume...

Page 9: ...res and photographs appear in vibrant colors with sharp detail GAME Enhances color TEXT Optimal balance of brightness and contrast prevent eyestrain The most comfortable way to read onscreen text Pres...

Page 10: ...d green blue intensity Volume Adjusts the volume of audio D SUB Selects input signal to analog D Sub Input Select DVI Selects input signal to digital DVI Resolution Select 720 640x400 70hz 1360 1280 1...

Page 11: ...ons The monitor will show an OSD Lock out message for 5 seconds and the message will disappear automatically Repeat this step to unlock Option 2 OSD Power button lock all 5 buttons including the POWER...

Page 12: ...ut LED Color DPM On 35 W maximum 240 VAC Green DPM Off 1 W maximum 240 VAC Yellow DC switch Off 1 W maximum 240 VAC Dark Disconnected 1 W maximum 240 VAC Meeting VESA DPM requirements measured from AC...

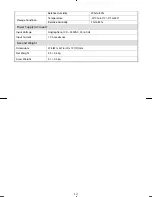
Page 13: ...C 4 F to140 Storage Condition Relative Humidity 5 to 85 Power Supply AC Input Input Voltage Single phase 100 240VAC 50 60 Hz Input Current 1 0 A maximum Size and Weight Dimensions 476 W x 347 6 H x 19...

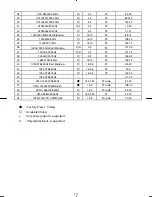
Page 14: ...15 VESA 1024 768 60Hz 4 3 PC 65 00 16 VESA 1024 768 70Hz 4 3 PC 75 00 17 VESA 1024 768 75Hz 4 3 PC 78 75 18 VESA 1152 864 75Hz 4 3 PC 108 00 19 SUN 1152 900 66Hz 3 84 3 PC 94 50 20 VESA 1280 960 60Hz...

Page 15: ...z d 4 3 PC 121 75 48 1400x1050 75Hz 4 3 PC 156 00 49 1680X1050 60Hz 16 10 PC 146 25 50 1280 X768 60Hz Red Blanking 16 9 6 PC 68 25 51 1280 X768 60Hz 16 9 6 PC 79 5 52 1280 X768 75Hz 16 9 6 PC 102 25 5...

Page 16: ...is no picture on LCD Monitor If there s no picture on the LCD Monitor please perform the following steps 1 Make sure the power indicator on the LCD Monitor is ON all connections are secured and the s...

Page 17: ...nitor touch screen or other Planar products visit our online store at www PlanarOnline com or find other stores who carry Planar products at http www planar com howtobuy Technical Support Visit Planar...

Page 18: ......

Reviews: