background image

11

Making Screen Adjustments

IMPORTANT: Allow the display to stabilize for at least 30 minutes before making 
screen adjustments.

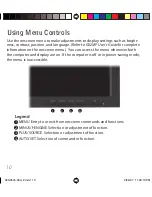
Logic of onscreen menu controls

To make screen adjustments

1  Press the MENU button. The main menu appears.

2  Use the MINUS or PLUS button to access a control.

3  Press the AUTO/SET button when the icon you want is highlighted.

4  Use the MINUS or PLUS buttons to adjust the value. (Use the AUTO/SET button 

to select other submenu items, then use the MINUS or PLUS button to adjust.)

5  Press the MENU button once to return to the main menu. Press the button 

twice to exit the menu.

020-0545-00A_2.indd   11

020-0545-00A_2.indd   11

2/22/07   11:09:13 PM

2/22/07   11:09:13 PM

Summary of Contents for Planar GX2MP

Page 1: ...GX2MP Display Quick Reference Windows XP Windows 2000 020 0545 00A_2 indd 1 020 0545 00A_2 indd 1 2 22 07 11 09 03 PM 2 22 07 11 09 03 PM...

Page 2: ...ponents For more product information go to www planar com support Warning Avertissement Avvertenza Advertencia Warnung Wear an antistatic heel or wrist strap when installing the controller and display...

Page 3: ...the original packaging materials for storage and shipping Unpacking the Display Video card Power cord Display driver CD and Calibration software CD DVI cable Also included VGA cable GX2MP display 020...

Page 4: ...mode or video signal not being received 2 3 1 The input power and video ports are located on the back of the unit See page 5 A USB hub is built into the desktop stand You can change the brightness of...

Page 5: ...ts DVI D digital video signal Requires DVI connector 3 VGA input port Supports analog video signal Requires an HD15 D sub or VGA connector 4 USB B port 5 USB A port 2 Back view 020 0545 00A_2 indd 5 0...

Page 6: ...s slot 5 Insert the controller into the slot align the connector pins and press the board down until it is firmly seated 6 Secure the mounting bracket 7 Reattach the computer cover and the peripherals...

Page 7: ...rt 1 to install the first display of a dual setup or to install a single display 4 Plug the other end of the power cord into a grounded outlet 5 Repeat steps 1 to 4 to connect a second display to the...

Page 8: ...agreement The installation starts 5 Follow the onscreen instructions to complete the installation Planar recommends that you select the Express installation option 6 When the Setup complete message a...

Page 9: ...for portrait mode 5 Click Yes to save the setting Then click OK until to return to the desktop To use a dual display configuration 1 Right click the desktop and select Properties Settings 2 Click the...

Page 10: ...enu whenever both the computer and display are on If the computer is off or in power saving mode the menu is inaccessible Legend 1 MENU Entry to or exit from onscreen commands and functions 2 MINUS f...

Page 11: ...e MINUS or PLUS button to access a control 3 Press the AUTO SET button when the icon you want is highlighted 4 Use the MINUS or PLUS buttons to adjust the value Use the AUTO SET button to select other...

Page 12: ...sed of properly Recycle or dispose of in accordance with local state or federal laws For more information contact the Electronic Industries Alliance at www eiae org For lamp specific disposal informat...

Page 13: ...unit to reach room temperature before powering on Avoid sudden temperature changes in the environment as this may cause condensation which damages the display Never remove the back cover or disassembl...

Page 14: ...creen gently with the dampened cloth 4 Use a dry clean lint free cotton cloth to wipe off the residue Cleaning the LCD Screen Do not spray or use acetone toluene or harsh solvents on the display case...

Page 15: ...China Compulsory Certification Japan Voluntary Control Council for Interference Korea Ministry of Information and Communications Germany T V Rheinland GS Mark Warranty Standard 3 year repair and retu...

Page 16: ...nd 358 9 420 01 phone 358 9 420 0200 fax vertrieb planar com medicalsupport planar com www planar com Asia Pacific Sales Planar Systems Inc 388 Nan Jing West Road Suite 3905 Shanghai Peoples Republic...

Reviews: