background image

4


 First Setup

Congratulations on your purchase of this high performance TFT LED monitor. 

This TFT LED Monitor comes with the following accessories : 

 LED Monitor

 Power Cable

 VGA Cable (15 pin)

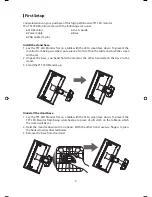
Install the stand base 

1.  Lay the TFT LED Monitor flat on a table with the LED screen face down. To prevent the 

monitor from being scratched, put a piece of soft cloth on the table on which the screen 

will be set. 

2.  Unpack the base, one hand hold the monitor, the other hand attach the base to the 

stand. 

3.  Stand the TFT LED Monitor up. 


Uninstall the stand base

1.  Lay the TFT LED Monitor flat on a table with the LED screen face down. To prevent the 

TFT LED Monitor from being scratched, put a piece of soft cloth on the table on which 

the screen will be set. 

2.  Hold the monitor down with one hand.  With the other hand, use two fingers to press 

the hooks down as directed below. 

3.  Remove the base from the stand. 


 User's Guide

 Base 

planar PL2210W manual.indd   4

2011/6/21   下午3:17

Summary of Contents for PLL1910W

Page 1: ...www planar com USER S GUIDE LCD Monitor PLL1910W C M Y CM MY CY CMY K...

Page 2: ...of the Product 5 Rear View of the Product 6 Quick Installation 7 Basic Operation 8 Advanced Operation OSD Menu 10 Supporting Timing Modes 12 Technical Information 13 Wall mount instruction 14 Care and...

Page 3: ...is TFT LED Monitor does cause serious interference to radio or television reception resetting the TFT LED Monitor may determine it Moreover users are encouraged to correct interference by doing one or...

Page 4: ...only be repaired by a qualified technician Do not remove the TFT LED Monitor cabinet There is high voltage parts inside that may cause electric shock to human bodies even when the power cord is disco...

Page 5: ...on the table on which the screen will be set 2 Unpack the base one hand hold the monitor the other hand attach the base to the stand 3 Stand the TFT LED Monitor up Uninstall the stand base 1 Lay the...

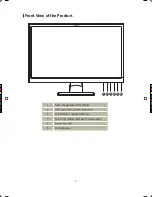
Page 6: ...5 Front View of the Product 1 Auto Image Adjust OSD Exits 2 3 Scroll Down Adjust Decrease 4 Scroll UP Adjust Increase Source select 5 6 LED Indicator 2 1 3 4 5 6 C M Y CM MY CY MY K L1910W...

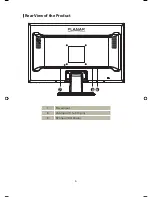
Page 7: ...6 Rear View of the Product 7 Power Input 8 VGA Input D Sub 15 pin 9 DVI Input DVI 24 pin 7 8 9...

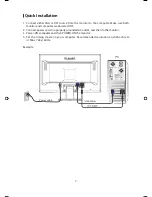
Page 8: ...sure both monitor and computer are powered OFF 2 Connect power cord to a properly grounded AC outlet and then to the monitor 3 Power ON computer and then POWER ON the monitor 4 Set the timing mode on...

Page 9: ...in OSD menu Exits from OSD menu Menu Displays main menu and enter items in OSD menu Select the desired item when in OSD menu Select the desired item when in OSD menu Selects between VGA or DVI mode w...

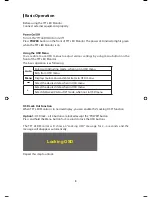
Page 10: ...e POWER button are locked Press and hold the button for 5 seconds to lock all 5 buttons The TFT LED Monitor will show an Locking Power Button message for 2 4 seconds and the message will disappear aut...

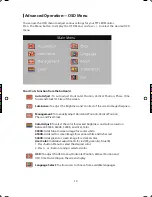
Page 11: ...Phase and Pixel Clock Color Adjust To select the color for desired brightness and color saturation between 9300K 6500K 5400K and User Color 9300K Adds blue to screen image for cooler white 6500K Adds...

Page 12: ...ngs You can select recall color only or recall all settings Information To display the information regarding the current input signal coming from the graphic card in your computer Aspect Ratio To sele...

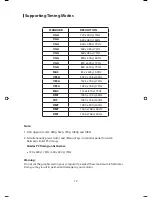
Page 13: ...0 72Hz x 480 75Hz x 600 60Hz 800 600 72Hz 800 0 75Hz 832 24 60Hz 1 x 768 60Hz 1024 768 70Hz 1024 768 75Hz 1152 870 75Hz 1280 20 60Hz 68 60Hz 1 00 60Hz 1360 x 60Hz 1366 x 60Hz 720 x 400 70Hz 640 x 480...

Page 14: ...andby Mode 1 Watt Displayable Resolution 1366 x 768 max Vertical Frequency 60Hz max Pixel Dimension 0 3 x 0 3 mm LED Display Color 16 7M Tilt 5 0 2 20 2 Active Display Area 409 8 mm x 230 4 mm Tempera...

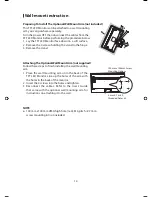
Page 15: ...taching The Optional Wall Mount Arm not supplied Follow these steps to finish installing the wall mounting arm 1 Place the wall mounting arm onto the back of the TFT LED Monitor Line up the holes of t...

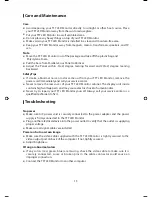
Page 16: ...remove the rear cover of your TFT LED Monitor cabinet The display unit inside contains high voltage parts and may cause electric shock to human bodies Never try to repair your TFT LED Monitor yoursel...

Page 17: ...ch screen or other Planar products visit our online store at www PlanarOnline com or find other stores who carry Planar products at http www planar com howtobuy Technical Support Visit Planar at http...

Page 18: ...E030055099 2011 C M Y CM MY CY CMY K...

Reviews: