background image

Operation Instructions 


Thank you for purchasing this edge-lit LED LCD monitor, a high-resolution multi-scan color LED 
LCD monitor.Please read this guide thoroughly before installation. 

 
FCC RADIO FREQUENCY INTERFERENCE STATEMENT   
WARNING: (FOR FCC CERTIFIED MODELS)


This LED LCD monitor has been tested and found compliant with the limits for a Class B digital 
device, pursuant to part 15 of the FCC Rules. These limits are designed to provide proper 
protection against harmful interference to a residential installation. This LED LCD monitor 
generates, uses, and can radiate radio frequency energy. Harmful interference to radio 
communication may be led as a result if it‘s not properly installed and used. However, there is no 
guarantee that interference will not occur in a particular installation. If this LED LCD monitor 
does cause serious interference to radio or television reception, resetting the LED LCD monitor 
may determine it. Moreover, users are encouraged to correct interference by doing one or more 
of the following:   


Reorient or relocate the receiving antenna. 


Move the LED LCD monitor and the receiver further away from each other. 


Connect the LED LCD monitor into an outlet on a circuit different from that to which the 
receiver is connected.


Consult your local dealer or an qualified technician.


FCC Warning: 

To assure a continued FCC compliance, a user must use a grounded power supply cord and the 
provided shielded video interface cable with bonded ferrite cores. Also, any unauthorized 
changes or modifications to this LED LCD monitor would void the user‘s authority to operate this 
device. 

 
Note: 

If necessary, shielded interface cables and AC power cord must be used to meet the 

emission level limits.


Summary of Contents for PLL1911M

Page 1: ...www planar com USER S GUIDE LED LCD Monitor PLL1911M...

Page 2: ...5 Front View of the Product 7 Rear View of the Product 8 Quick Installation 9 Basic Operation 10 Advanced Operation OSD Menu 12 Supporting Timing Modes 15 Technical Information 16 Wall mount instructi...

Page 3: ...not occur in a particular installation If this LED LCD monitor does cause serious interference to radio or television reception resetting the LED LCD monitor may determine it Moreover users are encou...

Page 4: ...sagers sont aussi encourag s corriger les interf rences en appliquant une ou plusieurs des d marches suivantes R orientez ou d placez l antenne de r ception Placez le moniteur et le r cepteur plus loi...

Page 5: ...inet There is high voltage parts inside that may cause electric shock to human bodies even when the power cord is disconnected Stop using the LED LCD monitor if the cabinet is damaged Have it checked...

Page 6: ...es le v rifier par un technicien qualifi Placez votre moniteur uniquement dans un environnement propre et sec D branchez imm diatement le moniteur s il tait mouill et faites appel votre r parateur D b...

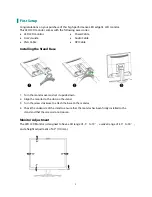
Page 7: ...and Base 1 Turn the monitor over and set it upside down 2 Align the monitor to the slots on the stand 3 Turn the screw clockwise to attach the base to the monitor 4 Check the underside of the stand to...

Page 8: ...6 Disconnecting the Stand Base 1 Turn the monitor over and set it upside down 2 Turn the screw counterclockwise to loosen it 3 Detach the stand from the monitor...

Page 9: ...7 Front View of the Product OSD Menu On Off Volume Adjust Scroll Down Adjust Decrease Preset Mode Scroll Up Adjust Increase Confirm Select Auto adjust Power ON OFF LED Indicator...

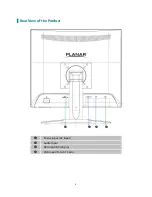
Page 10: ...8 Rear View of the Product Power input AC input Audio Input DVI input DVI 24 pin VGA input D Sub 15 pin...

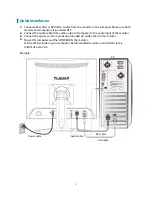
Page 11: ...he audio cable from audio output of computer to the audio input of the monitor 3 Connect the power cord to a properly grounded AC outlet then to the monitor 4 Power ON computer and then POWER ON the m...

Page 12: ...e Press the button for three seconds to auto adjust the image VGA only 2 Confirm the selection Select the desired item when in OSD menu When not in OSD menu directly enters Audio Adjust Select the des...

Page 13: ...uding the POWER button are locked Press and hold the 1 button and the button for 3 seconds to lock all 5 buttons The LED LCD monitor will show an Lock Out message for 5 10 seconds and the message will...

Page 14: ...Contrast To adjust the foreground white level of screen image increase contrast decrease contrast Brightness To adjust the luminance of the video increase brightness decrease brightness ECO Allows th...

Page 15: ...V Position To adjust the horizontal and vertical position of the video H Position move screen to the right move screen to the left V Position move screen up move screen down Fine Tune To adjust the d...

Page 16: ...st the OSD position move OSD up move OSD down OSD Time Out To automatically turn off On Screen Display OSD after a preset period of time OSD Background Allows the user to turn the OSD background On or...

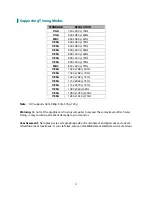
Page 17: ...x 768 75Hz VESA 1152 x 864 75Hz VESA 1152 x 870 75Hz VESA 1280 x 960 60Hz VESA 1280 x 1024 60Hz VESA 1280 x 1024 75Hz Note DVI supports 480i 480p 576i 576p 720p Warning Do not set the graphic card in...

Page 18: ...mum Standby Mode 0 5 Watt Off 0 5 Watt Displayable Resolution SXGA 1280x1024 max Vertical Frequency 75Hz max Pixel Dimension 0 294 x 0 294 mm Display Color 16 7M Tilt 5 19 Active Display Area 376 32mm...

Page 19: ...r 3 Remove the screws so that the stand base can be removed 4 Gently remove the stand base Attaching The Optional Wall Mount Arm not supplied Follow these steps to finish installing the wall mounting...

Page 20: ...er remove the rear cover of your LED LCD monitor cabinet The display unit inside contains high voltage parts and may cause electric shock to human bodies Never try to repair your LED LCD monitor yours...

Page 21: ...http www planar com support for operations manuals touch screen drivers warranty information and access to Planar s Technical Library for online trouble shooting To speak with Planar Customer Support...

Page 22: ...2013 P N 2001171476T...

Reviews: