background image

Planar RA-Series

22

8.  Technical Specifications

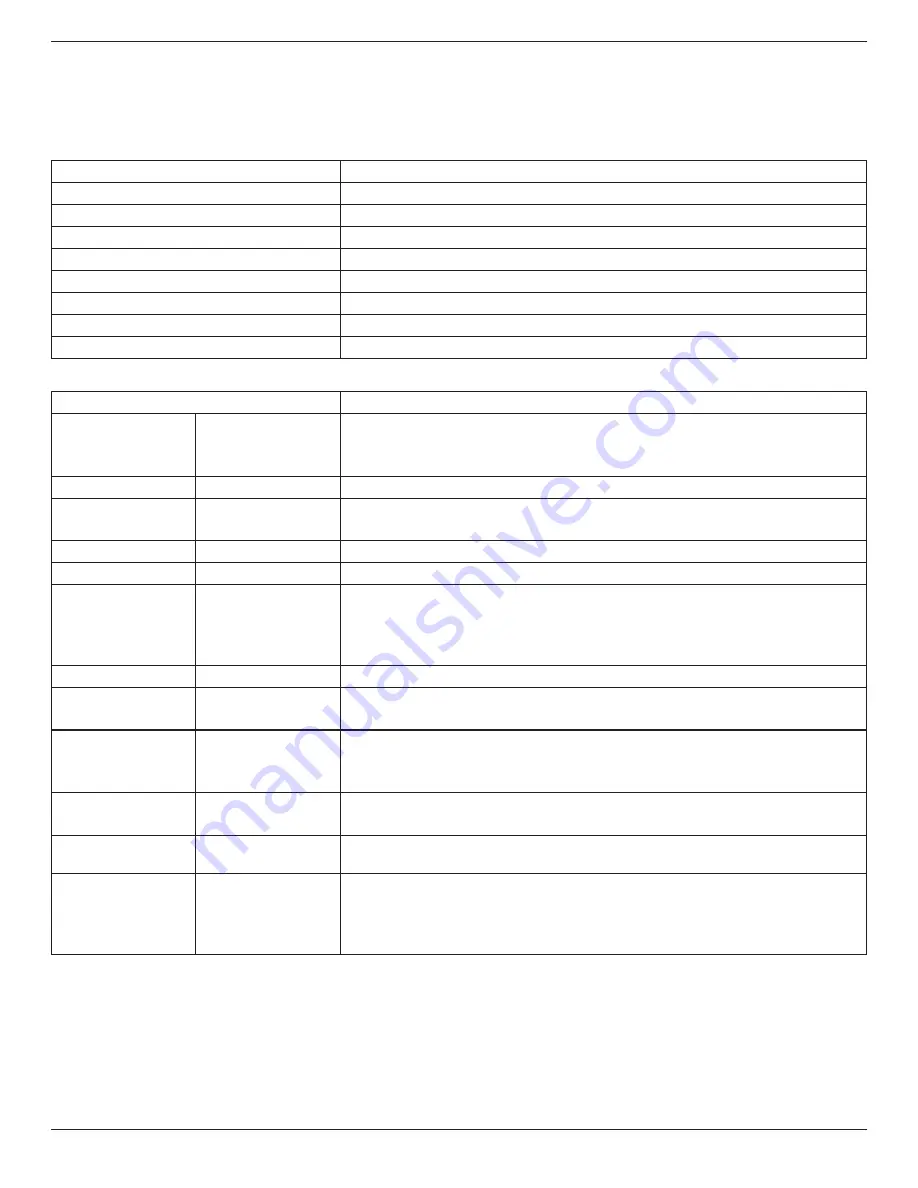
8.1.  RA4980

Display:

Item 

Specifications

Screen Size (Active Area) 

48.50” (123.2 cm) LCD  

Aspect Ratio 

16:9 

Number of pixels 

1920 (H) x 1080 (V) 

Pixel pitch 

0.55926 (H) x 0.55926 (V) [mm]

Displayable colors 

10bits(D),1.06 Billion colors

Brightness (typical) 

700 cd/m

2


Contrast ratio (typical) 

1300:1 

Viewing angle 

178 degrees

In/Out Terminals:

Item

Specifications

Speaker Output 

Internal Speakers
External Speakers

10W (L) + 10W (R) [RMS]/8Ω 
1 Way 1 Speaker System
82 dB/W/M/160 Hz ~ 13 KHz 

Audio Output 

Phone Jack x 1

0.5V [rms] (Normal) / 2 Channel (L+R)

Audio Input 

RCA Jack x 2
3.5 mm Stereo x 1 

0.5V [rms] (Normal) / 2 Channel (L+R) 

RS232C 

2.5mm Phone jack x 2

RS232C in/RS232C out

RJ-45

RJ-45 Jack x 1 (8 pin)

10/100 LAN Port

HDMI Input 

HDMI Jack x 2  

(Type A) (18 pin)

Digital RGB: TMDS (Video + Audio) 
MAX:


Video - 720p, 1080p, 1920 x 1080/60 Hz (WUXGA) 

Audio - 48 KHz/ 2 Channel (L+R)

Supports LPCM only

DVI-D Input 

DVI-D jack 

Digital RGB: TMDS (Video) 

VGA Input 

D-Sub Jack x 1 (15 pin)  Analog RGB: 0.7V [p-p] (75Ω), H/CS/V: TTL (2.2kΩ), SOG: 1V [p-p] (75Ω) 

MAX: 720p, 1080p, 1920 x 1080/60 Hz (WUXGA) 

DVI-I (DVI-D & VGA) 

Output

DVI-I Jack x 1 (29 pin) 

Digital RGB: TMDS (Video)
Analog RGB: 0.7V [p-p] (75Ω), H/CS/V: TTL (2.2kΩ), SOG: 1V [p-p] (75Ω) 
MAX: 720p, 1080p, 1920 x 1080/60 Hz (WUXGA) 

Component Input 

BNC Jack x 3

Y: 1V [p-p] (75Ω), Pb: 0.7V [p-p] (75Ω), Pr: 0.7V [p-p] (75Ω) 
MAX: 480i, 576i, 480p, 576p, 720p, 1080i, 1080p 

Video Input 

BNC x 1 (Share with 

Component_Y)

Composite 1V [p-p] (75Ω)

Displayport in/out

Displayport Jack x 2 

(20 pin)

Digital RGB: TMDS (Video + Audio)
MAX:


Video - 720p, 1080p, 1920 x 1080/60 Hz (WUXGA)  

Audio - 48 KHz/ 2 Channel (L+R)

Supports LPCM only

Summary of Contents for RA-Series

Page 1: ......

Page 2: ...ics stores Do not let cleaner seep into the display as it may cause electrical shock or damage To avoid the risk of shock or permanent damage to the set do not expose the display to dust rain water or...

Page 3: ...ful interference in a residential installation This equipment generates uses and can radiate radio frequency energy and if not installed and used in accordance with the instructions may cause harmful...

Page 4: ...uct or on its packaging illustrates that under European Directive 2012 19 EU governing used electrical and electronic appliances this product may not be disposed of with normal household waste You are...

Page 5: ...Displays in a Daisy chain Configuration 10 3 1 1 Display control connection 10 3 1 2 Digital video connection 10 3 1 3 Analog video connection 11 3 2 Connecting Audio Equipment 12 3 2 1 Connecting ex...

Page 6: ...ontrol and AAA Batteries RS232 Cable RS232 Loop Cable Quick Start Guide Alignment Plate 3 Spacer 6 Washer 4 Screw 4 NOTES For all other regions apply a power cord that conforms to the AC voltage of th...

Page 7: ...he retractable lens from the backside of the display The LED power status light is also best viewed when the lens is pulled down 2 When tiled in video walls the lens should be pushed up to optimize ti...

Page 8: ...injury to the user or installer Product warranty does not cover damage caused by improper installation 5 For the wall mounting kit use M6 mounting screws having a length 10 mm longer than the thicknes...

Page 9: ...lay The terminals will be on the right and top side of the user from the back of the display 2 You can also refer to the arrow mark on the label on the back cover 90 90 Display TM NOTE When installing...

Page 10: ...t while OSD menu is on or decrease the audio output level while OSD menu is off 6 button Move the highlight bar up to adjust the selected item while OSD menu is on 7 button Move the highlight bar down...

Page 11: ...RS232C IN 6 RS232C OUT RS232C network input output for the loop through function 7 LAN LAN control function for remote control from a network 8 HDMI1 IN 9 HDMI2 IN HDMI video audio input 10 DVI IN DV...

Page 12: ...hoose items 7 button Confirm an entry or selection 8 ADJUST button Access currently available picture and sound menus 9 MUTE button Press to turn the mute function on off 10 COLOR buttons Red Press to...

Page 13: ...button until the green LED blinks twice Programming ID Mode To assign an ID to a remote control 1 Enter ID mode 2 Press and hold the ID SET button until the red LED turns on 3 Using the numeric keypa...

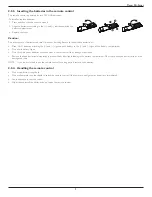
Page 14: ...signs of the battery compartment Do not mix battery types Do not combine new batteries with used ones It causes shorter life or leakage of batteries Remove the dead batteries immediately to prevent t...

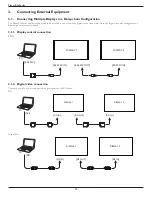
Page 15: ...video walls Note For larger video wall configurations a distribution amp is recommended 3 1 1 Display control connection RS232 PC RS 232C IN RS 232C RS 232C OUT RS 232C IN DISPLAY 1 DISPLAY 2 3 1 2 D...

Page 16: ...lanar RA Series 11 HDMI DVI IN HDMI DVI OUT DVI IN DISPLAY 1 DISPLAY 2 OPS DVI OUT DVI IN DISPLAY 1 DISPLAY 2 OPS 3 1 3 Analog video connection VGA PC VGA IN VGA DVI VGA OUT VGA IN DISPLAY 1 DISPLAY 2...

Page 17: ...Planar RA Series 12 3 2 Connecting Audio Equipment 3 2 1 Connecting external speakers External speakers 3 2 2 Connecting an external audio device Stereo Amplifier AUDIO OUT Audio In...

Page 18: ...IR IN IR OUT IR IN External IR Receiver DISPLAY 1 DISPLAY 2 NOTE This display s remote control sensor will stop working if the IR IN is connected 3 4 IR Pass through Connection DVD VCR VCD DVD VCR VCD...

Page 19: ...then press button Options General Original Movie Music Game News 4 5 Installing OPS Modules The Planar RA Series displays are equipped with an expansion slot that supports the Intel Open Pluggable Spe...

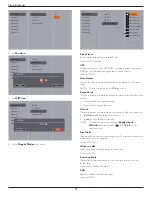
Page 20: ...e luminance and contrast Options 1 8 1 9 2 0 2 1 2 2 2 3 2 4 2 5 Color Temp Change the color balance Options 10000K 9300K 6500K 3200K Custom Custom Color Temp Customize color balance setting Only avai...

Page 21: ...ling Enable the reduction of sudden volume changes Options Off On Internal Speakers Turn on or off the internal speakers Options Off On Clear Sound Enhance sound quality Options Off On 5 1 3 Tiling En...

Page 22: ...ake from sleep See Auto Search Setting for more information on how to wake the display Auto Search Automatically detects available input sources when On If Backup Source is selected assigned sources i...

Page 23: ...ant devices through the HDMI port of this display using the same remote control Options Off On Auto Adjust Use this function to automatically optimize the display of VGA input image NOTE This item is...

Page 24: ...o the display s temperature Select Off to turn off the cooling fan NOTES The default Auto option will start running the cooling fan if the temperature of 60 C 140 F is reached RS 232 Control Select th...

Page 25: ...Hz 148 5 MHz 16 9 HD1080 SDTV Resolution Standard Resolution Active Resolution Refresh Rate Pixel Rate Aspect Ratio Stand for Mode H Pixels V Lines 480i 720 480 29 97 Hz 13 5 MHz 4 3 Modified NTSC St...

Page 26: ...incorrectly to underscan 3 If the image exceeds the screen size Scan Mode may need to be set to Underscan Use the Zoom mode or Custom zoom function in the Screen menu to fine tune display geometry and...

Page 27: ...out RJ 45 RJ 45 Jack x 1 8 pin 10 100 LAN Port HDMI Input HDMI Jack x 2 Type A 18 pin Digital RGB TMDS Video Audio MAX Video 720p 1080p 1920 x 1080 60 Hz WUXGA Audio 48 KHz 2 Channel L R Supports LPCM...

Page 28: ...56 8 Wall Mount mm Weight 19 0 Kg Gross Weight 25 3 Kg Environmental Condition Item Specifications Temperature Operational 0 40 C Storage 20 60 C Humidity Operational 20 80 RH No condensation Storage...

Page 29: ...Jack x 1 8 pin 10 100 LAN Port HDMI Input HDMI Jack x 2 Type A 18 pin Digital RGB TMDS Video Audio MAX Video 720p 1080p 1920 x 1080 60 Hz WUXGA Audio 48 KHz 2 Channel L R Supports LPCM only DVI D Inp...

Page 30: ...56 8 Wall Mount mm Weight 24 7 Kg Gross Weight 31 4 Kg Environmental Condition Item Specifications Temperature Operational 0 40 C Storage 20 60 C Humidity Operational 20 80 RH No condensation Storage...

Page 31: ...t for user manuals and warranty information To speak with Planar Customer Support please have you model and serial number available and dial Planar Support Tel 1 866 PLANAR1 866 752 6271 or 1 503 748...

Page 32: ...erton OR 97006 1992 Tel 1 866 PLANAR1 866 752 6271 or 1 503 748 5799 outside the United States 2015 Planar Systems Inc Planar is a registered trademark of Planar Systems Inc Other brands and names are...

Reviews: