background image

vi | SD2620W 

Contents  

Usage Notice ............................................................................................................. iii


Box Contents ............................................................................................................. iv


Stereoscopic Viewing .............................................................................................. 1


StereoMirror™ Technology ..................................................................................... 2


Getting Started .......................................................................................................... 4


Product Use ................................................................................................................ 9


Adjusting the Monitor's Display..........................................................................11


Target Color Coordinates......................................................................................17


Power Management ...............................................................................................17


OSD Lock Out Function .........................................................................................18


Monitor Specifications...........................................................................................19


System Care..............................................................................................................21


Software Compatibility..........................................................................................21


Accessories ...............................................................................................................21


Troubleshooting......................................................................................................22


Warranty....................................................................................................................23


Product Registration ..............................................................................................23


CRT Recycling...........................................................................................................24


Important Recycle Instructions ...........................................................................24


Summary of Contents for SD2620W

Page 1: ...SD2620W Stereoscopic Monitor USER S GUIDE www planar3d com...

Page 2: ...2 www planar com 2008 Planar Systems Inc Planar and the Planar logo are registered trademarks of Planar Systems Inc Other brands and names are the property of their respective owners Technical informa...

Page 3: ...the half mirror Use a soft cloth moistened with water and or mild detergent to clean the display housing and stand Use only high quality and safety approved AC DC power adapters Disconnect the power...

Page 4: ...ox contains the following components Bottom monitor assembly with mirror support arms and mirror adjustment screws Bottom cable management cover Top monitor assembly Top cable management cover Beamspl...

Page 5: ...lasses 2 ea Spring clip style glasses 1 ea Terminator style glasses 2 ea Soft dry cloths 3 ea Moistened cleaning pads 6 ea NOTE Both the Captain style and the Terminator style glasses for use with the...

Page 6: ...ed 4 Product Use 9 Adjusting the Monitor s Display 11 Target Color Coordinates 17 Power Management 17 OSD Lock Out Function 18 Monitor Specifications 19 System Care 21 Software Compatibility 21 Access...

Page 7: ...e SD2620W StereoMirror monitor in particular creates an unprecedented level of stereo 3D viewing quality and viewer comfort Stereo viewing is useful for the following applications Photogrammetry and r...

Page 8: ...of depth or stereopsis In the StereoMirror design this stereo separation is achieved using the principle of conservation of polarization Liquid crystal displays operate based on the ability of liquid...

Page 9: ...orrect parallax separation for the proper stereo effect Once the two viewpoints have been defined the 3D scene is rendered identical for each of the two viewpoints Many commercial 3D applications alre...

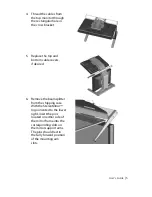
Page 10: ...y table or desktop To keep the display surface clean avoid touching the screen 2 Remove the top monitor assembly from the shipping box Loosen the two screws on the cover of the cable management compar...

Page 11: ...bottom cable covers if desired 6 Remove the beamsplitter from the shipping case With the StereoMirror logo oriented to the lower right insert the pins located on either side of the mirror frame into...

Page 12: ...etails on graphics cards software configuration and using side monitors with the SD2620W unit Install the mirror flip PCI card Proper ESD electrostatic discharge handling precautions should be exercis...

Page 13: ...output of the dual channel graphics card Plug the other end into the input port labeled IN of the mirror flip PCI card 3 Plug one end of the 12 foot DVI cable into the output port of the mirror flip P...

Page 14: ...n the mirror support arms Rotating these screws raises or lowers the beamsplitter mirror Adjust the screws so that the corners of the reflected image of the upper monitor are aligned with the corners...

Page 15: ...e mirror use two hands to lift it out of the locked slot and then lower it down onto the fine adjustment screws The mirror should not be forced down This can break the glass and damage the mirror fram...

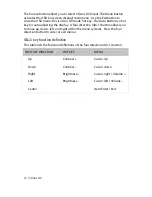
Page 16: ...ing the display A four direction 4D 1 button allows you to move up down left and right within the menu systems Press the four direction button to enter or exit menus 4D 1 key function definition This...

Page 17: ...tton The menu diagram pops up on the screen as shown Use the 4D 1 key to navigate to the function you want to adjust Push the 4D 1 key to enter a submenu and adjust the value Push the 4D 1 key again t...

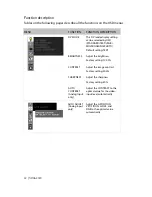
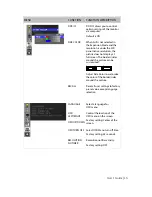
Page 18: ...E GAMING PHOTO Default setting TEXT BRIGHTNESS Adjust the brightness Factory setting 100 0 CONTRAST Adjust the image contrast Factory setting 50 0 SHARPNESS Adjust the sharpness Factory setting 50 AUT...

Page 19: ...arges native resolution to either horizontal or vertical limit Real Displays native resolution Default setting FULL LEFT RIGHT Analog Input only Adjust the horizontal image position DOWN UP Analog Inp...

Page 20: ...rast and brightness of each color of the white balance RED GREEN BLUE GAIN Allows you to adjust the Red Green Blue color gain RED GREEN BLUE OFFSET Allows you to adjust the Red Green Blue color offset...

Page 21: ...The borders sides around the picture can be customized Adjust Side Color to customize the color of the border sides around the picture RECALL Reset all user settings to factory preset value except lan...

Page 22: ...press the Exit key to close it OSD WARNING NO SIGNAL This OSD gives a warning when the selected input signal is not active After power on or when the input signal becomes inactive this warning appears...

Page 23: ...tor makes an auto adjustment To manually execute the Auto Adjust function press the Auto button Target Color Coordinates COLOR TEMPERATURE 9300K 7500K sRGB u 0 189 0 194 0 198 v 0 446 0 459 0 468 x 0...

Page 24: ...onitor shows an OSD Lock Out message The Power button can be used to turn the monitor on or off however the other menu buttons will not be functional and a warning message will be displayed Repeat the...

Page 25: ...gray to gray 5 ms typical Display color palette 16 7 million colors Refresh rate 50 to 76 Hz 60 Hz recommended Power requirements input voltage Single phase 100 240 VAC 50 60 Hz Power requirements inp...

Page 26: ...04 F Operating conditions Relative humidity 20 to 80 non condensing Storage conditions Temperature 20 C to 60 C 4 F to 140 F Storage conditions Relative humidity 5 to 85 non condensing Size and weight...

Page 27: ...olvents for cleaning Software Compatibility OpenGL The SD2620W unit is compatible with OpenGL stereo An appropriate graphics card is required to drive the two monitors with DVI signals For professiona...

Page 28: ...z vertical 50 76 Hz The Input Not Supported message appears on the screen if the timing is not supported by the LCD panel Both displays work but there is no stereo functionality Be certain the graphic...

Page 29: ...nspection warranty period All system components have a 1 year warranty Two business day delivery Expedited Delivery Service available Extended Warranty Terms are available Go to www planar com for the...

Page 30: ...discarded with other refuse A number of recycling programs are available Do an online search of CRT Recycling for potential service providers in your area Important Recycle Instructions LCD lamps insi...

Page 31: ...lutions for common problems download documentation view answers to frequently asked questions FAQs and get troubleshooting advice Visit www planar3d com for specific questions about configuring the st...

Page 32: ...Planar Systems Inc 1195 NW Compton Drive Beaverton OR 97006 1992 Customer Service E mail planarsupport planar com Online www planar com support Voice 1 866 Planar1 1 866 752 6271 020 0641 00A...

Reviews: