background image


NAS-7102 User Manual 

Page 1

4

Chapter 3: Web Configuration   

To configure the settings of your network drive, you will need to use a web browser, 
enter the IP address of your device and then use the web configuration for further setup. 
If you don’t know the IP address, see How to Login and use the NAS Finder. The default 
login is admin/admin.   


3.1 Status   


Host Name 
This name is used to identify your device on the network. If you prefer a different name 
that is easier to remember, click on “Change” and type in a new name. When selecting 

a new hostname, make sure to use a unique name and not one that has already been 
used on the local network. 
 
By default, the host name is set to NAS-7102.   
 

Group Name 

Summary of Contents for NAS-7102

Page 1: ...1 Bay SATA NAS Server NAS 7102 User s manual Version 1 0 0 ...

Page 2: ...tify any person of such revision or changes All brand and product names mentioned in this manual are trademarks and or registered trademarks of their respective holders Federal Communication Commission Interference Statement This equipment has been tested and found to comply with the limits for a Class B digital device pursuant to Part 15 of FCC Rules These limits are designed to provide reasonabl...

Page 3: ...equipment complies with all the requirements of DIRECTIVE 1999 5 CE OF THE EUROPEAN PARLIAMENT AND THE COUNCIL OF 9 March 1999 on radio equipment and telecommunication terminal Equipment and the mutual recognition of their conformity R TTE The R TTE Directive repeals and replaces in the directive 98 13 EEC Telecommunications Terminal Equipment and Satellite Earth Station Equipment As of April 8 20...

Page 4: ...PLANET NAS 7102 User Manual I Revision User s Manual for PLANET 4 Bay SATA NAS RAID Server Model NAS 7102 Rev 1 0 November 2009 Part No EM NAS7102V1 doc ...

Page 5: ...enance 20 3 4 SMB Server 23 3 5 FTP Server 26 3 6 BT Configuration 29 3 7 Printer 31 3 7 1 Media Server 31 3 7 2 Disk Utility 33 Chapter 4 Other Features and Exampls 35 4 1 File Access on a PC 35 4 1 1 Windows Explorer 35 4 1 2 Mapping a Network Drive 36 4 1 3 Disconnecting a Network Drive 37 4 1 4 FTP 38 4 2 File Access on a Mac 39 4 2 1 SMB 39 4 2 2 FTP 41 4 3 BitTorrent Download Manager 42 4 3 ...

Page 6: ...7102 User Manual Page 2 4 6 USB Device 54 Appendix A Precautions 56 Precautions 56 Trademarks 57 Appendix B Specifications 58 Appendix C Importance Notice 60 Appendix D Technical Terms 61 Appendix E FAQ 63 ...

Page 7: ... LAN users to backup data or share files through LAN and WAN The embedded Bit Torrent client feature brings you the most conveniences to download shared resources from the Internet The NAS 7102 also supports Print Server function for the user to connect their printer to NAS 7102 directly and share FTP server with Unicode supported the device is compatible to multilingual file name The NAS 7102 sup...

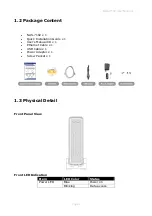
Page 8: ... x 1 z Quick Installation Guide x 1 z User s Manual CD x 1 z Ethernet Cable x 1 z USB Cable x 1 z Power Adapter x 1 z Screw Packet x 1 1 3 Physical Detail Front Panel View Front LED Indication Item LED Color Status Blue Power on Power LED Blinking Data access ...

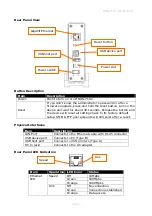
Page 9: ...lt setup SMB FTP user accounts will still exist after a reset Physical Interfaces Item Description LAN Port Connects to the Ethernet cable with RJ 45 connector USB device port Connects to PC Type B USB host port Connects to USB printers Type A DC In jack Connects to the AC adapter Rear Panel LED Indication Item Operation LED Color Status Off 10Mpbs Green 100Mpbs Speed Orange 1000Mpbs Off No connec...

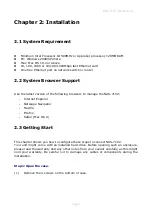
Page 10: ...t version of the following browsers to manage the NAS 7102 Internet Explorer Netscape Navigator Mozilla Firefox Safari Mac OS X 2 3 Getting Start This chapter shows you how to configure these steps to connect NAS 7102 Your unit might come with an installed hard drive Before opening such an enclosure please read the warranty and any other notes from your vendor carefully as this might void your war...

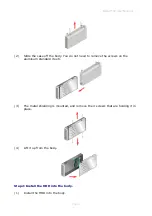
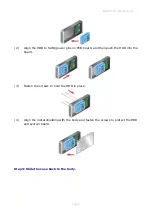
Page 11: ... body You do not need to remove the screws on the aluminum standard feet 3 The metal shielding is mounted and remove the 4 screws that are holding it in place 4 Lift it up from the body Step2 Install the HDD into the body 1 Install the HDD into the body ...

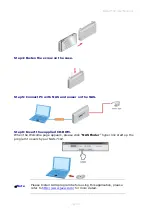
Page 12: ...SATA power pins on PCB board and then push the HDD into the board 3 Fasten the screws to hold the HDD in place 4 Align the metal shielding with the body and fasten the screws to protect the HDD and system board Step3 Slide the case back to the body ...

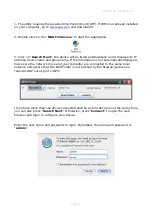
Page 13: ...th NAS and power on the NAS Step6 Insert the supplied CD ROM When the Welcome page appears please click NAS Finder hyper link start up the program to search your NAS 7102 Note Please Install JAVA program before using this application please refer to http www java com for more detail ...

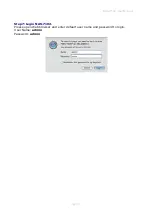
Page 14: ...NAS 7102 User Manual Page 10 Step7 Login NAS 7102 Please open Web browser and enter default user name and password to login User Name admin Password admin ...

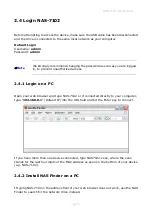
Page 15: ...uthorized access 2 4 1 Login on a PC Open your web browser and type NAS 7102 or if connected directly to your computer type 192 168 0 1 Default IP into the URL field and hit the Enter key to connect If you have more than one device connected type NAS7102 xxxx where the xxxx stands for the last four digits of the MAC address as seen on the bottom of your device e g NAS 7102 2 4 2 Install NAS Finder...

Page 16: ...nd group name If the information is not automatically displayed make sure the network drive and your computer are connected to the same local network and assure that the NAS Finder is not blocked by the firewall javaw exe requires UDP out at port 14675 If you have more than one device connected and the current device is not the correct one you can also press Search Next Otherwise press Connect to ...

Page 17: ...7102 User Manual Page 13 Note If you experience slow transfer speeds go to the Advanced Properties of your LAN card or network adapter and make sure the utility is enabled and the Speed is set to Auto Sense ...

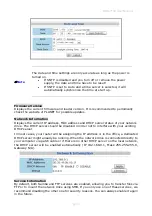
Page 18: ...know the IP address see How to Login and use the NAS Finder The default login is admin admin 3 1 Status Host Name This name is used to identify your device on the network If you prefer a different name that is easier to remember click on Change and type in a new name When selecting a new hostname make sure to use a unique name and not one that has already been used on the local network By default ...

Page 19: ...er name can not be changed but we strongly recommend changing the password as soon as you have logged in for the first time to prevent any unauthorized access To change the password click on Change enter your new password and click OK to apply the changes You will then be asked to login again with your new password Date Time Click on Change to setup the correct date and time z When SNTP is disable...

Page 20: ...us of your network drive The DHCP server should be disabled in order not to interfere with your existing DHCP server In most cases your router will be assigning the IP address or in the office a dedicated DHCP server might already be running When the network drive is connected directly to your computer via patch cable or if there is no other DHCP server on the local network the DHCP server will be...

Page 21: ...rd drive and the storage capacity If you do not see these details it is possible that the drive has not yet been installed or it has not been recognised because it has not yet been formatted Make sure the hard drive has been installed properly and then use the disk utility to format it ...

Page 22: ...y If you prefer setting it manually select the Static IP option enter your own values and click Apply to confirm the new settings Setting it manually is useful when you need to have a static IP address in order to mount the network drive or set up port forwarding as an example To find out the correct settings for a static IP setup refer to your router settings or ask your system administrator ...

Page 23: ... firmware for your network drive To do so 1 Download the latest firmware and loader from your vendor s website 2 Store the files on your computer and unzip them if necessary 3 Click on Browse and locate the firmware BIN file 4 Click on Upload 5 Click OK to confirm the pop up message to start the upgrade 6 During the upgrade process take no other actions and make sure the power is left on This migh...

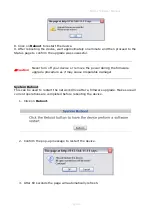
Page 24: ...ion Never turn off your device or remove the power during the firmware upgrade procedure as it may cause irreparable damage System Reboot This can be used to restart the network drive after a firmware upgrade Make sure all current operations are completed before rebooting the device 1 Click on Reboot 2 Confirm the pop up message to restart the device 3 After 60 seconds the page will automatically ...

Page 25: ...are upgrade it is recommended to reset all settings Resetting the device will set all settings except the SMB and FTP accounts back to its original factory default settings 1 Click on Reset 2 Click OK to confirm the pop up message to reset all settings 3 Click on Reboot to restart the device ...

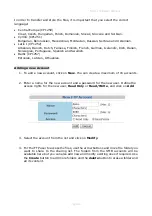
Page 26: ...ly The user name is guest and no password has been set Like any other account you can always modify delete or disable it Note Only the folders on the sharing list will be accessible on the network Select an account click on Modify and then use the arrow buttons to add and remove the folders from that list Deleting a folder will also erase all the files that are stored inside that directory Adding ...

Page 27: ...ne the access rights for the new user Read Only or Read Write and click on Add 3 Select the account from the list and click on Modify 4 Here you can modify the settings and also create and manage the shared folders Click on Create to add a new folder 5 Enter a name for the new folder max 12 bytes and click on OK ...

Page 28: ... on the arrow key to move it to the Sharing List Once moved the folder is then available for the selected user 7 You can remove the folders from the sharing list at any time and also rename them if required When deleting remember that this will also remove all the files in that directory ...

Page 29: ... port for the FTP service is 21 If required you can change it and use any port number from 1025 65500 however generally we recommend using the default of 21 When you change the port number for the FTP server remember to adjust your firewall otherwise the FTP access will likely be blocked FTP Codepage By default the encoding is set to English If you want to store or transfer files with a different ...

Page 30: ...tvian Lithuanian Adding a new Account 1 To add a new account click on New You can create a maximum of 16 accounts 2 Enter a name for the new account and a password for the new user Define the access rights for the new user Read Only or Read Write and click on Add 3 Select the account from the list and click on Modify 4 For the FTP user to access the files use the arrow buttons and move the folder ...

Page 31: ...NAS 7102 User Manual Page 27 ...

Page 32: ... internet and then upload it to the network drive Once the torrent file has been added you can start downloading The downloaded files will be stored in the folder that is set for the Download Path The BitTorrent client on the NAS 7102 can download 4 files at a time with a maximum of 40 files in the queue The download speed may not be as fast as a BitTorrent client on the computer but once the Torr...

Page 33: ...ed when a torrent is stopped or removed you can set up e mail notification Click on Mail Setup check Enable and fill out the configuration for your e mail To find out the correct settings for the mail server ask your system administrator or your e mail provider ...

Page 34: ...are your photos music and videos that are stored on the network drive with an Xbox 360 or PlayStation 3 video game console that is connected to the same local network 1 Select the folder where your files are stored from the sharing list 2 Click on Set to save the new setting and enable the file sharing with your video game console 3 Repeat the previous two steps for each media type photo music and...

Page 35: ... on the video game console only certain media files can be accessed For the Xbox 360 you can play JPG MP3 WMV and XviD files For the PlayStation 3 you can play JPG MP3 MPEG 1 MPEG 2 and XviD files iTunes will only be able to play MP3 music files ...

Page 36: ...that the network drive is only able to recognize the first partition and it has to be the FAT32 file system Sleep Time To save energy and keep the drive cool it is recommended to set a sleep time Select a time from the list between 10 to 60 minutes When the drive is idle for longer than the set time it will automatically go into stand by mode and spin down If you need immediate access to the drive...

Page 37: ...al Page 33 USB to a computer to scan for and fix the errors Use the Clear button to erase any old reports Caution Formatting the drive will erase all data and settings as well as deleting the SMB folders and FTP accounts ...

Page 38: ...permanent link to your network drive see Mapping a Network Drive You can copy files to the network drive as if it were a folder on your local drive Depending on the bandwidth you can also open and directly play the files although we recommend always transferring the data to your local drive first Note When you have to access multiple folders with different passwords or have modified the settings w...

Page 39: ... problems when trying to access the shared folders disconnect all network drives reboot your computer restart your network drive and then try again 1 Double click on My Computer go to the Tools menu and select Map Network Drive 2 Follow the setup wizard and fill in the path to your network drive When entering the IP address also add the shared folder name e g 192 168 11 11 public It is recommended...

Page 40: ... When you don t need a mapped network drive any more we recommend disconnecting it It is also necessary to disconnect a temporary network drive when you try to login with a new user name and password but have not restarted the computer in between 1 Double click on My Computer go to Tools and select Disconnect Network Drive 2 2 Select any temporary or mapped network drives that you would like to re...

Page 41: ...be opened directly via FTP so you will always have to transfer them to your computer first 1 Using Windows Explorer type ftp followed by the IP address of your network drive into the address field Add the user name and password in front of the IP address with an sign in between like this ftp demo demo 192 168 11 11 2 After login you can access the available folders and transfer your files ...

Page 42: ...rk drive use the Connect to Server command 1 Click on Go and select Connect to Server 2 Type smb followed by the IP address of your network drive and click on Connect 3 Select Registered User and enter your user name and password for the SMB account 4 Choose a folder from the list and click OK ...

Page 43: ...Manual Page 39 5 Mounted drive will be listed in your finder under Shared devices Here you can access the network drive and transfer your files When no longer needed click on the eject button to disconnect the drive ...

Page 44: ...read the data on the network drive but can not upload new data to it 1 Click on Go and select Connect to Server 2 Type ftp followed by the IP address of your network drive and then click on Connect 3 Enter the correct username and password The FTP folder will then be listed in your finder under Shared devices and you can download the files When the FTP is no longer needed click on the eject button...

Page 45: ...oad speed according to your network s bandwidth After changing each of the settings press the Apply button to save the new configuration 1 Use a search engine such as Google and browse the internet for the media files you would like to download Download and store the torrent file s on your computer 2 Login to your network drive and go to the BitTorrent menu Click on Browse and locate your torrent ...

Page 46: ...about the selected download click on Show 6 To update the information click on Refresh To return to the download queue click on Return Note The download speed of the built in BitTorrent t client may not be as fast as a client on the computer but once the Torrent has been added to the queue it can download the files by itself and the computer can be turned off ...

Page 47: ... data 1 Connect your USB printer to the USB host port on the network drive and turn both units on 2 Login to your network drive and go to the Printer menu to make sure the printer has been recognized We also strongly recommend using a fixed IP address in order to prevent having to modify the printer setup whenever the IP changes 3 On your PC go to Start and select Printers and Faxes 4 Go to File s...

Page 48: ...e the network drive and printer are both turned on and connected to the same local network as your computer then click on Next 8 Enter the IP address of your network drive the port name will be filled out automatically and then click on Next ...

Page 49: ...NAS 7102 User Manual Page 45 9 Select Custom and click on Settings to modify the configuration ...

Page 50: ... window will appear asking for a driver Select your printer model from the list or browse for the corresponding driver on your local drive 13 In the next few steps you will be able to give the printer a name set it as default printer add a description and print a test page It is not necessary to share the printer with other network users because it can be installed on other computers in the same w...

Page 51: ...4 Once you have completed the wizard set up your printer should be properly installed and ready to print Note Not all USB printers support LPR LPD printing therefore your printer may not be compatible and the installation might fail ...

Page 52: ...nces and click on Print Fax 2 Click the symbol to add a new printer 3 Select the IP tab For the Protocol select Line Printer Daemon LPD for the Address enters the IP address of your network drive and for the Queue enters lp1 The Name and Location are used to easily identify the printer and do not have to be the same as the ones used in this example For the last step select the corresponding printe...

Page 53: ...NAS 7102 User Manual Page 49 Note Not all USB printers support LPR LPD printing therefore your printer may not be compatible and the installation might fail ...

Page 54: ...onsole that is connected to the same local network Before you start make sure both devices are connected to the same local network and both are turned on 4 5 1 Xbox 360 1 On your network drive go to the Media Server menu and make sure that each of the sharing lists have a folder set and the directory is not disabled 2 On your Xbox 360 go to media select Music Pictures or Videos and press A to cont...

Page 55: ... list 4 Inside the shared folder you can access your pictures JPG music MP3 or videos WMV XviD depending on which mode you are currently using 5 Now select and play the files you would like view or listen to 6 Enjoy 4 5 2 PlayStation 3 1 On your network drive go to the Media Server menu and make sure that each of the sharing lists have a folder set and the directory is not disabled ...

Page 56: ...tect the shared folders of the media server on the network drive 3 When you turn on the PS3 media servers on the same local network are automatically detected and a shortcut will be displayed under Photo Music and Video 4 Select the network drive to access the shared folders of the media server and playback your photos JPG music MP3 and videos MPEG 1 MPEG 2 XviD ...

Page 57: ...etwork it can also be used as a simple USB mass storage device The user accounts and access rights used for the network drive do not apply to the USB drive When connected directly to the computer via USB all data can be accessed and modified 1 Login via a web browser stop all current downloads and then turn off the power 2 Disconnect the Ethernet cable and connect the USB cable to the USB device p...

Page 58: ...evice has to be turned off to change it from acting as USB drive to a network drive and vice versa When both USB cable and Ethernet cable are connected the USB connection has priority and it will act as USB drive until disconnected and restarted Do not format the drive on your computer Only use the disk utility of the network drive to do that ...

Page 59: ...ning your device in the following places Locations with direct sunlight and next to radiators or other sources of heat Locations with very high temperatures more than 38 C or humidity more than 90 Very dusty or sandy locations Locations subject to vibration shock or with a sloping base 3 Electricity and power plug Careful attention must be paid to the following points in order to avoid operational...

Page 60: ...upplied or recommended by your vendor in order to avoid the risk of malfunction electric shock and or possible interference to the device Trademarks Microsoft Windows 2000 XP Vista and Xbox are trademarks of Microsoft Corporation Apple Macintosh Mac and iTunes are trademarks of Apple Computer BitTorrent and Torrent are registered trademarks of BitTorrent Inc PlayStation and PS3 are trademarks of S...

Page 61: ...al HDD connection Support Protocol TCP IP HTTP FTP SMB Client OS Windows 2000 XP Vista Mac OS 10 2 or above Supported Concurrent Users 64 Max User Account 16 File Language Format English File System FAT32 Supported Media Server Xbox 360 JPG MP3 WMV XviD PlayStation 3 JPG MP3 MPEG 1 MPEG 2 XviD iTunes MP3 BitTorrent Network and Configuration Access Mode Static IP PPPoE DHCP Management Web System Co...

Page 62: ...NAS 7102 User Manual Page 58 Note Design and specifications are subject to change without prior notice and will depend on the model and the current firmware release ...

Page 63: ...work drive and a second copy either on your internal drive or another storage media such as a CD DVD Tape or an additional external drive Any loss or corruption of data while using the network drive is the sole responsibility of the user and under no circumstances will the manufacturer be held liable for compensation or the recovery of this data Intellectual Property The NAS 7102 network drive is ...

Page 64: ...of all pieces in the torrent It also contains the address of a tracker that coordinates communication between the peers in the swarm FAT32 File Allocation Table FAT is a file system developed by Microsoft for MS DOS The FAT file system is considered relatively uncomplicated and is consequently supported by virtually all existing operating systems for personal computers The maximum size of a single...

Page 65: ...7102 User Manual Page 61 SMB Server Message Block SMB is a network application level protocol mainly applied to share files printers serial ports and miscellaneous communications between nodes on a network ...

Page 66: ...tion and How to Login If none of these instructions help reset your device Connect it directly to your computer via Ethernet cable and access it using 192 168 0 1 Q4 My HDD is not recognized A The network drive can only access the first partition and it has to be formatted using the FAT32 file system We recommend only using the disk utility of the network drive to format the drive Q5 Which ports d...

Page 67: ...If you get this error message use the IP address instead of STORAGE 1 Log in as admin using your web browser 2 Under SMB Server make sure the folder you want to access is in the Sharing List 3 Go to IP Config and make sure it is set to Automatic IP 4 Go to Network Information in the Status menu and write down the IP address you see there 5 Go to your Finder and select Go Connect to Server 6 Type s...

Page 68: ...9 336 EEC 92 31 EEC 93 68 EEC For the evaluation regarding the Electromagnetic Compatibility the following standards were applied EN 55022 2006 Class B EN 61000 3 2 2000 EN 61000 3 3 1995 A1 2001 EN 55024 1998 A1 2001 A2 2003 IEC 61000 4 2 2001 IEC 61000 4 3 2002 IEC 61000 4 4 1995 A1 2000 A2 2001 IEC 61000 4 5 2001 IEC 61000 4 6 2001 IEC 61000 4 8 2001 IEC 61000 4 11 2001 Responsible for marking ...

Reviews: