background image


Summary of Contents for WNAP-6315

Page 1: ......

Page 2: ...limits are designed to provide reasonable protection against harmful interference in a residential installation This equipment generates uses and can radiate radio frequency energy and if not installed and used in accordance with the instructions may cause harmful interference to radio communications However there is no guarantee that interference will not occur in a particular installation If thi...

Page 3: ...nal Restrictions This device is intended for home and office use in all EU countries and other countries following the EU directive 1999 5 EC without any limitation except for the countries mentioned below Country Restriction Reasons remarks Bulgaria None General authorization required for outdoor use and public service France Outdoor use limited to 10 mW e i r p within the band 2454 2483 5 MHz Mi...

Page 4: ...Revision User Manual of PLANET 2 4GHz 802 11n Wireless Outdoor CPE AP Router Model WNAP 6315 Rev 1 0 May 2015 Part No EM WNAP 6315_v1 0 2081 E10620 000 III ...

Page 5: ...ion Precautions 12 3 3 Installing the AP 14 Chapter 4 Quick Installation Guide 16 4 1 Manual Network Setup TCP IP Configuration 16 4 1 1 Configuring the IP Address Manually 16 4 2 Starting Setup in the Web UI 20 Chapter 5 Configuring the AP 21 5 1 Setup Wizard 21 5 2 Operation Mode 26 5 3 TCP IP Settings 28 5 3 1 LAN Interface 28 5 3 2 WAN Interface 29 5 4 Wireless 34 5 4 1 Basic Settings 34 5 4 2...

Page 6: ...1 5 7 8 Upgrade Firmware 92 5 7 9 Save Load Setting 92 5 7 10 Password 94 5 7 11 Logout 95 Chapter 6 Quick Connection to a Wireless Network 96 6 1 Windows XP Wireless Zero Configuration 96 6 2 Windows 7 WLAN AutoConfig 98 6 3 Mac OS X 10 x 101 6 4 iPhone iPod Touch iPad 105 Appendix A Planet Smart Discovery Utility 108 Appendix B Troubleshooting 109 Appendix C Frequently Asked Questions 111 Q1 How...

Page 7: ...URE 5 3 WIZARD SETUP OPERATION MODE 23 FIGURE 5 4 WIZARD TIME ZONE SETUP 23 FIGURE 5 5 WIZARD SETUP LAN INTERFACE 24 FIGURE 5 6 WIZARD WAN INTERFACE SETUP 24 FIGURE 5 7 WIZARD WIRELESS LAN SETTING 25 FIGURE 5 8 WIZARD WIRELESS SECURITY SETTING 25 FIGURE 5 9 OPERATION MODE 26 FIGURE 5 10 LAN SETTING 28 FIGURE 5 11 WAN SETTING 30 FIGURE 5 12 WIRELESS MAIN MENU 34 FIGURE 5 13 TOPOLOGY AP BRIDGE MODE ...

Page 8: ...UTHENTICATION 61 FIGURE 5 43 WIRELESS ACCESS CONTROL 62 FIGURE 5 44 WIRELESS ACCESS CONTROL DENY 63 FIGURE 5 45 WDS MODE 65 FIGURE 5 46 WDS SETTINGS 65 FIGURE 5 47 WDS SET SECURITY 66 FIGURE 5 48 SITE SURVEY 67 FIGURE 5 49 WPS PBC 69 FIGURE 5 50 WPS PBC 69 FIGURE 5 51 WPS PIN 70 FIGURE 5 52 WPS PIN 70 FIGURE 5 53 WPS PIN 70 FIGURE 5 54 SCHEDULE 71 FIGURE 5 55 FIREWALL MAIN MENU 72 FIGURE 5 56 MANA...

Page 9: ...IGHLIGHT AND SELECT THE WIRELESS NETWORK 101 FIGURE 6 12 ENTER THE PASSWORD 102 FIGURE 6 13 CONNECTED TO THE NETWORK 102 FIGURE 6 14 SYSTEM PREFERENCES 103 FIGURE 6 15 SYSTEM PREFERENCES NETWORK 103 FIGURE 6 16 SELECT THE WIRELESS NETWORK 104 FIGURE 6 17 IPHONE SETTINGS ICON 105 FIGURE 6 18 WI FI SETTING 105 FIGURE 6 19 WI FI SETTING NOT CONNECTED 106 FIGURE 6 20 TURN ON WI FI 106 FIGURE 6 21 IPHO...

Page 10: ...age Contents Thank you for choosing PLANET WNAP 6315 Before installing the AP please verify the contents inside the package box WNAP 6315 Quick Guide Plastic Strap PoE Injector Power Adapter If there is any item missing or damaged please contact the seller immediately ...

Page 11: ... installations including omnidirectional yagi sector flat panel and grid antennas Furthermore the WNAP 6315 can directly communicate with the wireless IP cameras by using the popular 2 4GHz frequency band thus turning the surveillance services into a wireless environment Multiple Operation Modes Designed for Various Applications The WNAP 6315 supports as many as 8 wireless operation modes includin...

Page 12: ...eeting the IP55 rating for outdoor usage which is definitely suitable for harsh environments Besides with its UV resistant feature the surface of the WNAP 6315 s lightweight plastic housing does not yield to brittle fracture easily Thus it is as reliable as the metal case but more economical With the proprietary Power over Ethernet PoE design the WNAP 6315 can be easily installed in the areas wher...

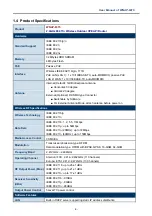
Page 13: ... rated outdoor UV resistant plastic enclosure Passive PoE design Reset button on PoE injector Operating temperature 20 70 degrees C Multiple Operations and Wireless Modes Multiple operation modes Bridge Gateway and WISP Multiple wireless modes AP Bridge AP Router Client Bridge WDS PtP WDS PtMP Repeater Universal Repeater and Client Router WISP Supports multiple SSID to allow users to access differ...

Page 14: ... before power on Wireless RF Specifications Wireless Technology IEEE 802 11b g IEEE 802 11n Data Rate IEEE 802 11b 1 2 5 5 11Mbps IEEE 802 11g up to 54Mbps IEEE 802 11n 20MHz up to 72Mbps IEEE 802 11n 40MHz up to 150Mbps Media Access Control CSMA CA Modulation Transmission Emission type OFDM Data modulation type OFDM with BPSK QPSK 16 QAM 64 QAM Frequency Band 2 412GHz 2 484GHz Operating Channel A...

Page 15: ... 5 Channel Width 20MHz 40MHz Wireless Isolation Enable to isolate each connected wireless client so that they cannot access mutually Encryption Type 64 128 bit WEP WPA WPA PSK WPA2 WPA2 PSK 802 1X Wireless LAN ACL Access Control List filtering Wireless MAC address filtering Supports WPS Wi Fi Protected Setup Wireless Security Enable Disable SSID Broadcast Max Wireless Clients 20 Max WDS APs 8 Max ...

Page 16: ... x 254 mm Weight 485g Installation Pole mounting or wall mounting Power Requirements LAN1 12V DC 1A passive PoE Pin 4 V DC Pin 5 reset Pin 7 8 V DC Power Consumption Max 4W Environment and Certification Operating Temperature 20 70 degrees C Operating Humidity 10 95 non condensing Regulatory CE FCC RoHS Accessory Standard Accessories WNAP 6315 x 1 12V Power Adapter x 1 PoE Injector x 1 Plastic Stra...

Page 17: ...re Installation Please follow the instructions below to connect WNAP 6315 to the existing network devices and your computers 2 1 Hardware Description Dimensions 127 x 63 x 254 mm W x D x H Figure 2 1 Three way View Rear Panel LED Figure 2 2 LED ...

Page 18: ...link LAN1 Blue Blinking Data is transmitting or receiving on the LAN interface Blue On Port linked Blue Off No link LAN2 WAN Blue Blinking Data is transmitting or receiving on the WAN interface Table 2 1 The LED Indication 2 1 1 The Bottom Panel Port The bottom panel provides the physical connectors connected to the power adapter and any other network device Figure 2 3 shows the bottom panel of th...

Page 19: ...User Manual of WNAP 6315 10 Figure 2 4 Port and Connector Description Label PoE Injector Figure 2 5 PoE Injector of WNAP 6315 Figure 2 6 Label of PoE Injector Reset Button ...

Page 20: ... PoE injector to power on the device PIN assignment Pin 4 VDC Pin 5 Reset Pin 7 8 VDC WAN 10 100Mbps RJ45 port auto MDI MDI X Connect this port to the xDSL modem in gateway mode Connect this port to the network equipment in bridge mode Reset Push continually the reset button on the PoE injector about 10 seconds to reset the configuration parameters to factory defaults If you have connected with th...

Page 21: ... performance in mind when selecting your installation site especially where there are electric power and phone lines 4 When installing the WNAP 6315 please note the following things Do not use a metal ladder Do not work on a wet or windy day Wear shoes with rubber soles and heels rubber gloves long sleeved shirt or jacket 5 When the system is operational avoid standing directly in front of it Stro...

Page 22: ...s Use approved non conducting lasers and other safety equipment Make sure all equipment is in good repair If a tower or mast begins falling don t attempt to catch it Stand back and let it fall If anything such as a wire or mast does come in contact with a power line DON T TOUCH IT OR ATTEMPT TO MOVE IT Instead save your life by calling the power company Don t attempt to erect antennas or towers on...

Page 23: ... 6315 to remove the sliding cover Figure 3 1 Connect the Antenna Step 2 Plug the RJ45 Ethernet cable into the PoE LAN Port of the WNAP 6315 Then slide back the cover of the WNAP 6315 to finish the installation Figure 3 2 Connect the Ethernet cable Step 3 Plug the power cord into the DC port and plug the other end of the RJ45 cable into the POE port of the PoE injector See Step 2 Figure 3 3 Connect...

Page 24: ... Successful installation Figure 3 4 Connect the PoE injector Step 5 Pole Mounting Place the strap through the slot on the back of the WNAP 6315 and then around the pole Tighten the strap to secure the WNAP 6315 Figure 3 5 Pole Mounting ...

Page 25: ...jector through the PoE port In the following sections we ll introduce how to install and configure the TCP IP correctly in Windows 7 And the procedures in other operating systems are similar First make sure your Ethernet Adapter is working and refer to the Ethernet adapter manual if needed 4 1 1 Configuring the IP Address Manually Summary Set up the TCP IP Protocol for your PC Configure the networ...

Page 26: ...ck OK to save your settings Now you can run the Ping command in the command prompt to verify the network connection between your PC and the AP The following example is in Windows 7 OS Please follow the steps below 1 Click on Start Run 2 Type cmd in the Search box ...

Page 27: ...tart Menu 3 Open a command prompt type ping 192 168 1 253 and then press Enter If the result displayed is similar to Figure 4 3 it means the connection between your PC and the AP has been established well Figure 4 3 Successful result of Ping command ...

Page 28: ...ns the connection between your PC and the AP has failed Figure 4 4 Failed Result of Ping Command If the address is 0 0 0 0 check your adapter installation security settings and the settings on your AP Some firewall software programs may block a DHCP request on newly installed adapters ...

Page 29: ... address After a moment a login window will appear Enter admin for the User Name and Password both in lower case letters Then click the OK button or press the Enter key Figure 4 6 Login Window Default IP Address 192 168 1 253 Default User name admin Default Password admin If the above screen does not pop up it may mean that your web browser has been set to a proxy Go to Tools menu Internet Options...

Page 30: ...low allowing you to manage the AP with ease Figure 5 1 Main Menu 5 1 Setup Wizard The Setup Wizard will guide the user to configure the WNAP 6315 easily and quickly Select the Setup Wizard on the left side of the screen and by clicking on Next on the Setup Wizard screen shown below you will then name your WNAP 6315 and set up its security Figure 5 2 Setup Wizard ...

Page 31: ...User Manual of WNAP 6315 22 Step 1 Setup Operation Mode The AP supports three operation modes Gateway Bridge and Wireless ISP ...

Page 32: ...Figure 5 3 Wizard Setup Operation Mode Step 2 Time Zone Setting The Time Configuration option allows you to configure update and maintain the correct time on the internal system clock Daylight Saving can also be configured to automatically adjust the time when needed Figure 5 4 Wizard Time Zone Setup ...

Page 33: ...up LAN Interface Figure 5 5 Wizard Setup LAN Interface Step 4 Setup WAN Interface The Wireless AP supports five access modes in the WAN side Please choose the correct mode according to your ISP Service Figure 5 6 Wizard WAN Interface Setup ...

Page 34: ...S and AP WDS Repeater mode Figure 5 7 Wizard Wireless LAN Setting Step 6 Wireless Security Setting Secure your wireless network by turning on the WPA or WEP security feature on the AP For this section you can set WEP and WPA PSK security mode Figure 5 8 Wizard Wireless Security Setting Click the Finished button to make your wireless configuration to take effect ...

Page 35: ...ject Description Gateway In this mode the device enables multi user to share Internet via ADSL Cable Modem The wireless port shares the same IP to ISP through Ethernet WAN port The Wireless port acts the same as a LAN port while at AP Router mode Bridge In this mode the device can be used to combine multiple local networks together to the same one via wireless connections especially for a home or ...

Page 36: ...his mode the device enables multi user to share Internet from WISP The LAN port devices share the same IP from WISP through Wireless port While connecting to WISP the Wireless port works as a WAN port at Client Router mode The Ethernet port acts as a LAN port ...

Page 37: ...fields Object Description IP Address The default LAN IP address of the WNAP 6315 is 192 168 1 253 You can change it according to your request Subnet Mask Default is 255 255 255 0 You can change it according to your request Default Gateway Default is 192 168 1 253 You can change it according to your request DHCP You can select a Disabled Client and Server Default is Disabled meaning the WNAP 6315 m...

Page 38: ...net computers to access the local host resources or devices as needed UPnP devices can be automatically discovered by the UPnP service application on the LAN If you change the IP address of LAN you must use the new IP address to login the AP When the IP address of the WNAP 6315 is changed the clients on the network often need to wait for a while or even reboot before they can access the new IP add...

Page 39: ... correct parameters from your local ISP in the fields which appear below DHCP Client Select DHCP Client to obtain IP Address information automatically from your ISP WAN Access Type Static IP Select Static IP Address if all the Internet port s IP information is provided to you by your ISP Internet Service Provider You will need to enter the IP address subnet mask gateway address and DNS ...

Page 40: ...e you with a username and password This option is typically used for DSL services User Name Enter your PPPoE user name Password Enter your PPPoE password PPTP Choose PPTP Point to Point Tunneling Protocol if your ISP uses a PPTP connection Your ISP will provide you with IP information and PPTP Server IP Address of course it also includes a username and password This mode is typically used for DSL ...

Page 41: ...elds Clone MAC Address You can input a MAC address here for using clone function Enable uPNP Check to disable enable uPNP function default disabled Enable IGMP Proxy Check to disable enable IGMP function default enabled Enable Ping Access on WAN Check to enable the Ping Access on WAN function default disabled Enable Web Server Access on WAN Check to enable the Web Server Access on WAN function def...

Page 42: ...t your DNS servers are set up improperly You should contact your ISP to get DNS server addresses WAN IP whether obtained automatically or specified manually should NOT be on the same IP net segment as the LAN IP otherwise the router will not work properly In case of emergency press the hardware Reset button ...

Page 43: ... the wireless network on this page After the configuration is done please click the Apply Changes button to save the settings First of all the wireless AP supports multiple wireless modes for different network applications which include AP Multiple SSIDs Universal Repeater Client WDS AP WDS It is so easy to combine the WNAP 6315 with the existing wired network The WNAP 6315 definitely provides a t...

Page 44: ...elds Object Description Disable Wireless LAN Interface Check the box to disable the wireless function Band Select the desired mode Default is 2 4GHz B G N It is strongly recommended that you set the Band to 2 4GHz B G N and all of 802 11b 802 11g and 802 11n wireless stations can connect to the WNAP 6315 ...

Page 45: ...ncy of wireless network Default 11 Broadcast SSID If you enable Broadcast SSID every wireless station located within the coverage of the AP can discover its signal easily If you are building a public wireless network enabling this feature is recommended In private network disabling Broadcast SSID can provide better wireless network security Default is Enabled Data Rate Set the wireless data transf...

Page 46: ...vice as a general wireless access point with multiple SSIDs Figure 5 16 Wireless Basic Settings Multiple AP The device supports up to four multiple Service Set Identifiers You can back to the Basic Settings page to set the Primary SSID The SSID s factory default setting is WNAP 6315 VAP1 4 Multiple SSID 1 4 The SSID can be easily changed to connect to an existing wireless network or to establish a...

Page 47: ...it is associated with WDS disabled The wireless repeater relays signal between its stations and the root AP for greater wireless range Figure 5 18 Topology Universal Repeater Mode 1 Example of how to configure Universal Repeater Mode Please take the following steps To configure each wireless parameter please go to the Wireless Basic Settings page Step 1 Configure wireless mode to AP and then check...

Page 48: ...User Manual of WNAP 6315 39 Figure 5 19 Universal Repeater 1 Step 2 Go to Site Survey page to find the root AP Select the root AP that you want to repeat the signal and then click Next ...

Page 49: ...User Manual of WNAP 6315 40 Figure 5 20 Universal Repeater 2 Step 3 Select the correct encryption method and enter the security key Then click Connect Figure 5 21 Universal Repeater 3 ...

Page 50: ...rsal Repeater 4 Step 5 Go to Management Status page to check whether the state of Repeater interface should be Connected Figure 5 23 Universal Repeater 5 Client Infrastructure Combine the Wireless AP to the Ethernet devices such as IP camera to make it be wireless station Figure 5 24 Topology Client Mode ...

Page 51: ...User Manual of WNAP 6315 42 Figure 5 25 Wireless Basic Settings Client ...

Page 52: ...S Settings submenu for the related configuration Furthermore click the Multiple AP button to enable multiple SSID function Network Type In Infrastructure the wireless LAN serves as a wireless station And the user can use the PC equipped with the WNAP 6315 to access the wireless network via other access points In Ad hoc the wireless LAN will use the Ad hoc mode to operate Default is Infrastructure ...

Page 53: ...ically it s not necessary to change this value unless you know what will happen after modification Default is Auto Enable Mac Clone Single Ethernet Client Enable Mac Clone Example of how to configure Client Mode Please take the following steps To configure each wireless parameter please go to the Wireless Basic Settings page Step 1 Go to Wireless Site Survey page and click Site Survey button Figur...

Page 54: ...User Manual of WNAP 6315 45 Step 2 Choose the root AP from the list If the root AP is not listed in the table re click Site Survey to update the list Figure 5 27 Client AP List ...

Page 55: ...ect Figure 5 28 Client Security Step 4 Wait until the connection established Check the Add to Wireless Profile option and then reboot it Figure 5 29 Client Status WDS Connect this Wireless AP with up to 8 WDS capable wireless APs to expand the scope of network Figure 5 30 Topology WDS PtP Mode ...

Page 56: ...User Manual of WNAP 6315 47 Figure 5 31 Topology WDS PtMP Mode ...

Page 57: ...g fields Object Description Disable Wireless LAN Interface Check the box to disable the wireless function Band Select the desired mode Default is 2 4GHz B G N It is strongly recommended that you set the Band to 2 4GHz B G N and all of 802 11b 802 11g and 802 11n wireless stations can connect to the ...

Page 58: ...uration Furthermore click the Multiple AP button to enable multiple SSID function Channel Width You can select 20MHz or 40MHz Control Sideband You can select Upper or Lower Channel Number You can select the operating frequency of wireless network Data Rate Set the wireless data transfer rate to a certain value Since most of wireless devices will negotiate with each other and pick a proper data tra...

Page 59: ...g fields Object Description Disable Wireless LAN Interface Check the box to disable the wireless function Country Select your region from the pull down list This field specifies the region where the wireless function of the Router can be used It may be illegal to use the wireless function of the Router ...

Page 60: ...iguration Furthermore click the Multiple AP button to enable multiple SSID function SSID The ID of the wireless network User can access the wireless network via the ID only However if you switch to Client Mode this field becomes the SSID of the AP you want to connect with Default WNAP 6315 Channel Width You can select 20MHz or 40MHz Control Sideband You can select Upper or Lower Channel Number You...

Page 61: ...ge To enable Universal Repeater Mode check the box and enter the SSID you want to broadcast in the field below Then please click Security submenu for the related settings of the AP you want to connect with 5 4 2 Advanced Settings Choose menu Wireless Advanced Settings to configure the wireless advanced settings for the wireless network on this page After the configuration please click the Apply Ch...

Page 62: ...Wireless Advanced page from Internal to External Default is Internal IAPP IAPP Inter Access Point Protocol enabled is recommended as it describes an optional extension to IEEE 802 11 that provides wireless access point communications among multivendor systems Default is Enabled Protection Enables a backward compatible protection mechanism for 802 11b clients When the protection mode is enabled can...

Page 63: ... adjust the wireless output power to different levels For short distance of PtP connection within 1Km it is suggested to reduce the output power to 50 or lower to prevent interference with each other Default is 100 5 4 3 Security Choose menu Wireless Security to configure the settings of wireless security for the wireless network on this page After the configuration please click the Apply Changes ...

Page 64: ...f both WPA and WPA2 at the same time Enterprise RADIUS When you select the authentication mode based on Enterprise Radius Server please enter the IP Address Port and Password of the Radius Server Authentication Mode Personal Pre Shared Key When you select the other authentication mode based on Personal Pre Shared Key please enter at least 8 ASCII characters Passphrase or 64 Hexadecimal characters ...

Page 65: ...and all its clients There are three options provided Open System this authentication accepts any client attempting to connect the Wireless AP without verifying its identity Shared Key the shared key security uses a WEP key to authenticate clients connecting to the network and for data encryption Auto allows wireless clients to connect to the network using Open WEP uses WEP for encryption only or S...

Page 66: ... as the encryption method to your wireless network Authentication Mode Select Enterprise RADIUS for user authentication and you will require a RADIUS authentication server to be configured on the wired network Select Personal Pre Shared Key and you will require a pre shared key to be configured for client authentication Management Frame Protection Management frame protection MFP provides security ...

Page 67: ...ge Authentication Code CBC MAC for message integrity The AES Counter Mode CBCMAC Protocol AESCCMP provides extremely robust data confidentiality using a 128 bit key Use of AES CCMP encryption is specified as a standard requirement for WPA2 Before implementing WPA2 in the network be sure client devices are upgraded to WPA2 compliant hardware Pre Shared Key Format Specify the format of the key pass ...

Page 68: ...rotection Management frame protection MFP provides security for the otherwise unprotected and unencrypted 802 11 management messages passed between access points and clients MFP provides both infrastructure and client support If you choose this to Required then clients are allowed to associate only if MFP is negotiated If you choose Capable then the non supporting clients are allows to associate w...

Page 69: ...ent devices are upgraded to WPA2 compliant hardware RADIU Server IP Address Enter the RADIUS server host IP address RADIU Server Port Set the UDP port used in the authentication protocol of the RADIUS server Range 1024 65535 Default 1812 RADIU Server Password A shared text string used to encrypt messages between the access point and the RADIUS server Be sure that the same text string is specified ...

Page 70: ... is a standard framework for network access control that uses a central RADIUS server for user authentication This control feature prevents unauthorized access to the network by requiring an 802 1X client application to submit user credentials for authentication Figure 5 42 Security Settings 802 1x Authentication ...

Page 71: ...in the authentication protocol of the RADIUS server Range 1024 65535 Default 1812 RADIU Server Password A shared text string used to encrypt messages between the access point and the RADIUS server Be sure that the same text string is specified on the RADIUS server Do not use blank spaces in the string Enter a shared secret password between 1 and 99 characters in length 5 4 4 Access Control Choose ...

Page 72: ... the list Current Access Control List You can select some MAC addresses and click the Delete Selected button to delete it Wireless Access Control example To deny a PC at the MAC address of 00 30 4F 00 00 01 to connect to your wireless network do as follows Step 1 Select Deny from MAC Address Filter drop down menu Step 2 Enter 00 30 4F 00 00 01 in the MAC address box and click Add Step 3 Click the ...

Page 73: ... 5 WDS WDS Wireless Distribution System feature can be used to extend your existing wireless network coverage Before configuring the WDS Setting page you have to select the wireless mode to WDS on the Wireless Basic Settings web page ...

Page 74: ...gure 5 45 WDS Mode Choose menu Wireless WDS Settings to configure WDS to connect the WNAP 6315 with another AP on this page After the configuration please click the Apply Changes button to save the settings Figure 5 46 WDS Settings ...

Page 75: ...k the Set Security button to configure the wireless security parameters of the AP you want to connect via WDS Show Statics Click the Show Statics button to show the WDS AP Current WDS AP List You can select some MAC addresses of the AP and click the Delete Selected button to delete it Once clicked Set Security to enter the following page to configure the encryption method and pre shared key for th...

Page 76: ...any Access Point is found you could choose any one to connect with manually when the Client Mode is enabled Figure 5 48 Site Survey 5 4 7 WPS WPS Wi Fi Protected Setup is designed to ease setup of security Wi Fi networks and subsequently network management This Wireless Router supports WPS features for AP mode AP WDS mode Infrastructure Client mode and the wireless root interface of Universal Repe...

Page 77: ...via WPS is established or not Self PIN Number It is the PIN number of the WNAP 6315 here Push Button Configuration Click the Start PBC to activate WPS as well in the client device within 2 minutes Client PIN Number In addition to the PBC method you can also use the PIN method to activate the WPS Just enter the PIN number of the client device in the field and click the Start PIN button The WPS encr...

Page 78: ...nished within 2 minutes iii Wait for a while until the next screen appears Click OK to complete the WPS configuration B By PIN If the new device supports Wi Fi Protected Setup and the PIN method you can add it to the network by PIN with the following two methods Method One Enter the PIN of your Wireless adapter into the configuration utility of the AP i Enter the PIN code of the wireless adapter i...

Page 79: ... Enter the PIN of the AP into the configuration utility of your Wireless adapter i Click the Start PBC Button on the WPS page of the AP Get the Current PIN code of the AP in WPS page each AP has its unique PIN code Figure 5 53 WPS PIN ii For the configuration of the wireless adapter please choose the option that you want to enter the PIN of the AP Registrar in the configuration utility of the Wire...

Page 80: ... guests during specific times of the day for parental control or security reasons Choose menu Wireless Schedule to configure the schedule rule of enabling wireless function After the configuration please click the Apply Changes button to save the settings Figure 5 54 Schedule When setting the Wireless Schedule it is important to ensure that your System Clock settings have been configured If not yo...

Page 81: ... a particular LAN IP address It helps users to host some servers behind the firewall After the configuration please click the Apply Changes button to save the settings Figure 5 6 1 Port Filtering The page includes the following fields Object Description Enable Port Filtering Enable Port Filtering function Port Range Add ports you want to control For TCP and UDP Services enter the beginning of the ...

Page 82: ...s of the user you wish to block Choose menu Firewall IP Filtering and you can configure which IP address and protocol to be restricted After the configuration please click the Apply Changes button to save the settings Figure 5 6 1 IP Filtering The page includes the following fields Object Description Enable IP Filtering Check this box to enable IP Filter function Local IP Address Add LAN IP addres...

Page 83: ...gure which computer of the specified MAC address to be restricted After the configuration please click the Apply Changes button to save the settings Figure 5 7 4 MAC Filtering The page includes the following fields Object Description Enable MAC Filtering Enable MAC filtering MAC Address Add MAC address you want to control You can add maximum 20 MAC Addresses in the table Comment The description of...

Page 84: ...ription Enable Port Forwarding Enable Port Forwarding function IP Address Add LAN IP address of specified host or server on the private local network Protocol Select the port number protocol type TCP UDP or both If you are unsure then leave it to the default both protocol Port Range Add ports you want to control For TCP and UDP Services enter the beginning of the range of port numbers used by the ...

Page 85: ...ave the settings Figure 5 7 3 URL Filtering The page includes the following fields Object Description Enable URL Filtering Check this box to enable URL Filter function IP Address The IP Address that you want to filter URL Address The URL Address that you want to filter Check the Select box of which rule you want to delete and then click the Delete Selected button to delete it If you wish to block ...

Page 86: ...computer to be exposed to the Internet so that some applications software especially Internet online game can have two way connections DMZ Host IP Address Enter the IP address of a particular host in your LAN which will receive all the packets originally going to the WAN port Public IP address above 5 6 QoS The QoS Quality of Service helps improve your network gaming performance by prioritizing ap...

Page 87: ...plink speed automatically by the WNAP 6315 Or enter the uplink data rate manually in the field below Automatic Downlink Speed Check the box to adjust the downlink speed automatically by the WNAP 6315 Or enter the downlink data rate manually in the field below QoS Rule Setting To set the priority rule you can appoint the computer by IP address or MAC address and enter it in the correct field Select...

Page 88: ...Firmware Upgrade Reboot Password Change and Syslog Figure 5 56 Management Main Menu 5 7 1 Status You can use this function to realize the instantaneous information of the Wireless AP The Information displayed here may vary on different configurations Choose menu Management Status to show the current status and some basic settings of the WNAP 6315 ...

Page 89: ...User Manual of WNAP 6315 80 Figure 5 57 Status 5 7 2 Statistics Choose menu Management Statistics to show the packet counters for transmission and reception regarding wireless and Ethernet network ...

Page 90: ... wireless LAN interface Ethernet LAN Sent Packets It shows the statistic count of sent packets on the Ethernet LAN interface Ethernet LAN Received Packets It shows the statistic count of received packets on the Ethernet LAN interface Refresh Click the refresh the statistic counters on the screen 5 7 3 DDNS Dynamic DNS Settings Enable Operation Mode Gateway or Wireless ISP mode and then enter the D...

Page 91: ...vider Select a server provider or disable the existing server Domain Name Enter the host name or domain name provided by DDNS provider Account Enter the DDNS user name of the DDNS account Password Enter the DDNS password of the DDNS account Example of Planet DDNS Settings Please go to http www planetddns com to register a Planet DDNS account Please refer to the FAQ http www planetddns com index ph...

Page 92: ...mic DDNS and PlanetDDNS com from the list of Dynamic DNS Provider to use the Planet DDNS service Step 2 Configure the DDNS account that has been registered in Planet DDNS website Domain Name Enter your DDNS host format xxx planetddns com xxx is the registered domain name User Name Email Enter your registered DDNS user name Password Enter the password of your account ...

Page 93: ...ccess on WAN port and configure WAN connection to Static IP fixed IP Step 4 Save the setting and connect your WAN port of the Wireless AP to the internet via Ethernet cable In a remote computer enter the DDNS host name as the figure shown below Then you should be able to login the WNAP 6315 remotely ...

Page 94: ...g Planet Easy DDNS service Step 1 Select Enable Easy DDNS to use the Planet Easy DDNS service Domain Name Display the specified domain name for this device Format ptxxxxxx planetddns com xxxxxx is the last six digit of the WAN Port MAC address Step 2 Go to TCP IP Settings WAN Interface Setup to enable Web Server Access on WAN port and configure WAN connection to Static IP fixed IP ...

Page 95: ... remotely 5 7 4 Time Zone Setting This section assists you in setting the Wireless AP s system time You can either select to set the time and date manually or automatically obtain the GMT time from Internet Choose menu Management Time Zone Setting to configure the system time You can also maintain the system time by synchronizing with a public time server over the Internet After the configuration ...

Page 96: ...on your selection Automatically Adjust Daylight Saving Select the time offset if your location observes daylight saving time Enable NTP client update Check to enable NTP update Once this function is enabled AP will automatically update current time from NTP server NTP Server User may select prefer NTP sever or input address of NTP server manually If the AP loses power for any reason it cannot keep...

Page 97: ...erved time in one or more days of a week Every day select this option to let the device reboot automatically according to the reserved time every day Weekday Check one or more days to let the device auto reboot on schedule When choosing Every day as your reboot plan the Weekday will be grayed out disabled which means Every day will auto reboot at the time that you scheduled 1 This setting will onl...

Page 98: ...y Sunday choose Weekday in the Reboot Plan field Figure 5 62 Schedule Reboot Example Step 3 Click the Apply Changes button to take this function effect 5 7 6 Denial of Service DoS The Wireless Router can prevent specific DoS attacks from entering your network A Denial of Service DoS attack is characterized by an explicit attempt by hackers to prevent legitimate users of a service from using that s...

Page 99: ...of WNAP 6315 90 Figure 5 7 6 Denial of Service The page includes the following fields Object Description Enable DoS Prevention Check to enable DoS function User may set other related configurations about DoS below ...

Page 100: ...wing fields Object Description Enable Log Check to enable log function System all Check this option to display all the system logs Wireless Check this option to display only the logs related to wireless module Enable Remote Log Enable this option if you have a syslog server currently running on the LAN and wish to send log messages to it Log Server IP Address Enter the LAN IP address of the Syslog...

Page 101: ...ant to upgrade and press Upload to perform upgrade Please wait till the related information is shown on the screen after upgrade is finished Do not disconnect the Wireless AP from your management PC the PC you use to configure the device or power off it during the upgrade process otherwise it may be permanently damaged The Wireless AP will restart automatically when the upgrade process which takes...

Page 102: ...nfiguration file of the WNAP 6315 and then click the Upload button to reload the configuration back into the WNAP 6315 Reset Settings to Default Click the Reset button to reset all settings of the WNAP 6315 to factory default Factory Default Settings User Name admin Password admin IP Address 192 168 1 253 Subnet Mask 255 255 255 0 Default Gateway 192 168 1 253 DHCP Disabled SSID WNAP 6315 Wireless...

Page 103: ...fy the user name and password Choose menu Management Password to change the user name and password which is inputted to access the web UI of the WNAP 6315 Figure 5 66 Password Setup he page includes the following fields T Object Description User Na Enter user name me New Password Input password for this user Confirmed Password Confirm password again For the sake of security it is highly recommende...

Page 104: ...User Manual of WNAP 6315 95 5 7 11 Logout To logout the WNAP 6315 please select Logout from the left side menu Then click OK to logout Figure 5 67 Logout ...

Page 105: ... 6 1 Windows XP Wireless Zero Configuration Step 1 Right click on the wireless network icon displayed in the system tray Figure 6 1 System Tray Wireless Network Icon Step 2 Select View Available Wireless Networks Step 3 Highlight and select the wireless network SSID to connect 1 Select SSID default 2 Click the Connect button Figure 6 2 Choose a wireless network ...

Page 106: ...ryption key that is configured in section 5 4 3 3 Click the Connect button Figure 6 3 Enter the network key Step 5 Check if Connected is displayed Figure 6 4 Choose a wireless network Connected Some laptops are equipped with a Wireless ON OFF switch for the internal wireless LAN Make sure the hardware wireless switch is switched to ON position ...

Page 107: ... connection tool is similar to wireless zero configuration tool in Windows XP Step 1 Right click on the network icon displayed in the system tray Figure 6 5 Network icon Step 2 Highlight and select the wireless network SSID to connect 1 Select SSID default 2 Click the Connect button Figure 6 6 WLAN AutoConfig If you will be connecting to this Wireless AP in the future check Connect automatically ...

Page 108: ...nter the encryption key of the Wireless AP 1 The Connect to a Network box will appear 2 Enter the encryption key that is configured in section 5 4 3 3 Click the OK button Figure 6 7 Type the network key Figure 6 8 Connecting to a Network ...

Page 109: ...User Manual of WNAP 6315 100 Step 5 Check if Connected is displayed Figure 6 9 Connected to a Network ...

Page 110: ...fault SSID of the WNAP 6315 is configured to default Step 1 Right click on the network icon displayed in the system tray The AirPort Network Connection menu will appear Figure 6 10 Mac OS Network icon Step 2 Highlight and select the wireless network SSID to connect 1 Select and SSID default 2 Double click on the selected SSID Figure 6 11 Highlight and select the wireless network ...

Page 111: ...section 5 4 3 2 Click the OK button Figure 6 12 Enter the Password If you will be connecting to this Wireless AP in the future check Remember this network Step 5 Check if the AirPort is connected to the selected wireless network If Yes then there will be a check symbol in the front of the SSID Figure 6 13 Connected to the Network ...

Page 112: ...e the MAC OS X Wireless settings Step 1 Click and open the System Preferences by going to Apple System Preference or Applications Figure 6 14 System Preferences Step 2 Open Network Preference by clicking on the Network icon Figure 6 15 System Preferences Network ...

Page 113: ...select the available wireless network 1 Choose the AirPort on the left menu make sure it is ON 2 Select Network Name default here If this is the first time to connect to the Wireless AP it should show Not network selected Figure 6 16 Select the Wireless Network ...

Page 114: ...owing sections the default SSID of the WNAP 6315 is configured to default Step 1 Tap the Settings icon displayed in the home screen Figure 6 17 iPhone Settings icon Step 2 Check Wi Fi setting and select the available wireless network 3 Tap General Network 4 Tap Wi Fi If this is the first time to connect to the Wireless AP it should show Not Connected Figure 6 18 Wi Fi Setting ...

Page 115: ...ss network SSID in Choose a Network 1 Turn on Wi Fi by tapping Wi Fi 2 Select SSID default Figure 6 20 Turn on Wi Fi Step 4 Enter the encryption key of the Wireless AP 1 The password input screen will be displayed 2 Enter the encryption key that is configured in section 5 4 3 3 Tap the Join button ...

Page 116: ... 107 Figure 6 21 iPhone Enter the Password Step 5 Check if the device is connected to the selected wireless network If Yes then there will be a check symbol in the front of the SSID Figure 6 22 iPhone Connected to the Network ...

Page 117: ... you to running the Planet Smart Discovery Utility Step 1 Deposit the Planet Smart Discovery Utility in administrator PC Step 2 Run this utility and the following screen appears Step 3 Press the Refresh button for the current connected devices in the discovery list as shown in the following screen Step 3 Press the Connect to Device button and then the Web login screen appears The fields in white b...

Page 118: ...onds e Use the Smart Discovery Tool to see if you can find the AP or not f If you did a firmware upgrade and this happens contact your dealer of purchase for help g If all the solutions above don t work contact the dealer for help I can t get connected to the Internet a Go to Status Internet Connection menu on the router connected to the AP and check Internet connection status b Please be patient ...

Page 119: ...r after that d Try to know what computers do on your local network If someone s transferring big files other people will think Internet is really slow e If this never happens before call you Internet service provider to know if there is something wrong with their network I can t log into the web management interface the password is wrong a Make sure you re connecting to the correct IP address of t...

Page 120: ...requently Asked Questions Q1 How to set up the AP Client Connection Topology Step 1 Use static IP in the PCs that are connected with AP 1 WNAP 6315 Site 1 and AP 2 Client Site 2 In this case Site 1 is 192 168 1 100 and Site 2 is 192 168 1 200 ...

Page 121: ... 1 go to Wireless Basic Settings to configure it to AP Mode Then configure the following wireless parameters for your wireless network 1 Network ID SSID set to a unique value 2 Channel set to a fixed one or auto suggested set to fixed channel ...

Page 122: ... of WNAP 6315 113 Step 3 Go to Wireless Security to configure the security setting Step 4 In AP 2 modify the default IP to the same IP range but different from AP 1 In this case the IP is changed to 192 168 1 252 ...

Page 123: ...User Manual of WNAP 6315 114 Step 5 In AP 2 configure it in Client mode ...

Page 124: ... Manual of WNAP 6315 115 Step 6 Go to Wireless Site Survey to find the AP 1 Then select it and click Next Step 7 Configure the Encryption and Pre Shared Key which must be the same as AP 1 Then click Connect ...

Page 125: ...User Manual of WNAP 6315 116 Step 8 Check Add to Wireless Profile and click Reboot Now to apply the setting Step 9 Go to Management Status to check the connection state should be Connected ...

Page 126: ... Use command line tool to ping each other to ensure the link is successfully established From Site 1 ping 192 168 1 200 and in Site 2 ping 192 168 1 100 Step 11 Configure the TCP IP settings of Site 2 to Obtain an IP address automatically ...

Page 127: ...nternet through the wireless connection The attention of the following hints should be paid 1 The encryption method must be the same as that of both sites if configured 2 Both sites should be Line of Sight 3 For the short distance connection less than 1km please reduce the RF Output Power of both sites to half or lower ...

Page 128: ...AP 6315 119 Q2 How to setup the WDS Connection Topology Step 1 Use static IP in the PCs that are connected with WNAP 6315 1 Site 1 and WNAP 6315 2 Site 2 in this case Site 1 is 192 168 1 100 and Site 2 is 192 168 1 200 ...

Page 129: ...User Manual of WNAP 6315 120 Step 2 In AP 1 go to Wireless Basic Settings to configure it to WDS Mode Then set the channel number to a fixed one ...

Page 130: ...configure the AP 2 s MAC address In AP 1 s WDS Setting configure AP 2 s MAC address Step 4 If you select Reboot Later you can click Set Security to continue to configure the encryption and security key of the WDS connection Then click Apply Changes to apply the setting ...

Page 131: ...User Manual of WNAP 6315 122 Step 5 In AP 2 modify the default IP to the same IP range but different from AP 1 In this case the IP is changed to 192 168 1 252 ...

Page 132: ...User Manual of WNAP 6315 123 Step 6 In AP 2 configure it to WDS mode and set the channel to the fixed one which is the same as AP 1 ...

Page 133: ...reless WDS Settings to configure the AP 1 s MAC address In AP 1 s WDS Setting configure AP 2 s MAC address Step 8 If you select Reboot Later you can click Set Security to continue to configure the encryption and security key of the WDS connection ...

Page 134: ...ssfully established From Site 1 ping 192 168 1 200 and in Site 2 ping 192 168 1 100 The attention of the following hints should be paid 1 The encryption method and channel must be the same for both sites 2 Both sites should be Line of Sight 3 For the short distance connection less than 1km please reduce the RF Output Power of both sites to half or lower ...

Page 135: ... For the evaluation regarding the R TTE the following standards were applied EN 55022 CLASS B 2010 AC 2011 EN 61000 3 2 2006 A1 2009 A2 2009 EN 61000 3 3 2013 EN 55024 2010 IEC61000 4 2 2008 IEC61000 4 3 2006 A1 2007 A2 2010 IEC61000 4 4 2012 IEC61000 4 5 2014 IEC61000 4 6 2013 IEC61000 4 8 2009 IEC61000 4 11 2004 EN 300 328 V1 8 1 2012 EN301 489 1 V1 9 2 2011 EN 301 489 17 V2 2 1 2012 EN 62311 20...

Page 136: ...nia wszystkie istotne wymogi i klauzule zawarte w dokumencie Directive 1999 5 EC Ελληνικά ΜΕ ΤΗΝ ΠΑΡΟΥΣΑ PLANET Technology Corporation ΔΗΛΩΝΕΙ ΟΤΙ ΑΥΤΟ Outdoor Wireless APΣΥΜΜΟΡΦΩΝΕΤΑΙ ΠΡΟΣ ΤΙΣ ΟΥΣΙΩΔΕΙΣ ΑΠΑΙΤΗΣΕΙΣ ΚΑΙ ΤΙΣ ΛΟΙΠΕΣ ΣΧΕΤΙΚΕΣ ΔΙΑΤΑΞΕΙΣ ΤΗΣ ΟΔΗΓΙΑΣ 1999 5 ΕΚ Português PLANET Technology Corporation declara que este Outdoor Wireless AP está conforme com os requisitos essenciais e outras ...

Reviews: