background image

25

Chapter5 Web Management

5

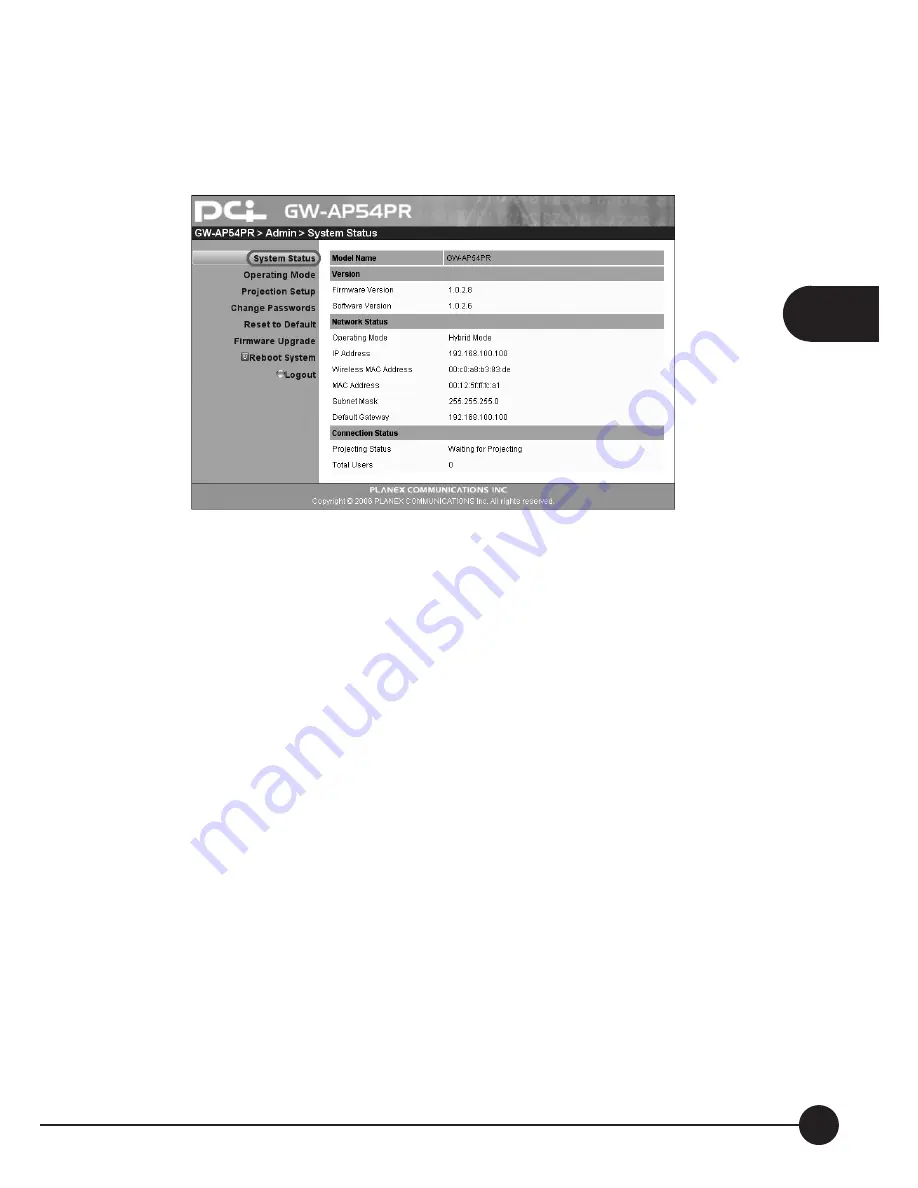
5.5 System Status

*** Click

[System Status]

, shows current system status.

Model Name

: Product model name

Version:

1.

Firmware version:

Product firmware version number.

2.

Software version:

Windows client utility version number.

Network Status:

1.

Operating Mode:

current operating mode

2.

IP address:

IP address of GW-AP54PR

3.

MAC address:

MAC address of GW-AP54PR

4.

Subnet Mask:

Subnet mask of GW-AP54PR

5.

Default Gateway:

Default gateway of GW-AP54PR

Connection Status:

1.

Projecting status:

It can be

ņ

Waiting for projecting

Ň

or

ņ

Projecting

Ň

2.

Total Users:

The number of users login to GW-AP54PR now

Summary of Contents for GW-AP54PR

Page 1: ...2 4 GHz IEEE 802 11g 54Mbps Wireless Presenter Gateway GW AP54PR User s Manual ...

Page 2: ...perational problems while conÀguring or setting up the product you may contact with our Customer Service Department or ask the agent or the distributor from which you bought the product for help Moreover during warranty if you Ànd any defect or breakdown of the product you may bring the product assembly and its warranty card to our company or to where you bought the product to ask for repair ŘEver...

Page 3: ...Trademarks All trade names and trademarks are the properties of their respective companies Copyright 2006 All Rights Reserved ...

Page 4: ...tion 5 Chapter3 Connect your PC to GW AP54PR 7 Chapter4 Client Utility 13 4 1 Starting Program 13 4 2 Login to GW AP54PR 15 4 3 Buttons Description 15 4 4 Start Presentation 16 4 5 Stop Presentation 16 4 6 Open Web Page 16 4 7 Searching Server 17 4 8 System Information 18 4 9 Exit Program 18 Chapter5 Web Management 19 5 1 Home Page 19 ...

Page 5: ...3 5 4 Login Web Admin 24 5 5 System Status 25 5 6 Operating Mode 26 5 7 Project Setup 32 5 8 Change Passwords 33 5 9 Reset to Default 34 5 10 Firmware Upgrade 36 5 11 Reboot System 36 5 12 Logout 36 Chapter6 Appendix 6 1 Wall Mount 37 GW DSMM Contents ...

Page 6: ...n easily download the driver and connect to GW AP54PR œFlexibility GW AP54PR is compatible with all kinds of projectors and using wired or wireless connection to display presentations Instantly project your screen to the projector within just one click No more bothersome cables œPerformance GW AP54PR has the ability to deliver real time animation screens for up to 1024x768 resolutions in 24 bit co...

Page 7: ...an easily login to GW AP54PR and switch the computer s screen to projector without moving the computer to the projector œDifferent operating mode to fulfill both Wireless and Ethernet environment œOne click operation User friendly graphic interface allows users to use it without any training œIntelligent searching function ...

Page 8: ...splays œReal time display for PowerPoint presentations images and applications œSupports display resolutions up to 1024x768 with 24 bit color œSoftware is directly downloaded from the device installation CD is not required œProvides session security login and wireless WEP key to protect presentation contents œConference control function is provided for the host to moderate a meeting œProvides frie...

Page 9: ...1 4 GW AP54PR 1 3 Product Functions œFront Panel œRear Panel LAN LED WLAN LED Power LED Power Button DC Socket VGA Socket RJ 45 Socket Reset Button Antenna ...

Page 10: ...ion 1 Connect the DC plug of the power adapter to GW AP54PR DC socket and other side to AC socket 2 Connect projector s VGA cable to GW AP54PR VGA connector on the rear panel 3 Power on both projector and GW AP54PR 4 Make sure your PCs NBs WLAN is enabled ...

Page 11: ...e GW AP54PR for the very first time please be aware that the default status of GW AP54PR is that it can only be connected with via Wireless network After login GW AP54PR through wireless network you may change the login mode ...

Page 12: ...4PR is ready now If the projector shows no screen please make sure both the projector and GW AP54PR powered on and check if the VGA connection installed properly 2 Open your web browser directly or enter the IP address to enter GW AP54PR s homepage œThe default IP address isņ192 168 100 100Ň œOr refer to the IP address which shown on the projector screen ...

Page 13: ...rogram œPressņLoginŇfunction to download software the default password is ņpasswordŇ œYou may execute this program directly or save it then perform it later œIt may shows the Hardware Installation warning dialog box just click ņContinue AnywayŇ to continue œAfter install the program the GW AP54PR shortcut icon shows on the desktop ...

Page 14: ...9 3 Chapter3 Connect your PC to GW AP54PR ...

Page 15: ... AP54PR 5 Make sure your personal firewall allows GW AP54PR software to pass through œWhen you see below dialog box just clickņUnblockŇto allow firewall to add this program on the exception list automatically ...

Page 16: ...y search GW AP54PR and if found one GW AP54PR aņLOGIN CODEŇ dialog box comes out Then enter the LOGIN CODE to start projecting You can find the Login Code on the projector screen 7 If Login Code is correct it will project your PC screen to the projector automatically Or you may click theņPlayŇicon to proceed ...

Page 17: ...4PR already before you perform the program Then click the GW AP54PR icon on the desktop to execute the program the steps are shown as below 1 The program will enter Searching state to search for GW AP54PR automatically 2 If found any GW AP54PR thenņLogin CodeŇdialog box will pop up 3 If found nothing it will enter the Disconnecting state and the ņReconnectŇbutton shows œSearching for GW AP54PR ...

Page 18: ...14 GW AP54PR 4 œGW AP54PR is founded and please enter the login code œFail to find GW AP54PR ...

Page 19: ...Code on the projector screen 4 3 Buttons Description 1 After login successfully operating UI comes out 2 Click the following buttons to Start or Stop project your presentation data to the projector screen Start projecting Stop projecting Refresh screen Login Code Function menu When projecting the icon is blinking Minimize the program Exit the program ...

Page 20: ... to start wireless projection 4 5 Stop Presentation Click to stop wireless projection 4 6 Open Web Page Click to find function menu and selectņWeb AdminŇto open Web page for management The web page function will be described on the next chapter ...

Page 21: ...17 Chapter4 Client Utility 4 4 7 Searching Server ClickņSearch ServerŇto search for GW AP54PR again It will show you the Login box or show Reconnect box to let you try again ...

Page 22: ...18 GW AP54PR 4 4 8 System Information ClickņInfoŇto show system information It includes product model number IP address and other information 4 9 Exit Program Click to terminate the program ...

Page 23: ...Make sure all the PCs NBs connect to GW AP54PR successfully 2 Open the web browser it should enter the homepage of GW AP54PR automatically 3 If not enter your IP address on the browser you can see the IP on the screen 4 The default IP address isņ192 168 100 100Ň ...

Page 24: ...directly 4 Follow Installation Wizard instructions to proceed till the installation process is complete 5 If pop upņWindows Security AlertŇbecause Windows firewall block this program You just pressņUnblockŇbutton to continue installation It may also shows the Hardware Installation warning dialog box just clickņContinue AnywayŇto continue 6 Once installation complete a utility shortcut come out on ...

Page 25: ...21 Chapter5 Web Management 5 ...

Page 26: ...22 GW AP54PR 5 ...

Page 27: ... let you host a meeting smoothly without projector cable swapping and each participant can show their slides easily 2 SelectņConference ControlŇfunction 3 Enter password the default value isņpasswordŇ and pressņLoginŇ button 4 After login you can see a User List which indicates all of users connected with GW AP54PR box There are three columns ņ Computer NameŇ ņPlay ControlŇandņIP AddressŇ shows th...

Page 28: ... NBs which connected to GW AP54PR œPlay controlĈCurrent user s projecting status Project the user s computer screen to Projector Stop the user which is just projecting œIP addressĈThe IP address of the Pc NB which currently connect to GW AP54PR 5 4 Login Web Admin ClickņAdminŇand enter the default password ņpasswordŇto login the page for web administrator ...

Page 29: ...ion Windows client utility version number Network Status 1 Operating Mode current operating mode 2 IP address IP address of GW AP54PR 3 MAC address MAC address of GW AP54PR 4 Subnet Mask Subnet mask of GW AP54PR 5 Default Gateway Default gateway of GW AP54PR Connection Status 1 Projecting status It can beņWaiting for projectingŇorņProjectingŇ 2 Total Users The number of users login to GW AP54PR no...

Page 30: ...26 GW AP54PR 5 5 6 Operating Mode GW AP54PR provides three kinds of operation mode You can choose a mode which is suitable for you according to your office network configurations 1 Independent Mode ...

Page 31: ... will be provided by GW AP54PR automatically œGW AP54PR provides DHCP server function in this mode œYou cannot connect to office network through GW AP54PR s LAN port because it is disabled IP Setup œIPAddress The default value is 192 168 100 100 œSubnet Mask The default value is 255 255 255 0 DHCP Server Setup œStart IP The start IP address of DHCP Server œEnd IP The end IP address of DHCP Server ...

Page 32: ...can all the wireless channels and select a clear channel automatically œWEP you can disable the WEP key or select one of 64bit or 128bit in ASCII or HEX string œKey If WEP is enabled you have to set key value according to WEP mode you selected Apply press button to select this mode Cancel press button to abort action Back back to the operation mode main menu 2 Hybrid Mode ...

Page 33: ... œIPAddress The default value is 192 168 100 100 œSubnet Mask The default value is 255 255 255 0 œDefault Gateway The default value is 192 168 100 100 Wireless Setup œSSID This is SSID of GW AP54PR The string length is 32 bytes œChannel Set fixed channel or Auto ņAutoŇmeans after power on GW AP54PR it will scan all the wireless channels and select a clear channel automatically œWEP you can disable...

Page 34: ...e network œThe client PCs NBs also connect to office Access Point Router so IP is assigned by your office DHCP server œThe GW AP54PR IP needs to be assigned manually Make sure both GW AP54PR and client PC NB are on the same segment œHowever in this mode the presentation performance maybe interrupted by other PCs NBs access WLAN Router Access Point access such as internet browsing œWhen GW AP54PR f...

Page 35: ...ce WLAN Router Access Point that GW AP54PR want to connect to The string length is 32 bytes œChannel Set fixed channel or Auto ņAutoŇmeans after power on GW AP54PR it will scan all the wireless channels and select a clear channel automatically œWEP you can disable WEP key or select 64bit or 128bit in ASCII or HEX string type œKey If WEP is enabled you have to set WEP Key value according to WEP mod...

Page 36: ...or 32 bit color depth It depends on your PCs NBs settings Screen Refresh Rate This is VGA output refresh rate provides 60 Hz and 70Hz to suit for different kinds of projectors Login Code To select Enable or Disable If you select Disable then GW AP54PR will not ask you for entering login code before doing presentation Apply Confirm and save all the settings Cancel Cancel all the modifications ...

Page 37: ...s Click Change Password button to change password value Enter New Password Enter new password you want to change for each category Confirm New Password Double confirm the new password Apply Confirm and save all the modifications 5 9 Reset to Default ...

Page 38: ...ll restore the factory default settings 5 10 Firmware Upgrade Click Firmware Upgrade button to upgrade firmware 1 Firstly you have to get latest firmware image file from our website http www planex net download index htm 2 Click Browse to search for the file which you download before 3 Click Upgrade to start upgrading 4 You will find warning message and count down counter on the screen 5 After a f...

Page 39: ...ilure Besides while upgrading please keep all the power on and stable If you do not follow the instructions and cause the upgrade failed this kind of damage is not included in warranty If you want to have the device fixed please send it to our company or the reseller We have to charge for the hardware maintenance fee ...

Page 40: ...36 GW AP54PR 5 5 11 Reboot System Click Reboot System button to restart system Reboot Confirm and reboot the system automatically 5 12 Logout Click Logout button to go back to the homepage ...

Page 41: ...move two rubber foots from the back side of GW AP54PR 2 Screw two mounting screws 3 Use four screws to fix mounting bracket 4 Hang up GW AP54PR on the mounting bracket Mounting Bracket Wall Bracket Fix Rubber Foot 2 Rubber Foot 4 Mounting Screw 2 Antenna ...

Reviews: