background image

2

Chapter2 Function Introduction and Quick Install Guide

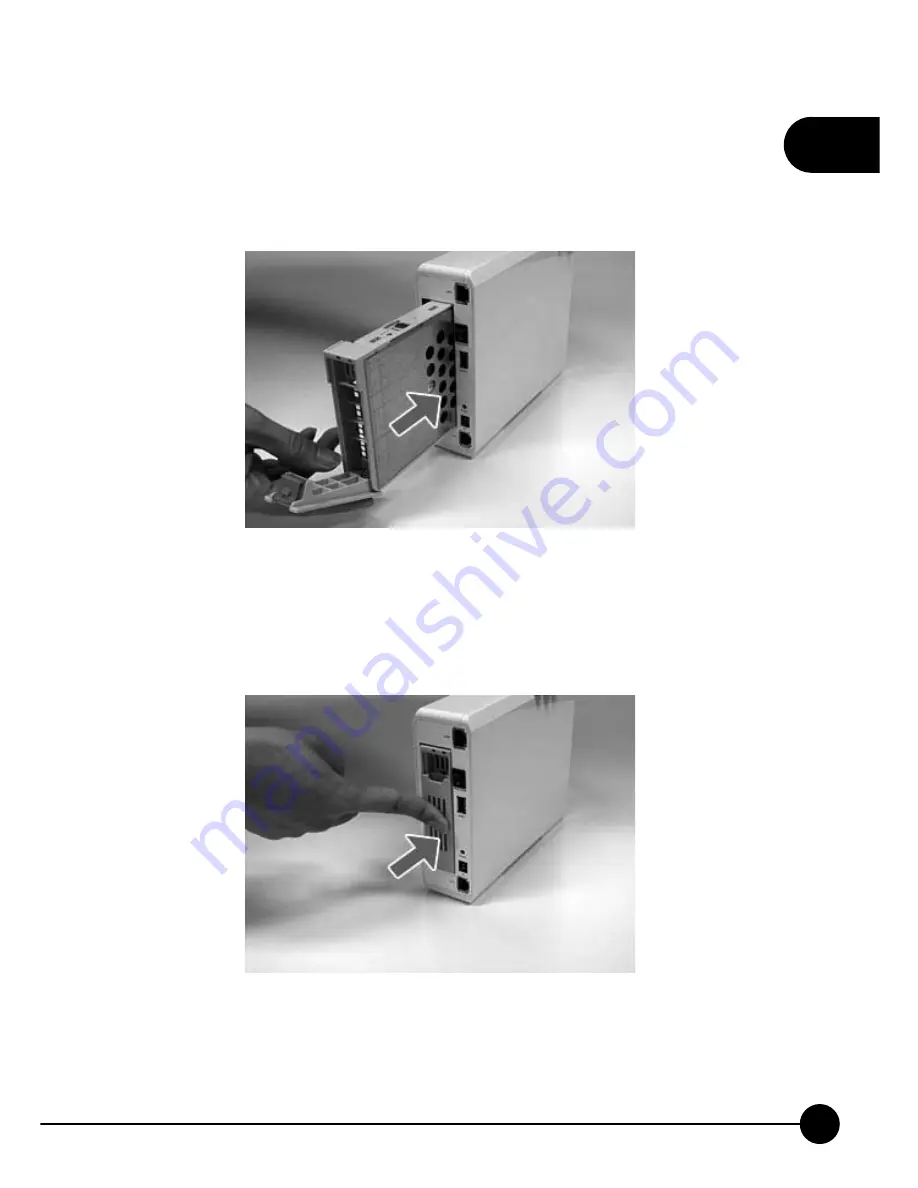
5.After securing the SATA hard disk tightly to the hard disk drawer, slide 

the drawer back to MZK-NAS01SG/MZK-NAS02SG gently as shown 
in the picture. 


6.Push the leverage of the hard disk drawer, sliding the drawer further 

into MZK-NAS01SG/MZK-NAS02SG until you hear a slight 

click

 sound. 

Note: Please make sure the hard disk drawer is installed correctly as 

shown in the picture.  

Summary of Contents for MZK-NAS01SG

Page 1: ......

Page 2: ...Multi Media Network Attached Storage 1 Bay Storage 2 Bay MZK NAS01SG MZK NAS02SG ...

Page 3: ...ve any operational problems while configuring or setting up the product you may contact with our Customer Service Department or ask the agent or the distributor from which you bought the product for help Moreover during warranty if you find any defect or breakdown of the product you may bring the product assembly and its warranty card to our company or to where you bought the product to ask for repa...

Page 4: ...Trademarks To maintain compliance with FCC RF exposure compliance requirements please avoid direct contact to the transmitting antenna during transmitting ...

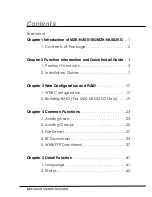
Page 5: ...3 1 Product Functions 3 2 Installation Guide 7 Chapter 3 Web Configuration and RAID 17 1 WEB Configuration 17 2 Building RAID For MZK NAS02SG Only 19 Chapter 4 Common Functions 23 1 Adding Users 23 2 Adding Groups 25 3 File Server 27 4 BT Download 33 5 WEB FTP Download 37 Chapter 5 Detail Function 41 1 Language 41 2 Status 42 MZK NAS01SG MZK NAS02SG ...

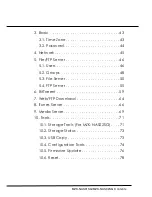
Page 6: ... 48 5 3 File Server 50 5 4 FTP Server 55 6 BitTorrent 59 7 Web FTP Download 64 8 iTunes Server 66 9 Media Server 69 10 Tools 71 10 1 Storage Tools For MZK NAS02SG 71 10 2 Storage Status 73 10 3 USB Copy 73 10 4 Configuration Tools 74 10 5 Firmware Update 76 10 6 Reset 78 MZK NAS01SG MZK NAS02SG Contents ...

Page 7: ...MZK NAS01SG MZK NAS02SG ...

Page 8: ... server thus you can access its settings through Web browsers such as IE Netscape Firefox and so on You can set up and configure the settings easily and completely and enjoy the convenience instantly MZK NAS01SG MZK NAS02SG have many features which includes Support two internal SATA hard disk drives MZK NAS02SG only Provide two USB ports for USB mass storage devices connecting Sharing your files v...

Page 9: ... damaged please contact with the distributor or the agency at once MZK NAS01SG MZK NAS01SG CD ROM User s Manual AC Adapter AC Power Cable Screw x4 Rubber Foot x4 UTP cable Warranty Card MZK NAS02SG MZK NAS02SG CD ROM User s Manual AC Adapter AC Power Cable Screw x8 Rubber Foot x4 UTP cable Warranty Card If plug the AC adapter which includes in the product package into a socket with different volta...

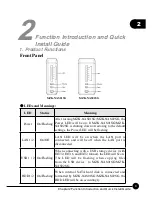
Page 10: ...hing LAN 1 2 On Off LAN LED will be on when the LAN port is connected and will be off when the LAN port is disconnected USB 1 2 On Flashing When connecting with a USB storage device with FAT32 FAT16 and EXT2 format the LED will be on The LED will be flashing when copying files from the USB device to MZK NAS01SG MZK NAS02SG HDD 1 2 On Flashing When internal SATA hard disk is connected and formatted...

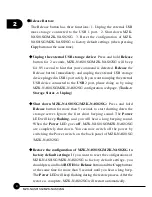
Page 11: ...figuration webpage Tools Storage Status Unplug Shut down MZK NAS01SG MZK NAS02SG Press and hold Release button for more than 5 seconds to start shutting down the storage server Ignore the first short beeping sound The Power LED will keep flashing and you will hear a long beeping sound When the Power LED goes off MZK NAS01SG MZK NAS02SG are completely shut down You can now switch off the power by s...

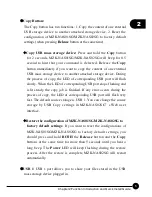
Page 12: ... will flash slowly When the LED of corresponding USB port stops flashing and is lit steady the copy job is finished If any error occurs during the process of copy the LED of corresponding USB port will flash very fast The default source storage is USB 1 You can change the source storage by USB Copy settings in MZK NAS02SG s Web user interface Restore the configuration of MZK NAS01SG MZK NAS02SG to...

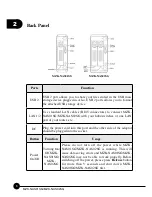
Page 13: ...ne LAN port of your router etc DC Plug the power cord into this port and the other side of the adaptor should be plugged into the socket Button Function Usage Power On Off Turning On Off MZK NAS01SG MZK NAS02SG Please do not turn off the power while MZK NAS01SG MZK NAS02SG is running This will cause data saving errors and MZK NAS01SG MZK NAS02SG may not be able to work properly Before switching of...

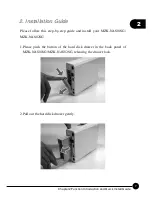
Page 14: ...2 Installation Guide Please follow this step by step guide and install your MZK NAS01SG MZK NAS02SG 1 Please push the button of the hard disk drawer in the back panel of MZK NAS01SG MZK NAS02SG releasing the drawer lock 2 Pull out the hard disk drawer gently ...

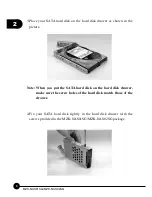
Page 15: ...r as shown in the picture Note When you put the SATA hard disk on the hard disk drawer make sure the screw holes of the hard disk match those of the drawer 4 Fix your SATA hard disk tightly in the hard disk drawer with the screws provided in the MZK NAS01SG MZK NAS02SG package ...

Page 16: ...isk drawer slide the drawer back to MZK NAS01SG MZK NAS02SG gently as shown in the picture 6 Push the leverage of the hard disk drawer sliding the drawer further into MZK NAS01SG MZK NAS02SG until you hear a slight click sound Note Please make sure the hard disk drawer is installed correctly as shown in the picture ...

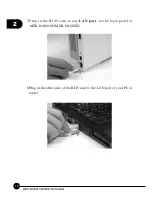
Page 17: ...2 10 MZK NAS01SG MZK NAS02SG 7 Plug in the RJ45 cord to any LAN port on the back panel of MZK NAS01SG MZK NAS02SG 8 Plug in the other side of the RJ45 cord to the LAN port of your PC or router ...

Page 18: ...ded in MZK NAS01SG MZK NAS02SG package into the DC port and the other side in the power socket as shown in the picture Plug the AC Adapter which comes with MZK NAS01SG MZK NAS02SG in a different voltage power supply will cause damage on MZK NAS01SG MZK NAS02SG and it is not included in warranty ...

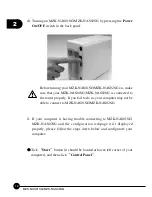
Page 19: ...webpage isn t displayed properly please follow the steps down below and configurate your computer Click Start button it should be located at lower left corner of your computer and then click Control Panel Before turning your MZK NAS01SG MZK NAS02SG on make sure that your MZK NAS01SG MZK NAS02SG is connected to the router properly If you fail to do so your computer may not be able to connect to MZK...

Page 20: ...2 13 Chapter2 Function Introduction and Quick Install Guide Double click Network and Internet Connections and then click Network Connections ...

Page 21: ...2 14 MZK NAS01SG MZK NAS02SG Right click Local Area Connection and select Properties a Local Area Connection Properties window will appear ...

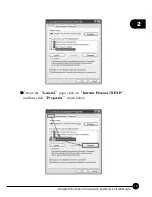
Page 22: ...2 15 Chapter2 Function Introduction and Quick Install Guide Choose the General page click on Internet Protocol TCP IP and then click Properties down below ...

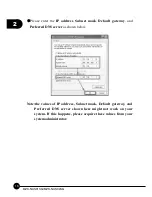
Page 23: ...et mask Default gateway and Preferred DNS server as shown below Note the values of IP address Subnet mask Default gateway and Preferred DNS server shown here might not work on your system If this happens please acquire these values from your system administrator ...

Page 24: ...rver and you can configure MZK NAS01SG MZK NAS02SG s settings through this easy to use configuration webpage Please follow this guide and start and start configuring your system 1 Start Your Web Browser IE Firefox or Netscape 2 Enter http 192 168 1 100 the default IP Address of the MZK NAS01SG MZK NAS02SG Address box and press Enter ...

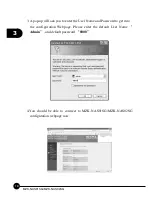
Page 25: ...p will ask you to enter the User Name and Password to get into the configuration Webpage Please enter the default User Name Admin and default password 0000 4 You should be able to connect to MZK NAS01SG MZK NAS02SG configuration webpage now ...

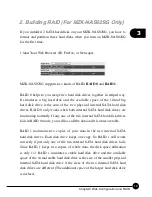
Page 26: ...both internal SATA hard disk drives are functioning normally If any one of the two internal SATA hard disk drives fails in RAID 0 mode you will lose all the data and it is unrecoverable RAID 1 maintains two copies of your data in the two internal SATA hard disk drives Each disk drive keeps one copy So RAID 1 still works correctly if just only one of the two internal SATA hard disk drives fails Sin...

Page 27: ...s on the left side of the menu and then click Storage Tools on the upper left 2 Click Enable choose the RAID mode you would like to apply and then click Apply to enable the RAID function 3 If you choose RAID 0 the system will ask you if you would like to keep the old data of your original RAID 0 or create a new RAID ...

Page 28: ...all the data in both hard disks and create a new RAID Click OK to proceed to the next step 4 Click OK and start formatting and partitioning your hard disk Note Do not turn off the power of MZK NAS02SG while formatting 5 System will automatically jump back to the Storage Tools page and you should be able to check the partition you just added in the list down below ...

Page 29: ...3 22 MZK NAS01SG MZK NAS02SG ...

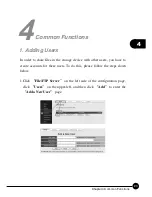
Page 30: ...files in the storage device with other users you have to create accounts for these users To do this please follow the steps down below 1 Click File FTP Server on the left side of the configuration page click Users on the upper left and then click Add to enter the Add a New User page ...

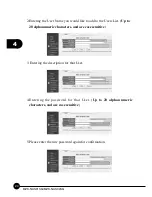
Page 31: ...to add to the Users List Up to 20 alphanumeric characters and are case sensitive 3 Entering the description for that User 4 Entering the password for that User Up to 20 alphanumeric characters and are case sensitive 5 Please enter the new password again for confirmation ...

Page 32: ...up for access management purposes To do so please follow the next steps 1 Click File FTP Server on the left side of the configuration page click Groups on the upper left and then click Add to enter the Add a New Group page 2 Entering the Group Name you would like to add to the Groups List Up to 12 alphanumeric characters and are case sensitive ...

Page 33: ...SG MZK NAS02SG 3 Entering the description for the Group 4 You can add users to the Group in this page as well Click the select box to add users click Save to create the Group and add the selected users to that Group ...

Page 34: ...1 Click File FTP Server on the left side of the configuration page and click File Server on the upper left to enter the File Server page 2 Entering the File Folder Name you would like to add to the Shared Folders List Up to 15 alphanumeric characters and underline _ 3 Entering the Workgroup Name you would like to add Up to 15 alphanumeric characters space and underline _ ...

Page 35: ...der Up to 43 alphanumeric characters 5 Click Add and fill the information of the Add Edit Shared Folder page to add a new Shared Folders for File server 6 Please enter the name of the Shared Folder you would like to create here Up to 20 alphanumeric characters and underline _ ...

Page 36: ...29 4 Chapter Common Functions 7 Click Browse button a pop up screen will show up ...

Page 37: ...ting screen then choose and click the hard disk partition icon on the right as shown in the picture below 9 You can click New Folder button to create a new Shared Folder in your hard disk Apop up screen will show up Enter the new folder s name under the Folder Name field and click New to create a new folder ...

Page 38: ...31 4 Chapter Common Functions 10 Click Submit button and add the new Shared Folder s Path 11 Add Delete Users from the Users Groups field ...

Page 39: ...4 32 MZK NAS01SG MZK NAS02SG 12 Click Save button to save the configurations you just made For more detail please refer to chapter 5 ...

Page 40: ...rrent downloading Manager allows you to download files without leaving your computer on To do so please follow the steps down below 1 Click BitTorrent on the left side of the configuration page 2 Click Add Torrent button and enter Add BT Torrent page ...

Page 41: ... http www xxx com files xxxx torrent PC a torrent file you downloaded to your PC or This File Server a torrent file you downloaded to the file server 4 If you choose Internet Address as your torrent file source please enter the URL in the field down below 5 If you choose PC or This File Server as your torrent file source please click Browse button and upload the torrent file ...

Page 42: ...ssigning the torrent file source please assign a path for saving the file you wish to download by clicking Browsing button on the field down below 7 Choose the path you would like to save your file and click Submit to save the configuration ...

Page 43: ...4 36 MZK NAS01SG MZK NAS02SG 8 Please assign a priority level to this BT download item 9 Click Add button and start downloading ...

Page 44: ...server without keeping your computer turned on To do so please follow the steps down below 1 Click WEB FTP Download on the left side of the configuration page 2 Click Enable and Save to enable the WEB FTP Download function 3 Enter the URL of the file you wish to download from Web or FTP server ...

Page 45: ...8 MZK NAS01SG MZK NAS02SG 4 Select a encoding used by the Web or FTP server 5 Please specify the location you wish to save downloaded file Click Browse button to select the folder you wish to save the file ...

Page 46: ...ns 6 If the Web or FTP server requires a User Name and a Password to log in please enter the User Name and the Password provided by the Web FTP server 7 Click Add to add the download job to the download list and start downloading ...

Page 47: ...4 40 MZK NAS01SG MZK NAS02SG ...

Page 48: ... Chapter Detail Function 5Detail Function 1 Language You can change the language of the MZK NS01SG MZK NS02SG configuration webpage Click the menu on the upper right and select the language for the webpage ...

Page 49: ...5 42 MZK NAS01SG MZK NAS02SG 2 Status This page displays the general information and the status of the system ...

Page 50: ...an enter the Internet address of an NTP Network Time Protocol Server for your system to synchronize with Daylight Saving Click the check box to enable the Daylight Saving function Select the period in which you wish to start using daylight saving Set System Date and Time If your network is not connected to the Internet the storage server will have no chance to get correct time from the time server...

Page 51: ...n up to 12 alphanumeric characters and are case sensitive Current Password Enter your current password Up to 12 alphanumeric characters and are case sensitive New Password Enter the new password for MZK NAS01SG MZK NAS02SG Up to 12 alphanumeric characters and are case sensitive Confirmed Password Please enter the new password again for confirmation Apply Click this button and save the changes you ...

Page 52: ... IP address Select this and assign IP address manually Please enter the IP Address Subnet Mask and Gateway Address Normally the Gateway address should be the IP address of the router that connects your network to the Internet addresses accordingly DNS Address Settings First Second Third DNS Address Enter the DNS Server s address You can enter the second and the third DNS address as well However th...

Page 53: ...FTP server on this page Add Click Add and fill the information of the Edit a User page to add a new user for File FTP server Edit Select any user in Users list and click Edit to modify her his profile Delete Selected Click Delete Selected to delete the selected users in Users list Delete All Click Delete All to delete all the users in Users list Reset Click Reset to reset selection in Users list ...

Page 54: ...tion for the User Password Entering the password for that User Up to 20 alphanumeric characters and are case sensitive Confirm Password Please enter the new password again for confirmation Save Save the User to the Users List Reset If there is anything wrong with the settings you made you can click Reset to configure the page again Cancel Click Cancel to exit the current configuration page ...

Page 55: ... of the Edit a Group page to add a new Group for File FTP server Edit Select any group in Groups list and click Edit to modify its profile Delete Selected Click Delete Selected to delete the selected groups in Groups List Delete All Click Delete All to delete all the groups in Groups list Reset Click Reset to reset selection in Groups list ...

Page 56: ...cription for the Group Select Authorized Users Please check the select box to add users to the new Group you just created Save Save the Group to the Groups List Select All Click Select All to select all the users in the list Reset If there is anything wrong with the settings you made you can click Reset to configure the page again Cancel Click Cancel to exit the current configuration page ...

Page 57: ...ng policies Name Entering the File Folder Name you would like to add to the Shared Folders List Up to 15 alphanumeric characters and underline _ Group Entering the Workgroup Name you would like to add Up to 15 alphanumeric characters space and underline _ Description Entering the description for the Shared Folder Up to 43 alphanumeric characters Save Save the Folder to the Shared Folders List Canc...

Page 58: ...Name list Reset Click Reset to reset selection in Folder Name list New Storage Default Sharing Policy This sharing policy will apply to all the Shared Folders created afterward There are three different policies you can choose to apply Read Write Users can both read and write files in the Shared Folders Read Only Users can only read files in the Shared Folders Not to Share Users can neither read n...

Page 59: ..._ Shared Folder s Path Click Browse button a pop up screen will show up You can add the Shared Folder s Path here Please follow the steps below and add a new Shared Folder s Path 1 Choose and click the hard disk icon on the upper left side of the Path Selecting screen then choose and click the hard disk partition icon on the right as shown in the picture below ...

Page 60: ...New Folder button to create a new Shared Folder in your hard disk A pop up screen will show up Enter the new folder s name under the Folder Name field and click New to create a new folder 3 Click Submit button and add the new Shared Folder s Path ...

Page 61: ...sers Groups You can also click Delete or Delete All buttons to delete users or groups in the right field Share Users Groups Authority You can choose an access policy for this Shared Folder You can choose Read Only so the users groups can only read files in the Shared Folders or Read Write so the users groups can both read and write files in the Shared Folders Description Entering the description f...

Page 62: ...list and click Edit to modify its profile Delete Selected Click Delete Selected to delete the selected User in the List Delete All Click Delete All to delete all the Users in the list Reset Click Reset to reset selection in the list Advanced Settings Max Users Set the maximum concurrent users for the FTP server Idle Time Set the time that FTP server will wait before disconnecting a FTP client when...

Page 63: ...cess this folder Shared Folder s Path Click Browse button a pop up screen will show up You can add the Shared Folder s Path here Please follow the steps below and add a new Shared Folder s Path 1 Choose and click the hard disk icon on the upper left side of the Path Selecting screen then choose and click the hard disk partition icon on the right as shown in the picture below ...

Page 64: ...tail Function 2 You can click New Folder button to create a new Shared Folder in your hard disk A pop up screen will show up Enter the new folder s name under the Folder Name field and click New to create a new folder ...

Page 65: ...ose Read Only so the users groups can only read files in the Shared Folders or Read Write so the users groups can both read and write files in the Shared Folders Save Save the configurations you made Reset If there is anything wrong with the settings you made you can click Reset to configure the page again Cancel Click Cancel to exit the current configuration page ...

Page 66: ...ction You can enable or disable BT Download Function here Max Concurrent Connection Number You can input the maximum BT download connection here valid range is from 1 to 50 You can download more files at the same time with higher connection number you input here but it will consume more bandwidth Save Save the configurations you made Cancel Click Cancel to exit the current configuration page BT Do...

Page 67: ...rce of the torrent file can be from Internet Address a URL address which should look like http www xxx com files xxxx torrent PC a torrent file you downloaded to your PC or This File Server a torrent file you downloaded to the file server 3 If you choose Internet Address as your torrent file source please enter the URL in the field down below ...

Page 68: ...his File Server as your torrent file source please click Browse button and upload the torrent file 5 After assigning the torrent file source please assign a path for saving the file you wish to download by clicking Browsing button on the field down below ...

Page 69: ...AS01SG MZK NAS02SG 6 Choose the path you would like to save your file and click Submit to save the configuration 7 Please assign a priority level to this BT download item 8 Click Add button and start downloading ...

Page 70: ...e downloading the selected file Resume Click this button and resume downloading the selected file Remove All Click this button and remove all the downloading files Remove Selected Click this button and remove all the selected downloading files Reset If there is anything wrong with the settings you made you can click Reset to configure the page again ...

Page 71: ... the URL of the file you wish to download from Web or FTP server URL Encoding Select a encoding used by the Web or FTP server Save as Please specify the location you wish to save downloaded file Click Browse button to select the folder you wish to save the file User Name Password These fields are optional If the Web or FTP server requires a User Name and a Password to log in please enter the User ...

Page 72: ...e downloading the selected file Resume Click this button and resume downloading the selected file Remove Selected Click this button and remove all the selected downloading files Remove All Click this button and remove all the downloading files Reset If there is anything wrong with the settings you made you can click Reset to configure the page again ...

Page 73: ...set If there is anything wrong with the settings you made you can click Reset to configure the page again Server name Please assign a name to iTunes server All iTunes clients will need this name to locate this iTunes server The length of a valid server name is from 4 to 20 characters and case sensitive Media folder Please specify the folder where the media files are stored and all media files insi...

Page 74: ...iTunes server scans The iTunes server periodically scan media folder for newly added files The valid rescan interval is from 1 to 300 seconds You can also click Rescan button to start a scan immediately The required scan time varies depend on the number of media files It may take several minutes to finish It s recommended to use default value 300 to prevent iTunes server from rescanning too freque...

Page 75: ...s anything wrong with the settings you made you can click Reset to configure the page again iTunes Server Status This field shows the current status of your iTunes Server iTunes User Status This field shows the current status of the clients that are connected to your iTunes Server Refresh Click this button to update the latest status ...

Page 76: ...re Media players need this name to locate this media server Rescan Interval Please specify the time interval in second between two media server scans The media server periodically scan media folder for newly added files The valid rescan interval is from 1 to 300 seconds You can also click Rescan button to start a scan immediately The required scan time varies depend on the number of media files It...

Page 77: ...older to store shared media files Remove Selected Click this button and remove all the selected folders Remove All Click this button and remove all the folders Reset If there is anything wrong with the settings you made you can click Reset to configure the page again ...

Page 78: ...rd disk drives RAID 0 only works when both internal SATA hard disk drives are functioning normally If any one of the two internal SATA hard disk drives fails in RAID 0 mode you will lose all the data and it is unrecoverable RAID 1 maintains two copies of your data in the two internal SATA hard disk drives Each disk drive keeps one copy So RAID 1 still works correctly if just only one of the two in...

Page 79: ...ble RAID Mode Choose a RAID mode for the two SATA hard disks you installed Apply Save the changes you made If you changed your RAID mode the system will automatically format and partition your SATA hard disks accordingly Reset If there is anything wrong with the settings you made you can click Reset to configure the page again ...

Page 80: ...nable USB Copy function by pressing the Copy button on the front panel of this storage server as well Source Path Select USB port that the source USB mass storage device of the USB Copy job will be plugged in Shared Path Select a shared folder as the destination of the USB Copy The USB Copy tool will create a folder named USBCopy under the shared folder you selected Save Save the configurations yo...

Page 81: ...ction to save current system settings or upload the previous settings Also you can set all the setting values to default by clicking the Reset button Save Settings to file You may click Save button to save current system settings to your local disk The format will be bin file ...

Page 82: ...n click Browse to search for the saved system setting file Click Open to select the system setting file that you want and then click Load Settings from file to start restore the settings Reset the setting value to default Click the Reset button and reset the setting to default All the settings you set up will be erased ...

Page 83: ...rmware of MZK NAS01SG MZK NAS02SG Be sure that the downloaded firmware is stored in your PC s disk and then click Browse to search for the firmware file which you just downloaded Click Open to use the firmware and then go back to the configuration page and click Firmware Update to start upgrading immediately It is recommended that you should save the settings before upgrading the firmware ...

Page 84: ...77 5 Chapter Detail Function ...

Page 85: ...SG MZK NAS02SG 78 10 6 Reset You may reboot the system via this configuration page Your previous settings will not be changed though Submit Reboot the system Cancel Click Cancel to exit the current configuration page ...

Page 86: ......
Reviews: