background image

11 

8.


FAQ 

Q. How do you change the Wall Touch Control to Fahrenheit/Celsius? 

A. Long press on the up and down arrows on the Wall Touch Control to toggle between Fahrenheit and Celsius. 

Q. What distance can the remote be used from the fireplace? 

A. Optimal distance for the remote control is within 6 meters. 

Q. Can you turn on the fireplace via the manual control and off via the remote (or vise versa)? 

A. Yes. 

Q. Does the fireplace need to be on a dedicated 15 amp circuit? 

A. Yes. 

Q. What thickness of sheetrock should be used for the recessed installation? 

A. 12mm or 16mm, thinner is recommended for tile façade.


Q. How often do the batteries in the remote need to be replaced? 

A. Annually, possibly more with heavy use. 

Q. Is there a remote receiver in the fireplace that requires batteries? 

A. No, only the actual remote requires batteries. The rest of the fireplace runs entirely off of the main power supply. 

9.


CLEANING AND MAINTENANCE 

There is very little maintenance involved with your electric fireplace. Please follow the few points below: 


On a semi-annual basis unplug the machine from its power source, wait for the heating element to cool and 

dust the fire unit with a dry cloth. Be careful not to brush any wires that may be exposed as you do this. 


To clean the glass face of the fireplace simply use your desired glass cleaner with paper towels. 


To clean the air inlets/outlets, wipe with a soft cloth or the nozzle of a vacuum cleaner 


Dust can easily build up around the heater area inside the fire unit, on the left and right sides. Take particular 

care to clean this area on a regular basis to prevent buildup. 


For long periods of inactivity, please unplug the fireplace and ensure the surrounding area remains dry.


Summary of Contents for Astro 1200

Page 1: ...ASTRO Copyright Planika Sp z o o IE0001 01 06 11 2020 Installation and user s manual ...

Page 2: ...n with Corner view 5 5 3 Recessed installation with Front view 5 5 4 Partly recessed installation 6 5 5 Wall mounted installation 6 5 6 Installing Wall Switch 7 5 7 Installing Side Covers 7 5 8 Removing the Glass 7 6 OPERATION MANUAL 8 6 1 Hand held remote 8 6 2 Pairing remote 8 6 3 Wall switch 9 6 4 Light indicator 9 6 5 Manual controls 10 7 TROUBLESHOOTING 10 8 FAQ 11 9 CLEANING AND MAINTENANCE ...

Page 3: ...heater only as described in this manual Any other use not recommended by the manufacturer may cause fire electric shock or injury to persons WARNING Improper installation adjustment alteration service or maintenance can cause injury or property damage Refer to this manual CAUTION Do not expose the heater to the elements such as rain etc For assistance or additional information consult a qualified ...

Page 4: ...installation and maintenance 5 INSTALLATION 5 1 Recessed installation with Three Sided view 1 Prepare the framed opening according to the table A Framing Dimensions opening size on page 3 Provide an electrical outlet on the back side of the framed opening near the top right corner 2 Install L Metal Mounting Brackets in top and bottom sections of the device to prepared holes 3 Install the fire unit...

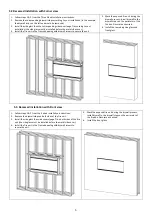
Page 5: ...ring the drywall process Install drywall to the drywall stops on the perimeter of the fire box Decorate as desired 6 Install the remaining side glass and front glass 5 3 Recessed installation with Front view 1 Follow steps 1 2 from the 3 sided installation instructions 2 Remove the drywall stops on both sides of the fire unit 3 Install the side glass then side covers page 7 on both sides of the fi...

Page 6: ...imeter of the fire box Decorate as desired 5 Install the side and front glass pieces 5 5 Wall mounted installation 1 Find the optimal place to mount your appliance 2 Hold the Wall Bracket up to the wall and ensure that it is level 3 Attached the Wall Bracket to the wall by using screws in pre made holes 4 Install the appliance by carefully moving the device to the wall and gently lower the device ...

Page 7: ...e glass face 5 7 Installing Side Covers Place the side cover and screw into position with the screws 5 8 Removing the Glass 1 To remove the glass from the appliance use cross headed screwdriver to unscrew the top bracket of the appliance holding the glass in place 2 Remove the top bracket out ensuring the glass is supported all the time 3 Gently lift the glass up and out from the appliance using s...

Page 8: ...GB wheel and brightness slider This is a zone setting that controls the color and brightness of the ember bed This is a zone setting that controls the color and brightness of the downlight 6 2 Pairing remote 1 With the fireplace ON press and hold the Power button for about 3 seconds until you hear the buzzer sound twice and the power indicators begin to flash 2 Within 5 seconds on the hand held re...

Page 9: ...setting Touching this button will allow you to change the color and brightness of the flame by using the RGB wheel and brightness slider This is a zone setting that controls the color and brightness of the ember bed This is a zone setting that controls the color and brightness of the downlight Pressing the Plus or Minus icons will start the thermostat setting Set to the desired temperature and the...

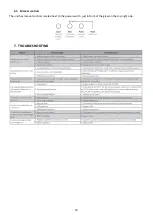
Page 10: ...10 6 5 Manual controls The unit has manual controls located next to the power switch just in front of the glass on the top right side 7 TROUBLESHOOTING ...

Page 11: ...hat requires batteries A No only the actual remote requires batteries The rest of the fireplace runs entirely off of the main power supply 9 CLEANING AND MAINTENANCE There is very little maintenance involved with your electric fireplace Please follow the few points below On a semi annual basis unplug the machine from its power source wait for the heating element to cool and dust the fire unit with...

Reviews: