background image

16


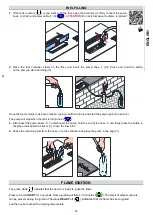
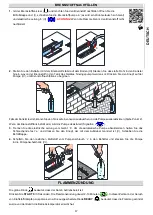
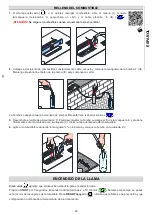
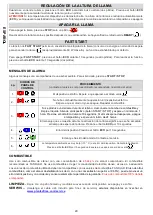
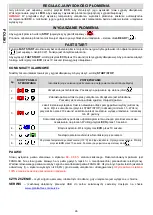
FLAME HEIGHT REGULATION 

When the flame is ignited, press 

ECO

 to lower the flame (two sound signals). Press 

ECO

 again to increase the flame 

height (one sound signal). 

ATTENTION! 

In case the device temperature is too high, the flame will be automatically lowered (

ECO

) and the height 

regulation blocked. If the temperature keeps increasing, the device will be turned off.


FLAME EXTINGUISHING


Press 

STOP

 to extinguish the flame (sound  


). 

You can ignite the flame again when the device is cooled 

– the green diode 

READY

 (        ). 

FAST START 

The

 FAST START

 offers faster flame ignition (when the device is ready (        ), the power consumption is 60 W higher). 

The function is enabled by default. 

To  disable 

FAST  START

,  press  and  hold 

ECO

  for  10  seconds  (four  sound  signals).  To  enable  the  function,  press 

and hold 

ECO

 for 10 seconds (two sound signals).  


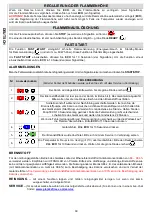
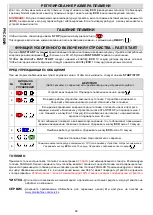
ERRORS 

Some alarms are accompanied by a sound signal. Press 

START/STOP

 to mute.


Lp. 

DIODES 

SOLUTION 

(contact the Service Department if the solution does not eliminate the error) 

1. 


The device is being cooled. Wait for the green diode         . 

2. 


The device run out of fuel while operating. The device is being cooled. 

Wait for the red diode to turn off. Refill the tank. 

3. 


If spillage occurred while pouring the fuel, disconnect the fuel pump and wipe off the 

visible liquid. Mute the device ( START/STOP button) and wait for at least one hour. 

Press and hold ECO for 10 seconds. If the message does not disappear, turn off the 

device and wait for a minimum of 24 hours. 

If the error occurred during flame ignition, it means that the ignition time 

has been exceeded. Press and hold 

ECO

 for 10 seconds. 

4. 


Device error. Press and hold 

ECO

 for 10 seconds. 

5. 


Tank overfilled. Contact the Service Department. 

6. 


Room temperature too low (<10

°C)


or device error. Increase the room temperature. 

Press and hold ECO for 10 seconds. Wait for the green diode        .  

FUEL 

Use only fuels consisting of 

95-96,6%


ethanol by volume. FANOLA® is the recommended fuel. Do not use gel, thick and 

viscous fuels or fuels of improper electric conductivity. 

The values must be compliant with those of FANOLA®. Other 

fuels, such as dehydrated ethanol (i.e. consisting of more than 96,6% by volume ethanol) will cause a device error and 
loss of the guarantee. 

Fuels consisting of 100% by volume ethanol will damage the device.


CLEANING


– 

clean with a damp cloth and delicate detergents, only when the device is turned off and  cooled.


SERVICE  -


(

keep  the  provided  usb  cable  for  servicing  purposes)   we  are  available  on  livechat  at  

www.planikafires.com/service


EN
GL
ISH


FUEL

READY

HOT

READY

HOT

FUEL

FUEL

READY

HOT

HOT

HOT

HOT

FUEL

FUEL

FUEL

READY

READY

READY

HOT

READY

READY

READY

READY

Summary of Contents for Prime Fire 1000

Page 1: ...TAGEANLEITUNG 2 ES MANUAL DE MONTAJE 2 FR NOTICE DE MONTAGE 2 IT ISTRUZIONI DI MONTAGGIO 2 PL INSTRUKCJA MONTAŻU 2 RU ИНСТРУКЦИЯ ПО МОНТАЖУ 2 EN INSTRUCTION MANUAL 15 DE BEDIENUNGSANLEITUNG 17 ES MANUAL DE USUARIO 19 FR NOTICE D UTILISATION 21 IT MANUALE D USO 23 PL INSTRUKCJA OBSŁUGI 25 RU ИНСТРУКЦИЯ ПО ЭКСПЛУАТАЦИИ 27 ...

Page 2: ...2 B M3x15 C D E G F optional optional optional optional optional I J K L H A optional 145 mm L1 700 mm L2 1000 mm 245 mm ...

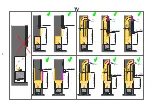
Page 3: ...st ein Dekorationsprodukt und es brennt mit echtem Feuer Vor der Montage und vor der Inbetriebnahme des Kamins lesen Sie bitte die beigelegte Dokumentation Machen Sie sich mit den lokalen Vorschriften bezüglich der Kamine vertraut 1 Der Kamin nur für den Einbau im Innenraum bestimmt Erforderliche Raumtemperatur min 10 C 2 Die Mindestkubatur für einen Kamin min 44 m3 Prime Fire 700 56 m3 Prime Fire...

Page 4: ...ivo con combustible 17 No deje el dispositivo funcionando sin supervisión Le produit est un dispositif décoratif qui produit un feu réel Familiarisez vous avec la documentation ci jointe avant d installer et de démarrer l appareil Familiarisez vous avec les réglementations locales concernant les cheminées 1 Produit à usage interne et uniquement pour l encastrement Utiliser à une température min de...

Page 5: ...za o le parti calde del dispositivo 16 Non trasportare il dispositivo con carburante 17 Non lasciare incustodito il dispositivo Produkt jest urządzeniem dekoracyjnym wytwarzającym prawdziwy ogień Zapoznaj się z załączoną dokumentacją przed montażem i uruchomieniem urządzenia Zapoznaj się z lokalnymi przepisami dotyczącymi kominków 1 Urządzenie wyłącznie do użytku wewnętrznego i w zabudowie Używać ...

Page 6: ...а влияние высокой температуры предметы должны находиться за пределами изделия в радиусе мин 1 м Одновременно их нельзя устанавливать непосредственно над камином 7 Запрещается размещать на устройстве любые предметы 8 Рядом с устройством должен находиться надежный углекислотный CO2 или порошковый огнетушитель 9 Устройство должно быть установлено таким образом чтобы его легко можно было извлечь для с...

Page 7: ...e de matériaux incombustibles isolé de tous les éléments inflammables de la construction Les raccordement et liants doivent être résistants aux hautes températures IT La struttura ad incasso deve essere fatta di materiali non combustibili isolati da tutti gli elementi infiammabili della struttura Collegamenti e leganti devo essere resistenti alle alte temperature PL Zabudowa wykonana z materiałów ...

Page 8: ... DE Die Konstruktion unter dem Kamin muss geschlossen sein ES El espacio debajo del dispositivo debe ser cerrado FR L espace sous le dispositif doit être fermé IT Lo spazio al di sotto del camino deve essere chiuso PL Przestrzeń pod urządzeniem musi być zamknięta RU Конструкция под устройства должна быть закрытой ...

Page 9: ...EDDA PL CHŁODNE POWIETRZE RU ХОЛОДНЫЙ ВОЗДУХ EN VENTILATION GRATE DE LÜFTUNGSGITTER FR GRILLE DE VENTILATION ES REJILLA DE VENTILACIÓN IT GRIGLIA DI VENTILAZIONE PL KRATKA WENTYLACYJNA RU ВЕНТИЛЯЦИОННАЯ РЕШЕТКА EN NON FLAMMABLE MATERIAL DE NICHT BRENNBARE MATERIALIEN FR MATÉRIAU NON INFLAMMABLE ES MATERIAL NO INFLAMABLE IT MATERIALE NON INFIAMMABILE PL MATE RIAŁ NIEPALNY RU НЕВОСПЛАМЕНЯЮЩИЙСЯ МАТЕ...

Page 10: ...10 I J H K L ...

Page 11: ...500 mm min 500 mm min 100 mm min 650 mm min 100 mm min 650 mm min 100 mm min 750 mm min 100 mm min 450 mm min 450 mm min 100 mm TV min 150 cm2 min 150 cm2 min 150 cm2 min 150 cm2 min 150 cm2 min 150 cm2 min O150 mm min O150 mm min O150 mm min O150 mm min O150 mm min O150 mm ...

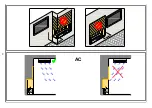
Page 12: ...12 AC ...
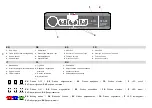
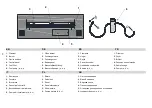
Page 13: ...o de combustible 6 Bomba a b c 1 Filament 2 Foyer 3 Brûleur 4 Panneau de commande 5 Remplissage 6 Pompe a b c IT PL RU 1 Resistenza 2 Focolare 3 Bruciatore 4 Pannello di controllo 5 Bocchettone di riempimento 6 Pompa di rifornimento a b c 1 Żarnik 2 Palenisko 3 Ruszt 4 Panel sterowania 5 Wlew paliwa 6 Pompa paliwa a b c 1 Нить накаливания 2 Желоб пламени 3 Верхняя плита 4 Панель управления 5 Отвер...

Page 14: ... di servizio 4 LED di controllo 1 Tryb ECO 2 Odpalanie wygaszanie płomienia 3 Gniazdo serwisowe 4 Diody kontrolne 1 Режим ECO 2 Запуск камина гашение пламени 3 Сервисное гнездо 4 Сигнализационные диоды EN Diodes OFF DE Dioden ausgeschaltet ES Diodos apagados FR Diodes éteintes IT LED spenti PL Diody wyłączone RU Диоды не светятся EN Diodes ON DE Dioden eingeschaltet ES Diodos encendidos FR Diodes ...

Page 15: ...is full sound 3 Disconnect the power cable b To disconnect the pump hold the end of the hose a and firmly press the button in the place marked with a sticker V Close the fuel inlet 4 Shake the remaining fuel from the hose c to the container and place the pump in the bag VI FLAME IGNITION The green diode indicates that the device is ready to ignite the flame Press and hold START for 3 seconds Flame...

Page 16: ... the fuel disconnect the fuel pump and wipe off the visible liquid Mute the device START STOP button and wait for at least one hour Press and hold ECO for 10 seconds If the message does not disappear turn off the device and wait for a minimum of 24 hours If the error occurred during flame ignition it means that the ignition time has been exceeded Press and hold ECO for 10 seconds 4 Device error Pr...

Page 17: ...aktivieren Siehe Punkt 2 Wenn der Brannstofftank befüllt wird wird die Pumpe deaktiviert Signalton 3 Trennen Sie die elektrische Leitung vom Gerät b Um die automatische Pumpe abzuklemmen halten Sie das Schlauchende fest a und drücken Sie den Knopf der mit dem Aufkleber markiert ist V Schließen Sie die Befüllklappe 4 Schütteln Sie den restlichen Kraftstoff vom Pumpenschlauch c in den Behälter und s...

Page 18: ...den trennen Sie die Brennstoffpumpe vom Kamin und wischen sichtbare Brennstoffspuren ab Schalten Sie das Gerät stumm Start Stop und warten Sie mindestens eine Stunde Halten Sie den Knopf ECO 10 Sekunden lang gedrückt Falls die Fehlermeldung nicht verschwindet schalten Sie das Gerät aus und warten Sie mindestens 24 Stunden Wenn die Fehlermeldung während Flammenzündung erscheint wurde die Wartezeit ...

Page 19: ... cable de alimentación b Para desconectar la bomba sostenga el fin de la manguera a y presione firmemente el botón marcado con la etiqueta V Cierre la tapa del llenado del combustible 4 Agite el combustible residual de la manguera c en la botella y coloque la bomba en la cubierta VI ENCENDIDO DE LA LLAMA Diodo verde significa que el dispositivo está listo para encender la llama Presiona START por ...

Page 20: ...rame durante el relleno desconecte la bomba de combustible y limpie el líquido Silencie el dispositivo botón START STOP y espere un mínimo de 1 hora Presione el botón Eco durante 10 segundos Si el mensaje no desaparece apague el dispositivo y espere un mínimo de 24 horas El mensaje que se muestra durante la activación de la llama significa que se ha excedido el tiempo de espera de la llama Presion...

Page 21: ...eint lorsque le réservoir de carburant est plein signal sonore 3 Débranchez le câble d alimentation b Pour déconnecter la pompe maintenez l extrémité du tuyau a et appuyez fermement sur le bouton marqué de l autocollant V Fermez le volet de remplissage de carburant 4 Secouez le reste du carburant du fil c dans la bouteille et placez la pompe dans le couvercle VI ALLUMAGE DE LA FLAMME La diode vert...

Page 22: ...hez la pompe à carburant et essuyez tout liquide visible Coupez le son de l appareil bouton START STOP et attendez au moins 1 heure Appuyez sur le bouton Eco pendant 10 secondes Si le message ne disparaît pas éteignez l appareil et attendez min 24 heures Le message affiché pendant le démarrage de la flamme signifie que le temps d attente pour la flamme a été dépassé Appuyez sur le bouton ECO penda...

Page 23: ...il serbatoio del combustibile è pieno segnale sonoro 3 Scollegare il cavo di alimentazione b Per scollegare la pompa mantenere l estremità del tubo flessibile a e premere saldamente il pulsante contrassegnato con l adesivo V Chiudere lo sportello del bocchettone di rifornimento del carburante 4 Scuotere il carburante rimanente dal tubo c nella bottiglia e rimettere la pompa nell apposito sacchetto...

Page 24: ... scollegare la pompa del combustibile e rimuovere il liquido visibile Disattivare il dispositivo pulsante START STOP e attendere almeno 1 ora Premere il pulsante Eco per 10 secondi se il messaggio non scompare spegnere il dispositivo e attendere min 24 ore Il messaggio visualizzato durante l avvio della fiamma significa che il tempo di attesa per la fiamma è stato superato Premere il pulsante ECO ...

Page 25: ... wyłączy się gdy zbiornik paliwa zostanie zapełniony sygnał dźwiękowy 3 Odłącz przewód zasilający b Aby wypiąć pompę przytrzymaj koniec węża a i mocno naciśnij przycisk oznaczony naklejką V Zamknij klapkę wlewu paliwa 4 Strząśnij resztkę paliwa z przewodu c do butelki i umieść pompę w pokrowcu VI ODPALANIE PŁOMIENIA Zielona dioda oznacza że urządzenie jest gotowe do odpalenia płomienia Wciśnij STA...

Page 26: ...j aż czerwona dioda zgaśnie Uzupełnij paliwo 3 Jeżeli rozlanie wystąpiło w trakcie nalewania odłącz pompę paliwa i wytrzyj widoczną ciecz Wycisz urządzenie przycisk START STOP i odczekaj minimum 1 h Wciśnij przycisk Eco przez 10 sekund Jeżeli komunikat nie zniknie wyłącz urządzenie i odczekaj min 24 godziny Komunikat wyświetlony podczas odpalania płomienia oznacza przekroczenie czasu oczekiwania n...

Page 27: ...ский насос см п 2 Насос выключится когда топливный бак камина будет полный звуковой сигнал 3 Отключить электрический провод b Чтобы отключить насос надо придержать конец шланга a и сильно нажать кнопку с наклейкой V Закрыть крышку отверстия для наполнения топливом 4 Стряхнуть остаток топлива c провода c в бутылку и поместить насос в чехле VI ЗАПУСК КАМИНА Зеленый диод обозначает что камин готов к ...

Page 28: ...ния красного диода Наполнить бак топливом 3 Если разлив произошел во время подачи топлива отключите насос и протрите видимую жидкость Выключить устройство кнопка START STOP и подождать мин 1 час Нажимать кнопку Eco 10 секунд Если сообщение не погаснет надо выключить изделие и подождать мин 24 часа Если сообщение появляется во время запуска камина то это обозначает превышение времени ожидания на по...

Reviews: