background image

11 PRINTING


24 Planmeca Creo

User’s manual

11  PRINTING

11.1  Calibration print

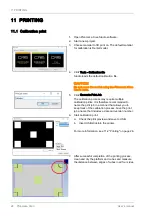
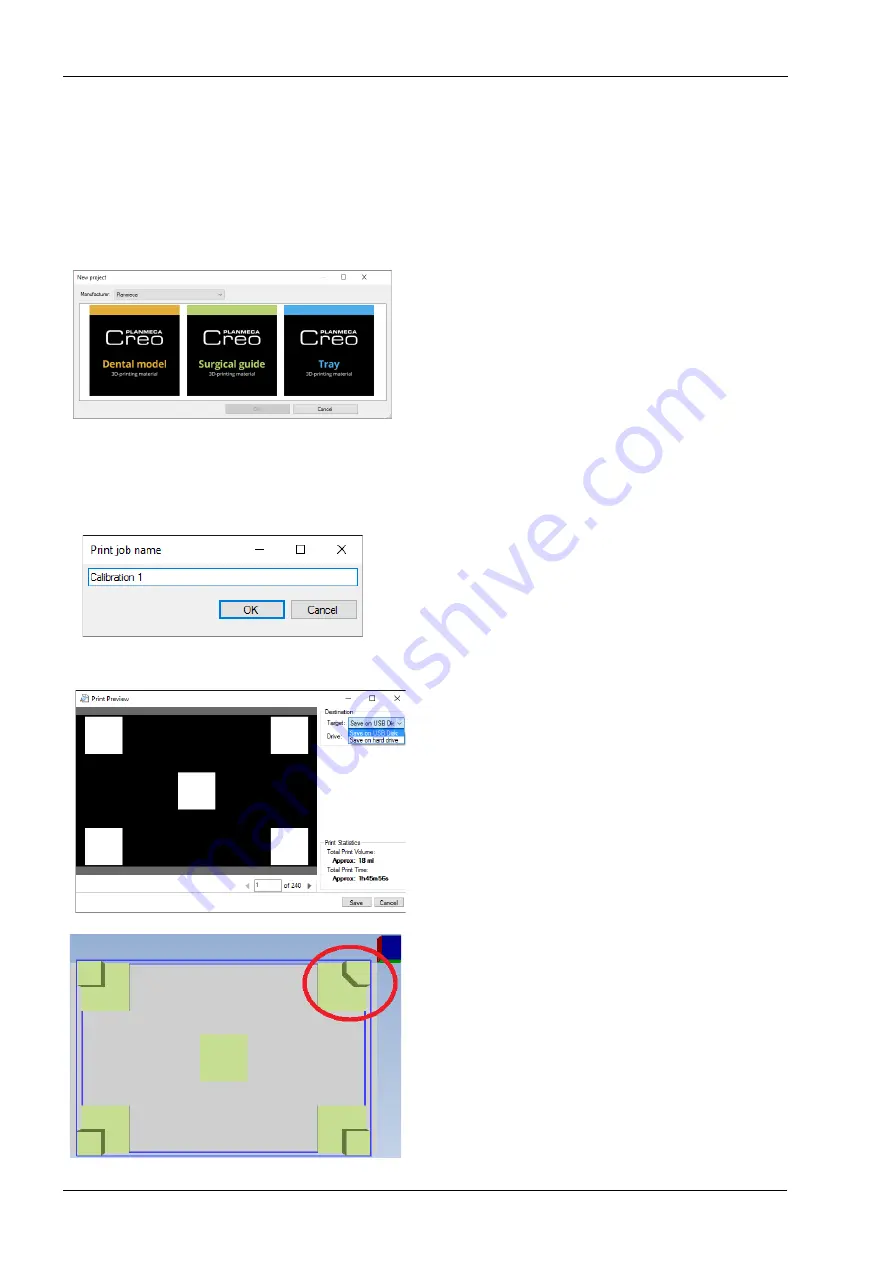
1. Open Planmeca Creo Studio software.
2. Start a new project.
3. Choose material to 3D print on. The default material 

for calibration is Dental model.

4. Click Tools - Calibration file.

Studio loads the default calibration file.

CAUTION

Do not move the model using the Planmeca Creo 

Studio tools.

5. Click Generate Print Job.

The calibration process may require multiple 

calibration prints. It is therefore recommended to 

name the print job in a manner that allows you to 

keep track of the calibration process. Give the print 

job a name that includes a date and version number.

6. Start calibration print.

a. Check the print preview and save to USB.
b. Insert USB stick into the printer.

For more information, see 11.2 "Printing" on page 26.

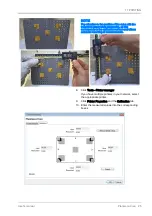
7. After successful completion of the printing process, 

clean and dry the platform and cubes and measure 

the distance between edges of cubes in all four sides.

Summary of Contents for Creo

Page 1: ...PlanmecaCreo EN 30003127_2 user s manual ...

Page 2: ......

Page 3: ...splash guard 16 10 2 Attaching basin 16 10 3 Levelling and installing build platform 17 10 4 Calibrating printer cubes calibration 19 10 5 Filling basin 20 10 6 Replacing Teflon film 21 11 PRINTING 24 11 1 Calibration print 24 11 2 Printing 26 12 AFTER PRINTING 27 12 1 Removing build platform 27 12 2 Removing prints from build platform and post processing 27 12 3 Cleaning build platform 28 12 4 Re...

Page 4: ...cifications We reserve the right to make changes without prior notice COPYRIGHT PLANMECA Publication number 30003127 Revision 2 Released 08 December 2017 Table of contents 13 10 Editing support structures 38 13 11 Generating print job 38 13 12 Saving print job to USB 38 13 13 Importing printer settings 39 14 TECHNICAL SPECIFICATIONS 40 15 DISPOSAL 40 Appendix A TROUBLESHOOTING A 1 TROUBLESHOOTING ...

Page 5: ...hickness of the next layer and the process is repeated until the part is complete NOTE Depending on your current configuration the parts illustrated may appear different from yours The instructions apply however for all configurations 2 ASSOCIATED DOCUMENTATION Planmeca Creo Technical manual publication number 30003128 For service personnel Gives instructions for service situations and parts repla...

Page 6: ...box with a QR code reader to enter the registration website OR Navigate to the registration website www planmeca com register in your Internet browser Follow the instructions on the website 5 PREVENTIVE MAINTENANCE Keep all parts that contact resin clean and free from uncured resin Check the projector lens is clean on a monthly basis Clean with air or a lint free cloth if required Check the fans a...

Page 7: ...anmeca Creo 3 6 SYMBOLS ON PRODUCT LABELS Serial number Date of manufacture Manufacturer Separate collection for electrical and electronic equipment according to Directive 2002 96 EC WEEE European conformity Non ionizing electromagnetic radiation ...

Page 8: ... for accessibility Ensure that the power outlet you plug the power cord into is easily accessible and located as close to the printer as possible If you need to disconnect power to the printer unplug the power cord from the electrical outlet CAUTION Do not use the printer near water CAUTION Do not place the printer on an unstable cart stand or table If the printer falls it could cause injury and o...

Page 9: ...into the wall outlet does not exceed the fuse rating Do not overload a power outlet strip or receptacle by plugging in too many devices The overall system load must not exceed 80 of the branch circuit rating If power strips are used the load should not exceed 80 of the power strip s input rating The printer s AC adapter is equipped with a three wire grounded plug The plug only fits in a grounded p...

Page 10: ...case is damaged the printer exhibits a distinct change in performance indicating a need for service the printer exhibits strange noises or odours the printer does not operate normally after following the operating instructions NOTE Adjust only those controls that are covered by the operating instructions since improper adjustment of other controls may result in damage and will often require extens...

Page 11: ...ug immediately if there is something wrong with your printer Do not operate if smoke strange noise or odour comes out of the printer It might cause fire or electric shock In this case unplug immediately and contact your dealer Do not keep using the printer if you break or drop it In this case contact your dealer for inspection When switching the printer off please ensure the printer has five minut...

Page 12: ...ins Before using any resin ensure that The operator is familiar with the specific safety requirements for that resin The working area is clean and free from any hazards that could lead to a spill The working area has a tray large enough to hold the build platform and any printed parts There is an adequate supply of absorbent towels to deal with any spills should they occur CAUTION Always wear suit...

Page 13: ...r is available to place the build platform and printed parts in Ensure that a supply of IPA 96 or ethanol 96 is available for cleaning the build platform and printed parts 8 2 Approved resins NOTE Please read the Planmeca Instructions For Use before using any of the listed resins Only the following resins are approved for use with the Planmeca Creo 3D printer Planmeca Surgical Guide Planmeca Denta...

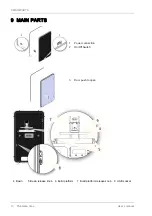
Page 14: ...9 MAIN PARTS 10 Planmeca Creo User s manual 9 MAIN PARTS 1 Power connection 2 On Off Switch 3 Door push to open 4 Basin 5 Basin release knob 6 Build platform 7 Build platform release knob 8 USB socket ...

Page 15: ...9 MAIN PARTS User s manual Planmeca Creo 11 9 Inner cover 10 Display buttons ...

Page 16: ...nmeca Creo manuals in USB flash drive 6 UV flash light 7 Pair of nitride gloves 8 Basin 9 Creo branded USB flash drive including PM Creo Studio installation package The Creo USB flash drive may be used for saving and transferring print jobs from Planmeca Creo Studio on PC to the Planmeca Creo 3D printer 10 AA batteries x 3 11 Scraper 12 Allen key 13 Power lead ...

Page 17: ...ON Be careful when handling the film for not to scratch or otherwise harm it On how to replace the film see section 10 2 Attaching basin on page 16 9 1 2 Build platform The build platform consist of tightening handle tightening screw and the plate itself CAUTION Do not disassemble the ball joint configuration attached to the build platform On how to use the build platform see section 10 3 Levellin...

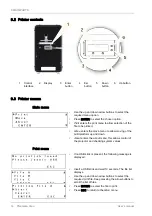
Page 18: ...atform up and down About enters the about menu this allows control of the projector and checking system values Print menu If no USB stick is present the following message is displayed Insert a USB stick and wait 10 seconds The file list displays Use the up and down arrow buttons to select the required print file Keep pressing the arrow buttons to scroll the list of files Press ENTER to select the ...

Page 19: ...Move menu From the Main menu select the Move option and press ENTER Use the Move Up and Move Dn to move the build platform To return to the Main menu press ESC If the build platform reaches the upper limit switch it stops moving and can only be moved in the down direction If the build platform reaches the lower limit switch it starts the homing calibration sequence After homing the build platform ...

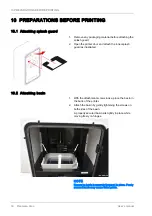
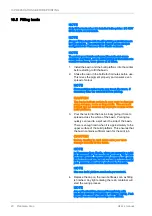
Page 20: ...er door and attach the inner splash guard as illustrated 10 2 Attaching basin 1 With the attachment screws loose place the basin in the back of the printer 2 Attach the basin by gently tightening the screws on both sides of the basin A properly secured basin sits tightly in place while moving freely on hinges NOTE Ensure he basin is securely fastened in place Poorly secured basin may cause failed ...

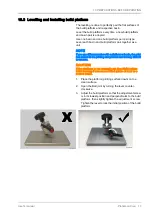
Page 21: ...u use different resins with a platform or basin the print can adhere to the printing components and be very difficult to remove CAUTION If the platform is not correctly set too high before initial homing it can cause failed prints or lead to a broken basin 1 Place the platform printing surface down onto a clean surface 2 Open the Ball joint by turning the lever counter clockwise 3 Adjust the build...

Page 22: ...ONS BEFORE PRINTING 18 Planmeca Creo User s manual 4 Mount the build platform to the printer 5 Drive the motor down until the printer initiates and completes a homing cycle 6 Release the clamp by opening the handle ...

Page 23: ...ng normal printing perform a printer calibration test print to ensure that Planmeca Creo Studio and the printer are aligned Additionally the calibration print ensures that the build platform and basin have been successfully leveled The calibration job prints five cubes onto the build platform The four corner cubes are measured for calibration values and the fifth center cube is printed to ensure t...

Page 24: ...ools or fingernails The ceramic bottom can be cracked by improper motion of the build platform 3 Pour the resin into the basin slowly giving it time to spread across the whole of the basin Pouring too quickly can lead to a spill over the side of the basin There is enough resin when it is approximately to the upper surface of the build platform This ensures that the basin contains sufficient resin ...

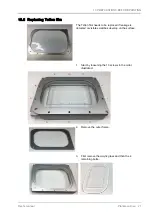
Page 25: ...placing Teflon film The Teflon film needs to be replaced if leakage is detected or visible scratches develop on the surface 1 Start by loosening the 10 screws in the order illustrated 2 Remove the outer frame 3 First remove the acrylic glass and then the 4 remaining bolts ...

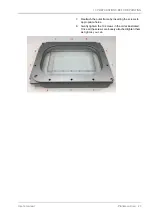
Page 26: ...r s manual 4 Remove the frame with the Teflon film attached to it and replace the old film frame with a new one 5 Secure the frame with the 4 bolts without fully tightening them 6 Embed the acrylic glass back Ensure cleanliness wipe surface if necessary ...

Page 27: ... User s manual Planmeca Creo 23 7 Reattach the outer frame by inserting the screws to appropriate holes 8 Gently tighten the 10 screws in the order illustrated Once all the screws are loosely attached tighten them as tight as you can ...

Page 28: ...erate Print Job The calibration process may require multiple calibration prints It is therefore recommended to name the print job in a manner that allows you to keep track of the calibration process Give the print job a name that includes a date and version number 6 Start calibration print a Check the print preview and save to USB b Insert USB stick into the printer For more information see 11 2 P...

Page 29: ...en measuring as this corresponds to the calibration screen and allows accurate recording of measurements 8 Click Tools Printer manager If you have multiple printers in your network select the appropriate printer 9 Click Printer Properties and the Calibration tab 10 Enter the measured values into the corresponding boxes ...

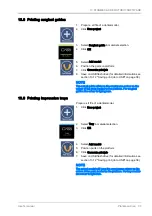
Page 30: ...ck the slots and openings on the printer provided for ventilation 1 Process a part to print using Planmeca Creo Studio for detailed description see section 13 6 Creating new project on page 36 2 Download file to USB stick 3 Insert USB with the required print file into the printer USB port NOTE It can take up to 10 seconds to list the print files 4 Select Print 5 Select the file to print 6 Press St...

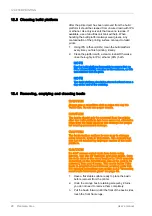
Page 31: ... it gently under one corner of the print 3 Repeat working the scraper under all the corners rotate the platform if required 4 Go lightly around the edges using the scraper and gradually separate print from platform NOTE Trying to remove the print working only from one corner can cause the print to break CAUTION Be careful with not to damage yourself or the platform surface with the scraper when re...

Page 32: ...h to wipe and dry the Teflon film Do not use paper towels CAUTION The basin should only be removed from the printer after the build platform has been removed otherwise drips from the build platform can damage the projec tor causing permanent damage CAUTION The basin bottom surface is very easy to damage using scraper tools or fingernails The ceramic bot tom can be cracked by improper motion of the...

Page 33: ...he pigment properly CAUTION Do not leave resin in the printer after printing 7 After emptying using IPA or ethanol clean the basin every time you finish printing ideally 8 Wipe basin clean with ordinary paper dry with compressed air to ensure no paper fibres remain Otherwise rinse thoroughly in IPA ethanol 96 bath NOTE Dry the basin thoroughly to ensure that no IPA ethanol 96 remains on the surfac...

Page 34: ...t to clean the outside surfaces of the printer CAUTION Do not use liquid cleaners or aerosol cleaners CAUTION Do not use abrasive cleaners waxes or solvents to clean the printer CAUTION Clean any spills immediately with Isopropyl Alco hol IPA 96 or Ethanol 96 If left they will cure making cleaning more difficult If the printer is not being used for a long period of time disconnect the power plug f...

Page 35: ...w 13 1 1 Top menu File Add model Ctrl L Adds new model stl file to existing project Open project Ctr l O Opens previously saved projects Save project Ctrl S Saves existing project Clear project Ctrl e Deletes all model files and material information from existing project Export as stl Exports existing models as stl file from Studio Generate print job Ctrl p Creates print job for printer Exit Close...

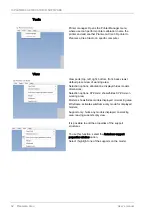
Page 36: ...t view of working area Selection options annotations displays hides models dimensions Selection options XYZ Axis shows hides XYZ Axis on working area Models shows hides models displayed on working area Wireframe activates wireframe only mode for displayed models Support only hides any models displayed on working area leaving supports only view It is possible to edit the properties of the support s...

Page 37: ...s information from a specific Planmeca Creo Studio installation after receiving support files by e mail To create these files Click Help Support Create support files Planmeca Creo Studio creates a ZIP file for e mailing Support files contain the following information Logging folder The information logged during the printing process Materials folder The material used in the print job Models folder ...

Page 38: ...es a print file for Planmeca Creo 3D Printer 13 3 Default views Default preset views of working area Front view Back view Left view Right view Bottom view Top view 13 4 Bottom menu Bottom menu functions help control the models on the working area Rotate X counter clockwise moves parts on X direction Rotate X clockwise moves parts on X direction Rotate Y counter clockwise moves parts on Y direction...

Page 39: ...odel without beginning a new project Support basement Adds a printed base to the model to assist in securing the print to the build platform 13 5 Print area controls NOTE The print area indicated in the software is the actual size of the print area not the one of the platform Print area can be controlled using windows mouse For moving the models on the platform use the left mouse button To zoom in...

Page 40: ...n requires for material to be safe for handling in patients mouth and safe with contact with patients blood CAUTION Do not use materials if they are not designed for your application 13 7 Printing dental models 1 Prepare stl file of a dental model 2 Click New project 3 Select Dental model in material selection 4 Click OK 5 Select Add model 6 Position parts on the platform 7 Click Generate print jo...

Page 41: ...actual guide will have the exact same colour as the colour of the parts loaded to the platform For surgical guides the colour is light green 13 9 Printing impression trays Prepare stl file of a dental model 1 Click New project 2 Select Tray in material selection 3 Click OK 4 Select Add model 5 Position parts on the platform 6 Click Generate print job 7 Save on USB flash drive for detailed informat...

Page 42: ...ct for 3D printing on Planmeca Creo 3D Printer The software cuts parts into slices for the printer to build a part from liquid material To generate a job 1 Click on Generate print job 2 In the opening Print Preview menu click Next Slice to view each individual slice for your planned project The print statistics shows Approximate total print volume in ml Approximate total print time NOTE It is impo...

Page 43: ...settings allows you to for example transfer Planmeca Creo Studio to another PC reinstall the PC operating system or reinstall Planmeca Creo Studio without needing to recalibrate the printer The option is available from the Printer Manager menu 1 Click Import 2 Choose the Printer Settings XML file 3 Click Open Planmeca Creo Studio adds the printer or printers saved in this XML file ...

Page 44: ...es Front 50 cm 19 7 in Sides 50 cm 19 7 in Rear 50 cm 19 7 in Top 50 cm 19 7 in Operating temperature 15 32 C 59 89 6 F 15 DISPOSAL Do not throw this electronic device into the trash when discarding To minimize pollution and ensure utmost protection of the global environment please recycle For more information please see the Waste from Electrical and Electronics Equipment WEEE regulations The appr...

Page 45: ...that is geometrically incorrect or to the fact that the printing process has failed to produce the part An interrupted printing process can result in parts of the prints getting stuck to the basin glass and build platform NOTE The printer can pause and resume print jobs but if a power failure or other issue occurs to interrupt the print job the printer cannot resume Clean the parts and begin the p...

Page 46: ...art Part base smaller than largest cross section If you print a cone with the point to the build platform for example the print can detach when the force between the basin and the printed part becomes greater than the force holding the part to the build platform Change the orientation of the part If you cannot change the orientation of the part add supports to the part where the cross section star...

Page 47: ... loose basin can allow one print to complete successfully but cause failure in the next print job Tighten the basin fixing screws Check that the basin still pivots Resin contaminated build platform or basin If the build platform or basin has been used with multiple different resin types the print can deform due to resin coagulating over curing or under curing Over curing and under curing can both ...

Page 48: ...me For more information see sections 12 3 Cleaning build platform and 12 4 Removing emptying and cleaning basin on page 28 5 Replace the basin and build platform 6 Restart the print job A 2 2 Print layer stuck to basin floor The 3D print job can fail as a result of a resin layer remaining behind on the basin floor after curing The UV light can cure the resin layer and cause it to adhere to the bas...

Page 49: ...emoved then peel it away from the basin floor CAUTION Do not use tools or fingernails to scrape off the cured resin 1 Pour the excess uncured resin out of the basin and back into its storage bottle Remember to filter the resin as small cured pieces can be loose in the material Leave a thin layer of uncured resin in the bottom of the basin to assist in the adherence of the detachment knob to the fa...

Page 50: ...TROUBLESHOOTING 46 Planmeca Creo User s manual 3 Lift the basin and shine the UV flashlight against the detachment knob base and the underside of the failed print 4 Carefully lift and angle the detachment knob to peel away the cured resin ...

Page 51: ...iew of the print job showing each layer as a black and white image If the first image in this preview is black it means the print model is not correctly flush with the build platform and will not connect correctly during the initial printing process Move the print model down in Creo Studio so it contacts the build platform printing area It is also very important to place sufficient connectors betw...

Page 52: ...equipment does cause harmful interference to radio or television reception which can be determined by turning the equipment off and on try to correct the interference in the following ways Reorient or relocate the receiving antenna Increase the separation between the equipment and the receiver Connect the equipment to an outlet on a circuit different from that to which the receiver is connected Co...

Page 53: ...APTURE Printer Manager tool allows the capture of Planmeca Creo 3D printer serial numbers to assist in troubleshooting and tracking This feature allows you to keep track of your printer Saving your printer s serial number in the configuration also helps Planmeca After Sales to provide you with assistance ...

Page 54: ......

Page 55: ......

Page 56: ...Planmeca Oy Asentajankatu 6 00880 Helsinki Finland tel 358 20 7795 500 fax 358 20 7795 555 sales planmeca com www planmeca com ...

Reviews: