background image

Library Installation

Plasmon D875 - D2175 User Manual

Page 22 

Document Revision E

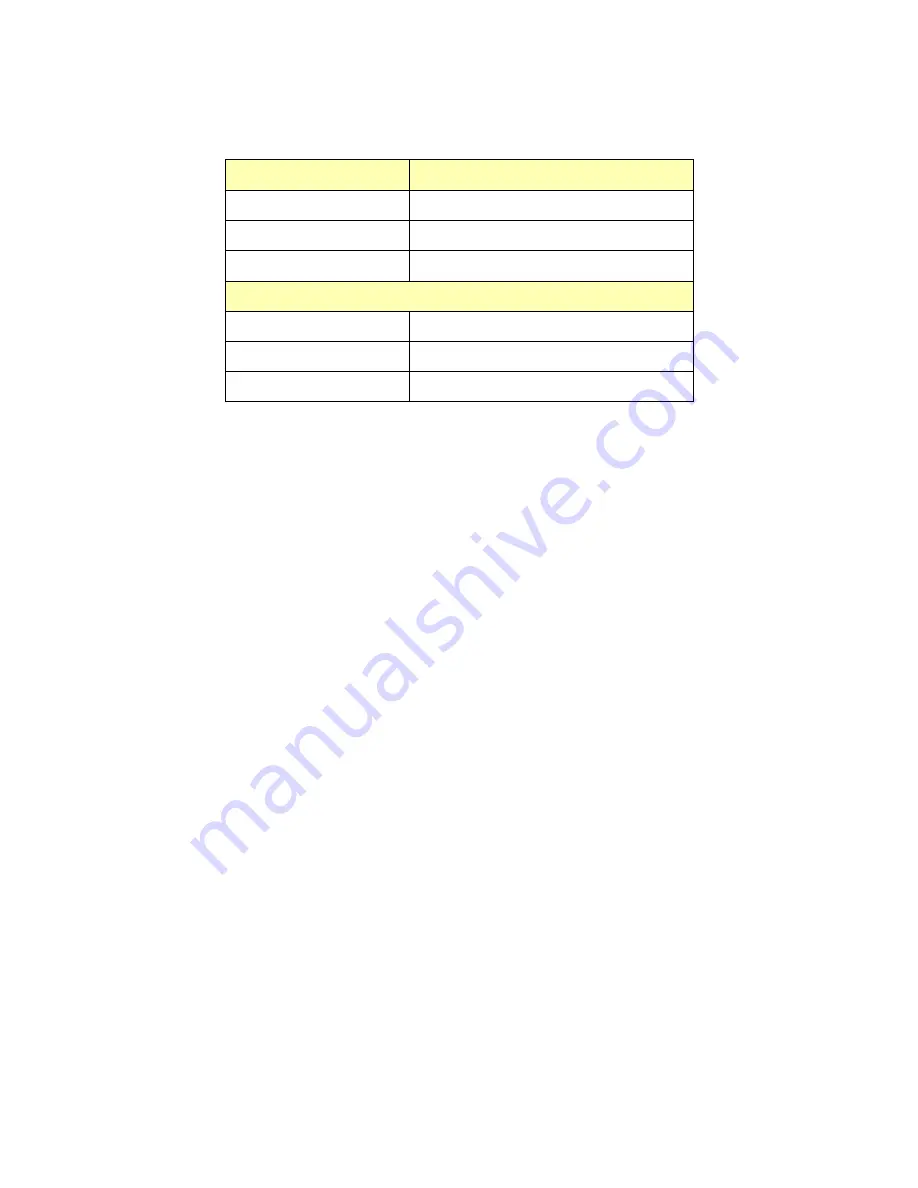
Table 3. Magazine Slot LED Indicators

LED State

Description

On

Magazine present or not present

Off

N/A

Blinking

Magazine may be removed

Bulk Loading Indicators

On

Magazine in use

Off

Remove to reload with media

Blinking

Insert magazine in appropriate position

Summary of Contents for LIBRARIES D2175

Page 1: ...The Plasmon Enterprise D Series D875 D2175 Libraries DVD Drive User Manual P N 97704577 E ...

Page 2: ......

Page 3: ...lasmon makes no representation or warranties with respect to the contents of this document and specifically disclaims any implied warranties of merchantability or fitness for any particular purpose Further Plasmon reserves the right to revise this publication without obligation of Plasmon to notify any person or organization of such revision or changes Trademark Notices Plasmon is a U S registered...

Page 4: ...is available on the Plasmon web site www plasmon com or www plasmon co uk Revision Date Description A September 2002 Initial release B November 2002 Updated installation information C March 2003 Updated to include Multi Drive D June 2003 Minor updates from Service E October 2004 Updated format and presentation Added bay pack ing to Ch 2 ...

Page 5: ...he reader to situations or conditions that could potentially result in personal injury fire hazard or equipment damage CAUTION A CAUTION is used to warn of undesirable procedures or of situations in which equipment damage could result NOTE A NOTE is used to emphasize an area of text or to provide additional information ...

Page 6: ...incompatable software and or firmware The library fails because of accident misuse abuse neglect mishandling misapplication alteration faulty installation modification or service by anyone other than the factory service center or its approved agent The library is repaired by anyone including an approved agent in a manner that is contrary to the maintenance or installation instructions supplied by ...

Page 7: ...dia 11 The Magazine 12 Media and Magazine Handling 13 Major Hardware Components 14 Front Access Door 14 Front Panel Display 14 Magazine Access Door 14 Magazine Slots 14 Import Export Port I E 15 Drive Modules 15 Main Power Switch and Power Cable 15 SCSI Interface 15 Power Supplies 15 Rear Access Door 16 Lift Assembly 16 Media Transport Element MTE 16 Rotation Station 16 Storage Slot Map 16 CHAPTER...

Page 8: ...NDIX A SPECIFICATIONS 51 Overall Library Specifications 51 Power Cable Specification 53 SCSI Cable Specification 53 SCSI Cables and Connectors 53 SCSI Cable Length 53 SCSI Termination 53 APPENDIX B SCSI BUS INFORMATION 55 SCSI Bus Configurations 55 Single Bus Configuration 55 Dual Bus Configuration 56 Triple Bus Configuration 57 SCSI ID Configuration 58 Drive Combinations 59 APPENDIX C SAFETY AGEN...

Page 9: ...xpansion Bay Installation f 27 Packing the D875 D2175 Libraries a 28 Packing the D875 D2175 Libraries b 29 Packing the D875 D2175 Libraries c 29 Packing the D875 D2175 Libraries d 30 Packing the D875 D2175 Libraries e 30 Packing the D875 D2175 Libraries f 31 Expansion Bay Packing a 32 Expansion Bay Packing b 33 Expansion Bay Packing c 33 Expansion Bay Packing d 34 Expansion Bay Packing e 34 Expans...

Page 10: ...List of Figures Plasmon D875 D2175 User Manual Page 8 Document Revision E ...

Page 11: ...anization of Media in the Library 23 LCD Symbols 40 Power Up LCD Symbols 41 Main Menu Selections 43 Library Status Menu Selections 45 Set Up Library Menu Selections 48 D875 D2175 Specifications 51 Media Specifications 52 Maximum Allowable SCSI Cable Length LVD 53 Factory Default SCSI IDs for the D875 D2175 Libraries 58 SCSI Bus and Drive Combinations 59 D875 D2175 Error Codes 64 ...

Page 12: ...List of Tables Plasmon D875 D2175 User Manual Page 10 Document Revision E ...

Page 13: ...smon libraries Table 1 D875 D2175 Library Models The number of media slots varies because adding a drive module which holds two drives subtracts 25 media storage slots Command Processing The library responds to SCSI commands from a host computer system to load and unload drives and move media within the library Media Movement The media transport element MTE is used to move media between the media ...

Page 14: ...available Contact Plasmon for ordering information In the US Asia Pacific South America and Canada call 1 800 451 6845 In Europe Middle East and Africa call 44 0 1763 262 963 Table 2 Plasmon Pre loaded Media Figure 1 The Bulk Loading Magazine Media Type Capacity DVD R 9 4 GB dual sides DVD R 4 7 GB single sided DVD RAM 9 4 GB dual sided DVD RAM 4 7 GB single sided DVD RAM 2 6 GB single sided Media...

Page 15: ...e or media trays To ensure continued reliability observe the following When loading a magazine into the library or when handling a magazine ensure that the case is clean Dirty magazines can cause problems in loading or the loss of written data Do not load damaged media trays into a magazine or the library Damaged media trays can interfere with system robotics Do not expose the media to moisture or...

Page 16: ...y which provide the user interface to the system It is used to display tests modes error codes and other user related messages Magazine Access Door The magazine access door opens on the magazine slots Magazine Slots There are five magazine slots behind the magazine access door Each magazine slot holds one magazine containing up to ten pieces of media These slots are used to bulk load the library T...

Page 17: ...asmon for the latest drive updates Main Power Switch and Power Cable The power cable is routed through the bottom of the library to the power connector The power switch is located just above the power connector SCSI Interface The connection between the library and a host computer The interface to the library is LVD SCSI using a 68 pin high density connection The host computer must also be set up f...

Page 18: ...dia transport element MTE providing access to all media locations Media Transport Element MTE The MTE is the mechanism that picks media and moves it between storage locations and the drives Rotation Station The Rotation Station allows use of double sided media Storage Slot Map The storage slot map is located on the inside of the rear access door It identifies the media locations for all D875 D2175...

Page 19: ...erial in case it is ever necessary to ship the library Library Position Position the library in a location that allows both the front and rear door to open completely without any obstructions The figure below should be used as a guide for library space planning Figure 4 Space Planning for the Library Allow 3 inches 7 6 cm behind and 2 inches 5 1 cm on both sides of the unit for sufficient airflow ...

Page 20: ...ctor Figure 5 D875 D2175 Power Connector and Power Switch Connect the power cable to a suitable AC source The power switch is located beside the power cable connection Power on the library The front panel display now prompts to remove the protective packaging material Removing Internal Packing Material 1 Apply power to the library 2 Follow the instructions on the front panel display to check the t...

Page 21: ...ibrary now performs a self calibration and initialization routine NOTE It may be necessary to reboot the host computer for it to recognize the library Some modifications to the host hardware or operating system may be necessary for it to recognize the library These modifications may include patches driver updates or modifications to the configuration files Please consult the host hardware or opera...

Page 22: ...ure that the library is powered off prior to connecting the SCSI cables The SCSI cable passes through the bottom of the library into the appropriate SCSI connector inside the front door of the library CAUTION Ensure the host computer provides an LVD SCSI interface HVD SCSI is not compatible with LVD SCSI If an improper connection is made damage to the library or connected equipment could result Fi...

Page 23: ...or the first time use the high speed bulk loading method described below 1 Turn on the power 2 From the front panel menu select Set Up Library Offline Operations Bulk Load Library 3 Open the library front door and the magazine access door Note that when the Bulk Load Library option is selected the magazine door opens 4 Place a pre loaded magazine in each magazine slot magazine 1 through magazine 6...

Page 24: ... Revision E Table 3 Magazine Slot LED Indicators LED State Description On Magazine present or not present Off N A Blinking Magazine may be removed Bulk Loading Indicators On Magazine in use Off Remove to reload with media Blinking Insert magazine in appropriate position ...

Page 25: ...076 1075 1101 1100 1126 1125 1151 1150 1176 1175 1200 1326 1325 1351 1350 1376 1375 1401 1400 1426 1425 1451 1450 1476 1475 1501 1500 1525 1201 1226 1225 1251 1250 1276 1275 1301 1300 551 625 626 575 576 600 601 650 651 676 675 701 700 726 725 751 750 776 775 801 800 826 825 851 850 875 1651 1650 1676 1675 1701 1700 1726 1725 1751 1750 1776 1775 1801 1800 1826 1825 1850 1526 1551 1550 1576 1575 16...

Page 26: ...smon D875 library are shipped separately The following instructions explain how to mount the bays to the main library chassis Note This operation should be performed by two people 1 The main library chassis is shipped without side panels as shown below Remove the side panels if upgrading a standard D875 library to a D1525 and D2175 Figure 10 Expansion Bay Installation a ...

Page 27: ...l Library Installation Document Revision E Page 25 2 Position the expansion bay flush against the library chassis matching the guide pins on the chassis to the guide holes on the expansion bay Figure 11 Expansion Bay Installation b ...

Page 28: ...tch hooks that hold the expansion bays to the library chassis There are two on each side of the bay Figure 12 Expansion Bay Installation c 4 Using a phillips head screw driver attach the finish matching cover plate to the back side of the expansion bay with the color coated screws provided Figure 13 Expansion Bay Installation d ...

Page 29: ...ttach the finish matching square column to the front of the bay by hanging it on the screw heads provided Figure 14 Expansion Bay Installation e 6 Finally attach the finish matching side panel to the bay by hanging it on the screw heads provided Figure 15 Expansion Bay Installation f ...

Page 30: ... the warranty Replacement packaging is available from Plasmon The library must be parked before packing the system Follow these steps to pack the library for shipping 1 While parking the library prompts for insertion of the MTE packaging material 2 Insert the first piece of foam under the Rotation Station Place this foam so the tab is on the top left side when viewed from the back of the library 3...

Page 31: ...elcro on packaging skid Figure 17 Packing the D875 D2175 Libraries b 5 Roll the library onto packaging skid The library s front door goes onto skid first Push on bottom of library when rolling onto packaging skid 6 Cover the library with the anti static bag and insert back edge board into slots with foam protected side toward library Figure 18 Packing the D875 D2175 Libraries c ...

Page 32: ... 30 Document Revision E 7 Remove ramp from skid and place upright in slot provided behind library Close velcro fasteners Figure 19 Packing the D875 D2175 Libraries d 8 Place top foam over library and fit in place Figure 20 Packing the D875 D2175 Libraries e ...

Page 33: ...2175 User Manual Library Installation Document Revision E Page 31 9 Place cardboard sleeve over library and place lid on top Figure 21 Packing the D875 D2175 Libraries f 10 Finally strap box to the skid for shipping ...

Page 34: ...lowed CAUTION Plasmon libraries and bays must be shipped in the original packaging Shipping a unit in anything other than the manufacturers packaging voids the warranty Replacement packaging is available from Plasmon Follow these steps to pack the bays for shipping 1 Lay out the pallet ramp wheeled skid and mounting blocks as shown in the picture below Ensure the ramp is securely attached to the p...

Page 35: ...allation Document Revision E Page 33 2 Place the first bay on the wheeled skid as shown in the picture below Figure 23 Expansion Bay Packing b 3 Position the bay so the mounting bolt hole lines up as shown below Figure 24 Expansion Bay Packing c ...

Page 36: ... Page 34 Document Revision E 4 Use a mounting block and a hex head bolt to secure the bay to the wheeled skid Figure 25 Expansion Bay Packing d 5 Hang the painted skin and spacer column on their mounting screws as shown Figure 26 Expansion Bay Packing e ...

Page 37: ...E Page 35 6 Secure a second bay in the same way but facing the opposite direction Figure 27 Expansion Bay Packing f 7 With two people steadying the bays roll the wheeled skid up the ramp onto the pallet Push at the bottom to avoid tipping Figure 28 Expansion Bay Packing g ...

Page 38: ... Document Revision E 8 Secure the wheeled skid to the pallet with four hex head bolts two on each side Figure 29 Expansion Bay Packing h 9 Cover each bay with an anti static bag and tape the ramp in an upright position as shown Figure 30 Expansion Bay Packing i ...

Page 39: ...ion E Page 37 10 Place the shaped foam topper on the bays Make certain the center spacer foam fits down between the bays Then slid the cardboard box over the bays and tape the top flaps closed Figure 31 Expansion Bay Packing j 11 Finally strap box to skid for shipping ...

Page 40: ...Library Installation Plasmon D875 D2175 User Manual Page 38 Document Revision E ...

Page 41: ...tus and other important information Figure 32 LCD Display Format The description line displays the number and name of the mode or test when navigating menus An ellipsis following a name indicates that the selection contains submenus The selection button indicators display the function of the four buttons located directly below the indicators A dash above a button means that no function is associat...

Page 42: ...oll mode B Confirm a selection V Decrement a numeric value or scroll display up U Increase a numeric value N Go to the previous menu item M Go to the next menu item D Display a list of menu items R Run a motor or execute a function X Indicates a drive is turned off z Indicates media exists in an element Indicates magazine exists in an element Indicates the element is empty Indicates an empty tray ...

Page 43: ...splay Table 6 Power Up LCD Symbols Symbol Meaning D Drive status drive present media present T Media Transport Element status media present I I E Port status magazine present MAG Ten Slot Magazine slot status magazine present Empty element z Media in element Magazine in element Empty tray in drive Displays element status information as described in the table below Displays Error xx if an error occ...

Page 44: ...a selection press H Figure 34 Main Menu Overview Select Menu 1 Library Status 3 Turn Drive Off 5 Service Drive 7 Setup Library 4 Turn Drive On 2 Exchange Magazines 6 Restore Drive 8 Maintenance Mode 1 Config Information 2 Status Information 3 Error Information 4 Network Interface 1 Config Information 2 Status Information 3 Error Information 4 Network Interface 5 Off line Operations Reserved for Pl...

Page 45: ...e to allow removal or replacement This option takes down the entire SCSI bus the drive is on and all drives associ ated with this bus loose SCSI access For password protected operations the factory default password is AAAA 6 Restore Drives Use to restore power to the drives after removal or replacement For pass word protected operations the factory default password is AAAA 7 Set Up Library Allows ...

Page 46: ...atus menu options Figure 35 Library Status Menu Options 1Library Status 3ErrorInf ormation 2StatusInf ormation 4NetworkInterf ace 1Conf igInf ormation 1UnitInf ormation 2 SerialNumber 3 Date andTime 4SCSI BusConf ig NotUsed 1 Element Status 2Driv eStates 3 Power OnHours 4Unit Cy cleCount 5ChangerAddress 6Driv eAddresses 7ChangerOptions 8Passwords 9RMIInf ormation 5Driv eLoadCounts 1 ErrorLog 2 Err...

Page 47: ... Recovery Errors Y or default N Limit Recovery Y or default N Enable All Uattn Y or default N 8 Passwords This option is not available when library is online 9 RMI Information Not supported 2 Status Information Allows viewing only of library status 1 Element Status To view which elements slots drives pickers or I E station are populated by media 2 Drive States To view the power on off state of a d...

Page 48: ...story To view the SCSI command event history since it was last reset Only SCSI commands which affect library operations are recorded 4 Micro Op Stack To view a list of operations performed for the last failing SCSI command These micro operations include position position and flip pick store load and unload The list includes forward and backward operations media movement and undo and retry for atte...

Page 49: ...ormation 2 Status Information 5 Offline Operations 4 Network Interface 1 Config Information 1 Rescan Elements 2 Return all Trays 3 Park Library 4 Test Library 5 Service Drives 6 Restore Drives Not Used 1 Element Status 2 Drive States 3 Power On Hours 4 Unit Cycle Count 5 Drive Load Counts 1 Error Log 2 Error Statistics 3 Event History 4 Micro Op Stack 6 Function Counts 7 Bulk Load Library 8 Bulk U...

Page 50: ...uto clamping and unclamping of the media tray Ignore Recover Errs If library can recover from an error it will keep operating and not report the error Limit Recovery To limit error recovery effort to four tries Enable All UATTN Enable all unit attention conditions to host 8 Passwords To set or change passwords To remove password protection from a menu selection press the check mark without enterin...

Page 51: ...nd These micro operations include position flip pick store load and unload The list includes forward and backward operations media movement and undo and retry for attempted failure recovery This log is cleared whenever the system is initialized This error should be reported to Plasmon for decoding 4 Network Interface Not Used 5 Offline Operations Allows basic offline operations 1 Rescan Elements S...

Page 52: ...Menu System Plasmon D875 D2175 User Manual Page 50 Document Revision E ...

Page 53: ...econds 302 swaps per hour 8 5 seconds 425 swaps per hour 9 8 seconds 6 39 seconds Maximum Number of Drives 12 12 12 Library Reliability MSBF 2 500 000 2 500 000 2 500 000 Rotation Station TM Standard Standard Standard Picker Type Dual Dual Dual Import Export Port Ten Slot Magazine Ten Slot Magazine Ten Slot Magazine Removable Storage Slots Five Ten Slot Magazines Five Ten Slot Magazines Five Ten S...

Page 54: ...89 cm 325 lbs 148 kgs 2 see D875 dimensions Operating Temperature 50 to 90F 10 to 32C Non Operating Temperature 40 to 158 F 40 to 70 C Operating Humidity 10 to 90 RH non condensing Operating Voltage 100 to 240 VAC Auto ranging power supply Operating Frequency 50 60 Hz Power Consumption 2 Drives 145 W 495 BTU hr Power Consumption 12 Drives 285 W 972 BTU hr If the third power supply is installed add...

Page 55: ...e are any questions in regards to the proper cord sets consult the distributor SCSI Cable Specification SCSI Cables and Connectors Plasmon recommends using Wide LVD SCSI cables and connectors that conform to SCSI 3 specifications NOTE To comply with the regulations and standards in this manual all SCSI cables and connectors used with the library must be properly shielded SCSI Cable Length Plasmon ...

Page 56: ...Appendix A Plasmon D875 D2175 User Manual Page 54 Document Revision E ...

Page 57: ...g three figures show how to connect drives for single dual and triple SCSI bus configurations Each bus in the library supports a maximum of four drives The library address should always be assigned to SCSI Bus 1 Single Bus Configuration Figure 37 Single Bus Configuration Host Computer Terminator Drive 1 Drive 2 Drive 3 Drive 4 SCSI Bus 1 ...

Page 58: ... D2175 User Manual Page 56 Document Revision E Dual Bus Configuration Figure 38 Dual Bus Configuration Host Computer Terminator Drive 1 Drive 2 Drive 3 Drive 4 SCSI Bus 1 Drive 5 Drive 6 Drive 7 Drive 8 Terminator SCSI Bus 2 ...

Page 59: ...vision E Page 57 Triple Bus Configuration Figure 39 Triple Bus Configuration Host Computer Terminator Drive 1 Drive 2 Drive 3 Drive 4 SCSI Bus 1 Drive 5 Drive 6 Drive 7 Drive 8 Terminator SCSI Bus 2 Drive 9 Drive 10 Drive 11 Drive 12 Terminator SCSI Bus 3 ...

Page 60: ...g 4 Bus Config 5 Bus Config 6 Bus Config 7 SCSI Bus SCSI ID SCS Bus SCSI ID SCSI Bus SCSI ID SCSI Bus SCSI ID SCSI Bus SCSI ID SCSI Bus SCSI ID SCSI Bus SCSI ID Drive 1 1 0 1 0 1 0 1 0 1 0 1 0 1 0 Drive 2 1 1 1 1 1 1 1 1 1 1 1 1 1 1 Drive 3 1 2 2 0 1 2 1 2 1 2 1 2 1 2 Drive 4 1 3 2 1 1 3 1 3 1 3 1 3 1 3 Drive 5 2 0 2 0 2 0 2 0 2 0 Drive 6 2 1 2 1 2 1 2 1 2 1 Drive 7 2 2 3 0 3 0 2 2 Drive 8 2 3 3 1...

Page 61: ...s may only be used on Bus 2 and Bus 3 Table 14 SCSI Bus and Drive Combinations Drive Combination Bus 1 Maximum Num ber of Drives Bus 2 Maximum Num ber of Drives Bus 3 Maximum Num ber of Drives Maximum Total Number of Drives DVR RAM only 4 4 4 12 DVD R only 0 2 2 4 DVD RAM DVD R 4 DVD RAM only 2 DVD R only 2 DVD R only 8 Multi Drive 4 4 4 12 Maximum Drives per Bus 4 4 4 12 maximum drives for the li...

Page 62: ...Appendix B Plasmon D875 D2175 User Manual Page 60 Document Revision E ...

Page 63: ...ual may cause harmful interference to radio communications Operation of this equipment in a residential area is likely to cause harmful interference in which case the user will be required to correct the interference at his own expense Shielded cables are required for this device to comply with FCC Rules Use shielded cables when connecting this device to others Industry Canadian Notice per ICES 00...

Page 64: ...anel contain a lithium battery which could explode if incorrectly replaced Replace only with a qualified replacement battery Return the old battery to the manufacturer for disposal or dispose of in accordance with local regulations for the disposal of lithium batteries ATTENTION IL Y A DANGER D EXPLOSION S IL Y A REPLACEMENT INCORRECT DE LA BATTERIE REMPLACER UNIQUEMENT AVEC UNE BATTERIE DU MEME T...

Page 65: ...ting and finding the corrective action for a library error Note the error code number displayed on the front panel display and find the corresponding error code in the following table The table is sorted by error code number CAUTION The corrective actions shown in the error code table should only be performed by qualified Plasmon trained personnel Example When a library error occurs the LCD screen...

Page 66: ...stack over flow Recording operation Firmware Download new firmware 2 Undoing operation 0D 1 Bad OP stack index Nothing to undo Firmware Download new firmware 2 Invalid undo operation code 0E group Flash program fail main code Code down load progress MAIN code Main control ler or Firm ware Replace Main controller download new firmware 0F group Flash program fail DSP Code download progress DSP code ...

Page 67: ... 5 Main circuit board cable fail CJ7 interlock ref erence sensor 6 Main circuit board cable fail CJ10 To PWR dist circuit board supply monitor 7 Drive interface CJ5 to SCSI converter 8 Drive interface CJ11 to SCSI converter 9 Magazine interface CJ4 to magazine detector circuit board 10 Magazine interface CJ7 to Access door solenoid sensor 11 Magazine interface CJ8 to flipper 12 Drive interface cir...

Page 68: ... decoder 6 Main controller fuse 6 overload 5V interface CJ8 to MC SCSI adapter 7 Main controller fuse 7 overload 12V interface CJ8 to MC SCSI adapter 8 Main controller fuse 9 overload 5V interface CJ12 to External SCSI interface circuit board 9 Main controller fuse 10 overload 24V for lift motor interface CJ4 to pivot lift circuit board s 10 Main controller fuse 11 overload 24V for step per motors...

Page 69: ...9 Magazine interface access door solenoid 24V fuse overload F2 20 Magazine interface flip per 24V fuse overload F3 21 Power distribution fuse 1 overload 5V inter face CJ7 for Power to Mag circuit board 22 Power distribution fuse 2 overload 5V inter face CJ7 for Power to RMI circuit board 23 Power distribution fuse 3 overload 24V inter face CJ7 for Power to Mag circuit board 24 Power distribution f...

Page 70: ...esponse test fail VP Emitter Detector circuit board 8 Drive interface I O loop back test failed 9 Drive interface 3 3V failure 10 Drive interface 2V fail ure 11 Drive interface 24V fail ure 12 SCSI Converter SE term power bad bus 1 or bus 3 13 SCSI Converter LVD term power bad bus 1 or bus 3 14 SCSI Converter SE term power bad bus 2 15 SCSI Converter LVD term power bad bus 2 16 Mag interface not p...

Page 71: ...e out setting drive loaded 6 CAN time out setting drive unloaded 7 CAN time out setting drive id 8 CAN time out powering on drive 9 CAN time out getting drive type 10 CAN time out powering off drive 11 CAN time out clamping drive 12 CAN time out unclamp ing drive 13 CAN time out complet ing clamp unclamp drive 14 CAN time out isolating bus 15 CAN time out restoring bus 16 CAN time out blinking LED...

Page 72: ...e out reading mag interface circuit board temp 7 CAN time out turning on mag LED 8 CAN time out turning off mag LED 9 CAN time out blinking mag LED 10 CAN time out firing mag door solenoid 11 CAN time out start ver ify temp 12 CAN time out reset mag door state 17 1 Main board SCSI termpower No term pwr at MC SCSI adapter circuit board 18 1 Power supply voltage 5V out of range during check main cir...

Page 73: ...1B 1 Too few power supplies More than one drive interface board and only one power supply Add power supply 22 1 Bus already iso lated Service drives isolate request and bus already isolated 2 Restore drives isolate request and bus already isolated 23 1 Bus not isolated Service drives un iso late request and bus not isolated 2 Restore drives un iso late request and bus not isolated 31 1 Drive not i...

Page 74: ...on MTE sensor VP sensor Replace MTE VP sensor run offsets to correct positioning 3 Drive not set to loaded 4 Drive load retry aborted 36 1 Drive unload fail Drive not unclamped Drive drive cables Replace drives or cables 2 Pick finger did not hold on to tray VP or Tray sensor blocked Alignment problem Run offsets 3 No tray seen in unload attempt Alignment problem MTE tray sensor Run offsets replac...

Page 75: ...ess in setup con figuration 2 Address conflict with another drive 40 1 Not supported by bus config Attempt to put drive in service state via SCSI drive not supported by current bus config 2 Attempt to restore drive via SCSI drive not sup ported by current bus config 41 1 Drives overheat ing Warning for an over heating drive Cabinet Temp Check room temp 42 1 Drives shut down heat Drive will be shut...

Page 76: ... moving out to store a media tray This prob lem is detected when the picker returns to the home position 8 Picker home sensor not blocked after picking a tray 9 Edge of picker not seen by Tray sensor while positioning to home 10 Pick home sensor blocked positioning to destination other than home Obstruction or alignment Clear obstruction run offsets 52 1 Swap pickers fail Could not change the acti...

Page 77: ...fter starting to pick media Alignment problem Run offsets Replace tray 2 Picker Tray sensor blocked on tray only check after picking tray 3 Picker Tray sensor not blocked on tray only check after picking tray 4 Terminated SCSI task or completion status not started during a pick tray retry 58 1 Store tray fail Tray front or back did not block Tray sensor during a store Alignment or obstruction Run ...

Page 78: ...nsor dur ing initialization Bad Vp sen sor tray out slot 3 VP or Tray sensor blocked after storing media during initializa tion Obstruction in slot 4 Blocked VP sensor not in the column clear attempt being tried 5 VP or Tray sensor blocked after store or load during clear attempt Obstruction in slot or drive 6 VP or Tray sensor blocked after store operation move from lift Obstruction in slot 7 VP ...

Page 79: ...n fail Time out waiting for mag door status Mag inter face circuit board mag solenoid Replace Mag circuit board or solenoid check mechanical obstruction 71 1 Mag access door is open Mag door open during initialization Close door 2 Mag door opened in online mode not by solenoid 72 1 Door open pre vented SCSI prevent com mand was issued by host mag door opening is not allowed Issue SCSI allow from h...

Page 80: ... of NVRAM says source element is empty Run Check Elements Host needs to check inventory 2 Online check of NVRAM says source element is empty to element is full not exchange command 3 Src element 1st desti nation element during exchange command 85 1 Destination is full Online check of NVRAM says destina tion element is full not an exchange com mand Run Check Elements Host needs to check inventory 2...

Page 81: ...n Firmware Picker faulty Tray in picker while picking initialize and retry replace picker 2 VP or Pemt sensor blocked moving to the unload drive position 3 Both pickers are not empty to do an exchange during check move 4 Picker full not a move to Lift and from Lift dur ing check move 5 SCSI exchange 2nd destination picker source not picker 8C 1 Both pickers full Check move NVRAM says both pickers ...

Page 82: ...tion lift or picker properly while checking elements Alignment problem Run offsets 2 Invalid Element current element check B2 1 Flipper invalid position Both flipper home sen sors blocked Flipper Replace flipper B3 1 FS EEPROM write fail Write flipper EEPROM status failed Flipper mag interface cir cuit board Replace flipper or mag inter face B4 1 Missing flipper tray No tray in flipper at least on...

Page 83: ...ROM command 12 Time out for flipper write EEPROM com mand 13 Time out for flipper unlock EEPROM com mand 14 Time out for flipper lock EEPROM command 21 Command resent to flipper 3 times flipper NAK d 22 Comm error on status command to flipper 23 No ACK from flipper command resent 3 times B7 21 Flipper power reset Flipper to mag interface comm err SNAK bit for power up bitmask Flipper Replace flipp...

Page 84: ...t board Replace flipper or mag inter face circuit board 2 Status of reading flipper EEPROM failed BE 1 Flipper status fail Status of reading flipper read status command failed Flipper mag interface cir cuit board Replace flipper or mag inter face circuit board BF 1 Flipper time out Flipper failed to com plete command in allot ted time Flipper Replace flipper C1 1 Pick offset fail ure Pick offset t...

Page 85: ...ve physical boundary count 4 Pivot offset greater than positive physical boundary count C4 1 Offset target fail ure Target could not be found Offset target offset sensor on MTE Verify offset targets not dam aged Offset sensor is work ing or replace MTE 2 Target horizontal posi tion found crudely but not with fine resolution 3 Target vertical position found crudely but not with fine resolution 4 Re...

Page 86: ... parity error Terminator or SCSI cable Check conflicting SCSI id s F9 1 Abort mesg received SCSI abort mesg received Terminator or SCSI cable Check conflicting SCSI id s FD 1 Host commun time out SCSI host communica tions time out Terminator or SCSI cable Check conflicting SCSI id s Error Code hex Sub code Error Description Subcode Description Compo nent Corrective Action ...

Page 87: ...odules 15 drives number of 11 51 E error codes 63 expansion bay installation 24 expansion bay packing instructions 32 F front access door 14 front panel display 14 39 INDEX G general information 11 getting started 17 H hardware components 14 I I E port loading 21 import export port 15 initializing library 19 installation bay 24 library 17 L LCD symbols front panel display 40 LEDs magazine slot 22 ...

Page 88: ...s 40 navigating 39 power up display 41 models library 11 MTE 16 N number of drives 11 51 P packing instructions bays 32 packing instructions library 28 packing material removing 18 power cable 15 18 supplies 15 switch 15 18 R rear access door 16 removable storage slots 14 51 rotation station 16 S safety agency standards 61 SCSI bus configuration 55 connection 20 drive combinations 59 ID configurat...

Page 89: ...erial number Description of failure System information Computer type and SCSI adapter Software configuration Software and version number Technical Support in the United States Plasmon Technical Support 1 877 585 6793 1 719 593 4192 fax e mail tech support plasmon com Internet www plasmon com Technical Support in Europe Middle East and Africa Plasmon Technical Support 44 0 1763 262 963 44 0 1763 26...

Page 90: ......

Reviews: