IMPORTANT NOTES: Read First
www.playcraftsystems.com
For Customer Service Call
800.333.8519 (U.S.A.) or 541.955.9199 (International)
TRI DECK ASSEMBLY
INSTALLATION INSTRUCTIONS
Rev F
7/15/2019
1102
Page 1 of 2
See Installation Manual
Section 09 Collars
Figure 1.1
Figure 1.1
45"
1143mm
42"
1067mm
(A)
Use liquid thread lock (such as Loctite
®
) with all threaded hardware.
Important:
Liquid thread lock (prior
to curing) helps to eliminate the common problem of "thread seizure" in stainless steel hardware by serving
as a lubricant during assembly.
(B)
The top of the collars are located 7/8" [22mm] below the top of the deck. Refer to Installation Manual for
09 Collars installation instructions.
(C)
An appropriate energy absorbing safety surface is required under and around all playground equipment.
Loose fill protective surfacing is shown only as an example for the purpose of this assembly instruction. Other
surfacing material may vary in thickness and/or compression depths. See free publication - The Handbook for
Public Playground Safety, Publication #325 at www.cpsc.gov for the surfacing appropriate for the fall height
of the equipment or consult your surfacing supply representative.
(D)
All deck heights on your system's top view drawing are measured from the top of ground cover (finished
grade) to the top of the deck. Post location dimensions are on centers.
(E)
Never allow the gap between decks to be between 3-1/2" [89mm] and 9" [229mm]. Deck fillers are
provided for gaps between decks with 6" [152mm] and 12" [305mm] rise increments.
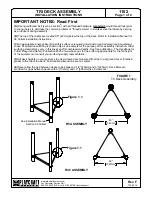
FIGURE 1
Tri Deck Assembly
R5 ASSEMBLY
R3.5 ASSEMBLY


