www.playcraftsystems.com
For Customer Service Call
800.333.8519 (U.S.A.) or 541.955.9199 (International)
BOARDWALK CURVED 90°
INSTALLATION INSTRUCTIONS
Rev B
8/19/2019
PC-2430(1965)
Page 3 of 4
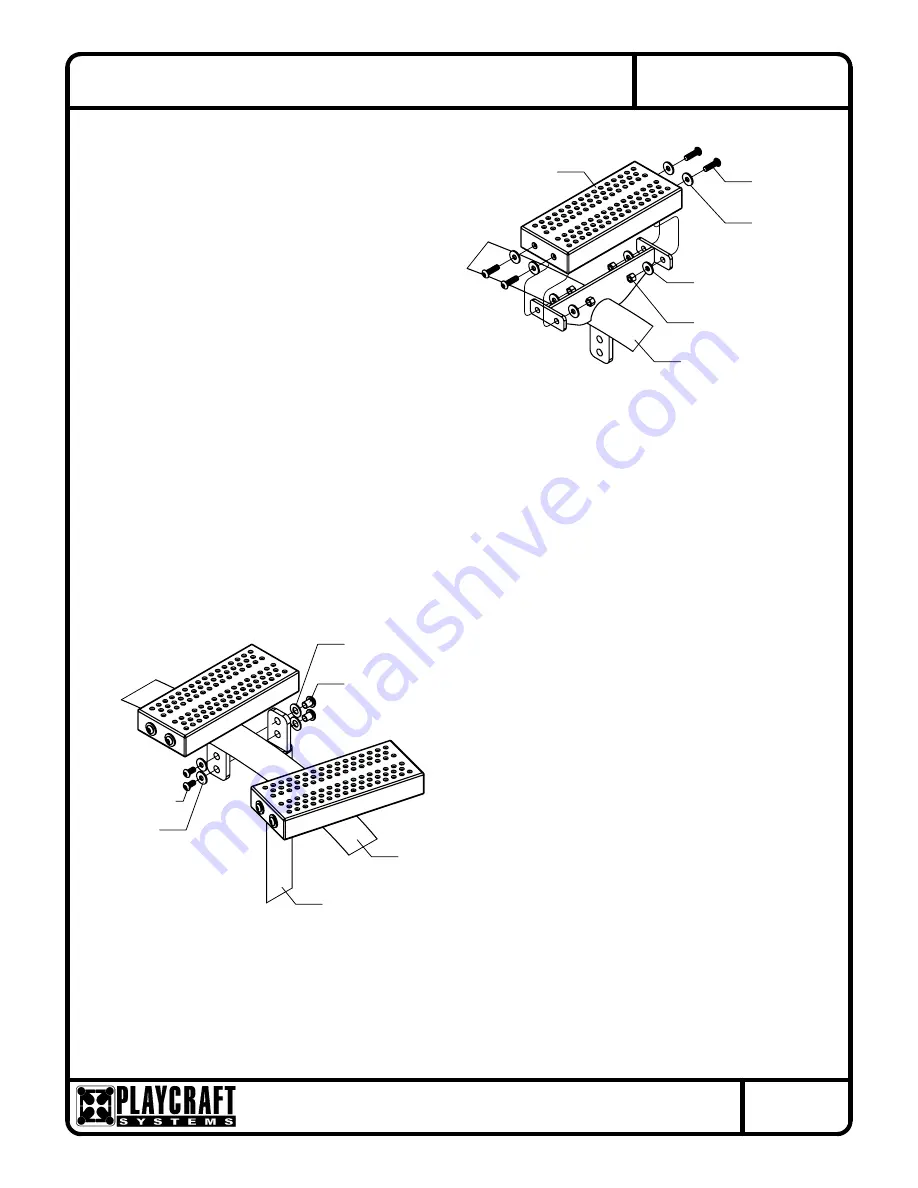
3/8" x 1-1/4"
Button Head Bolt
4 Plcs
3/8" x 1" O.D.
Washer
4 Plcs
3/8" x 1" O.D.
Washer
4 Plcs
3/8" Lock Nut
4 Plcs
Figure 1.1
BOARDWALK
CURVED 90°
WELDMENT
BOARDWALK
TREAD
3/8" x 5/8"
Barrel Nut
2 Plcs
1/2" SAE
Washer
2 Plcs
BOARDWALK
CURVED 90°
WELDMENT
BOARDWALK
LEG
3/8" x 1" O.D.
Washer
2 Plcs
3/8" x 3/4"
Button Head Bolt
2 Plcs
Figure 1.2
Step 2
(Factory Assembled)
Attach each Boardwalk Tread to Boardwalk
Curved 90° Weldment as shown in Figure 1.1.
(See Note A)
NOTE:
7 Places
Step 3
Attach Boardwalk Legs to Boardwalk Curved
90° Weldment as shown in Figure 1.2.
(See Note A)
NOTE:
3 Places
Step 4
Fully tighten all fasteners according to the
"TIGHTENING TORQUE FOR HARDWARE"
section of the Installation Manual.
Step 5
Plumb and level entire component. Pour
concrete into footing holes. Allow at least 72
hours to cure before using this equipment.
(See Note B)
Step 6
Place required protective surfacing under and
around Boardwalk Curved 90°. (See Note D)


