For Customer Service Call
800.333.8519 (U.S.A.) or
541.955.9199 (International)
Manufactured by Krauss Craft, Inc.
www.playcraftsystems.com
TUBE PANEL
Rev D
10/23/2010
1613
Page 4 of 5
3/8" x 1-3/4"
WINDOW
Bolt
Button Head
O.D. Washer
3/8" x 1"
O.D. Washer
3/8" x 1"
Cap Nut
3/8" Black
O.D. Washer
3/8" x 1"
Cap Nut
3/8" Black
O.D. Washer
3/8" x 1"
Button Head Bolt
TRIM
3/8" x 2"
STRAIGHT
TUBE SUPPORT
Step 5
Plumb and level entire component. Pour concrete into
footing hole. Allow at least 72 hours to cure before
using this equipment. (See Note B)
Step 6
Place appropriate compliant protective surfacing under
and around Tube Panel. (See Note D)
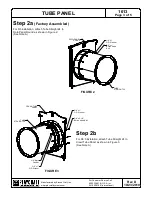
Step 3
Attach panel to deck and collars. Place Straight
Tube Support in footing hole. If attaching Window
and Trim, do so as shown in Figure 4. If not,
attach Straight Tube Support to Straight Tube 24
as shown in Figure 1.1. (See Notes A & C)
IMPORTANT: Use bolts shown, not bolts supplied
with Tube Support.
Step 4
Fully tighten all fasteners according to the
"TIGHTENING TORQUE FOR HARDWARE"
section of the Installation Manual.
FIGURE 4
TUBE
STRAIGHT 24
Figure 1.1
Button Head Bolt
3/8" x 1-1/4"
O.D. Washer
3/8" x 1"
O.D. Washer
3/8" x 1"
Cap Nut
3/8" Black
STRAIGHT
TUBE SUPPORT


