background image

Assembly Instructions

PS 8821

Spiral Tube Slide

Call Toll Free 

1-888-752-9782

Customer Service:  Monday - Friday, 8:00 

A.M.

to 5:00 

P. M.

C.S.T.

We’re Here To Help!

Play Action

®

Important!

Intended for residential use by children ages 2 to 10, only on properly installed PlayStar playsets. 

Before use refer to complete safety guidelines in your original playset, at www.playstarinc.com, or at 1-888-752-9782.

Summary of Contents for PS 8821

Page 1: ...onday Friday 8 00 A M to 5 00 P M C S T We re Here To Help Play Action Important Intended for residential use by children ages 2 to 10 only on properly installed PlayStar playsets Before use refer to...

Page 2: ...nut 148 2 Side Walls Floor Top Bar Right Entrance Section Left Entrance Section Exit 9 60 Halves 2 Anchors Support Bracket Exit Top TOOLS REQUIRED Socket Wrench and Socket and Wrench or Adjustable Wr...

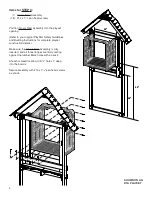
Page 3: ...pression Flanges Attach the top bar to the side walls using x 1 hex bolts washers and lock nuts as shown Tighten firmly with a socket and wrench but do not over tighten Items for STEP 1 2 Side Walls 1...

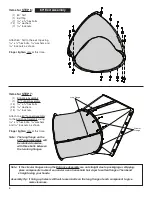
Page 4: ...details Make sure the Crow s Nest Assembly is fully inserted and all three flanges are firmly resting against the lumber Mark holes with a pencil At each marked location drill holes 1 deep into the b...

Page 5: ...halves using x hex bolts washers and lock nuts as shown Finger tighten only at this time Repeat this assembly four times Items for STEP 4 1 Left Entrance Section 1 Right Entrance Section 6 x hex bolt...

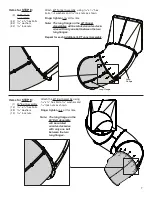
Page 6: ...langes Long Flange Circular Flange Items for STEP 6 1 60 half 1 Exit Top 7 x hex bolts 14 washers 7 lock nuts Items for STEP 7 1 Entrance Assembly 1 60 Tunnel Assembly 14 x hex bolts 28 washers 14 loc...

Page 7: ...at this time Note The long flange on the 60 Tunnel Assemblies will be rotated counter clock wise with only one bolt between the two long flanges Repeat for each Additional 60 Tunnel Assembly Long Flan...

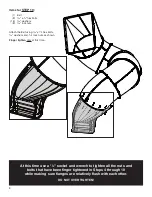
Page 8: ...y at this time Items for STEP 10 1 Exit 8 x hex bolts 16 washers 8 lock nuts At this time use a socket and wrench to tighten all the nuts and bolts that have been finger tightened in Steps 4 through 1...

Page 9: ...s nest as a reference mark a 23 x 17 rectangle on the ground as shown Remove 1 of soil at the marked location Note Failure to do this step will create a hazardous condition and misuse of this product...

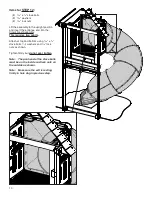
Page 10: ...the Crow s Nest Assembly This requires two adults Attach at top and bottom using x stove bolts washers and lock nuts as shown Tighten firmly but do not over tighten Note The pan head of the stove bol...

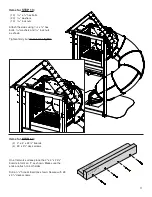
Page 11: ...ends are flush on both sides Drill an hole at locations shown Secure with 8 x 2 deck screws Items for STEP 14 2 2 x 4 x 24 boards 4 8 x 2 deck screws Items for STEP 13 10 x hex bolts 20 washers 10 loc...

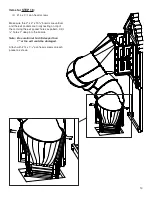
Page 12: ...s as shown Make sure both sides are flush with the Step 14 Assembly laying on the ground Drill an hole at locations shown Secure each 2 x 4 x 19 to the Step 14 Assembly with 8 x 2 deck screws as shown...

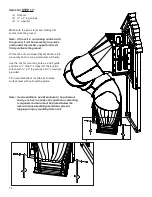
Page 13: ...ds are vertical and the exit pockets are firmly resting on top of them Using the exit pocket holes as pattern drill holes 1 deep into the boards Note Be careful not to drill deeper than 1 or the exit...

Page 14: ...help Use the anchor mounting hole as a drill guide and drill a hole 1 deep into the boards Attach with x 2 lag screws and washers provided Fill in around bottom of slide exit to make surface level wit...

Page 15: ...through the 2 x 4 x 9 board Attach with x 2 hex bolt washers and lock nut as shown Items for STEP 19 RTA 1 x 2 hex bolt 2 washers 1 lock nut Locate the second bolt from the top on the 60 Exit Assembl...

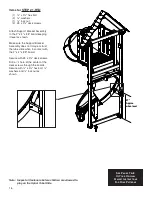
Page 16: ...e tube slide when in contact with the 2 x 4 x 88 board Secure with 8 x 2 deck screws Drill a hole at the center of the deck screws through the boards Secure with x 3 hex bolt washers and lock nut as s...

Page 17: ...ard Attach with x 2 hex bolt washers and lock nut as shown Items for STEP 19 BIY 1 x 2 hex bolt 2 washers 1 lock nut Locate the first bolt from the top on the 60 Exit Assembly as shown Remove and disc...

Page 18: ...cket Assembly does not torque or twist the tube slide when in contact with the 2 x 4 x 112 board Secure with 8 x 2 deck screws Drill a hole at the center of the deck screws through the boards Secure w...

Page 19: ...ension Water Slide Stakes Water Cannon Add the Water Slide Kit to extend sliding surface May be used wet or dry Kit includes Water Slide Water Cannon and Water Slide Stakes Expand your Playset with th...

Page 20: ...C S T Do not return to the store Thank You for choosing PlayStar Because it is our intention to make this a positive family experience we have taken great care in preparing this product Should you ha...

Reviews: