7
GB/IE/NI
Design variation 2:
• Caution! To be used with protective
equipment.
Not to be used in traffic.
20kg maximum
Design variation 3:
• Caution! To be used with protective
equipment.
Not to be used in traffic.
50kg maximum
• Caution! Not suitable for children under
36 months. Risk of suffocation as small parts
could be swallowed or inhaled!
Design variations 1, 2, and 3
CAUTION!
• None of the packaging and attach-
ment materials are a constituent
part of the toy and should be
removed for safety reasons before
the article is given to children to play
with.
• Children may only play with the
article under supervision.
Risk of injury!
• The assembly of the article should always be
carried by adults due to the presence of small
parts!
• The article may only be used by one person
at a time.
• Inspect the article before each use for
damage or wear. Always check that all con-
necting elements are firmly in place. The
article may only be used while in perfect
condition!
• Ensure that screws and threaded sleeves
retain their self-locking characteristics.
• Do not modify the article in such a way that it
could endanger your safety.
• Always wear suitable protective equipment
(helmet, hand, wrist, elbow, and knee protec-
tors) and shoes!
• Always show consideration for others!
• Only use the article on suitable surfaces that
are smooth, clean, and dry. Ride away from
other road users where possible. Avoid
sloping terrain, stairs, and open bodies of
water.
• Never ride in the dark or in bad visibility.
• Do not allow your child to use the article
without supervision, as children are not able
to assess potential risks.
• Skill is required for the use of the article in
order to avoid falls or collisions that could
lead to injury to the driver or to other persons.
Avoiding damage to property!
• Avoid water, oil, potholes, and very rough
surfaces.
Assembly
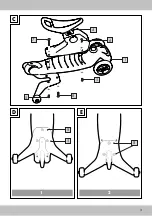
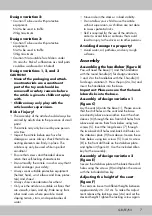
Assembling the handlebar (figure B)
You will need the base (1) and the handlebar
with the round handle (2) for design variations
1 and 2 or the handlebar with the T-handle (3)
for design variation 3. Press the pin (2a, 3a) and
insert the handlebar into the base.
Important: Please ensure that the hand-
lebar clicks into the base.
Assembly of design variation 1
(figure C)
Lay the seat (4) onto the base (1). Please ensure
that the drill holes on the seat and the base
are directly above one another. Insert the short
sleeves (6) through the two front drill holes from
above and secure them from below using two
screws (5). Insert the long sleeves (7) through
the two back drill holes and back drill holes on
the stabiliser plate (9) from above. Secure these
from below using two screws (5). Insert a screw
(8) in the front drill hole on the stabiliser plate
and tighten it (figure D). Use the included Allen
key for the assembly.
Assembly of design variation 2
(figure E)
Secure the stabiliser plate at the back three drill
holes using the screws (8) and tighten the screws
with the included Allen key.
Adjusting the height of the seat
(figure F)
The seat can be set to different heights between
approximately 26 - 32 cm. To make this adjust-
ment release the locking screw (4a) and set the
desired height. Tighten the locking screw again.
Summary of Contents for 293408
Page 2: ...2 2 7 12 2 7 12 5 8 6 7 3 4 1 2 9 A 1 2 3 2a 3a 2a 3a B...
Page 3: ...3 7 5 5 8 6 4 1 C 5 8 D 8 E 1 2...
Page 4: ...4 4 4a F G 1 2 3...
Page 13: ...13 IAN 293408 Service Danmark Tel 32 710005 E Mail deltasport lidl dk DK...
Page 26: ...26...
Page 27: ...27...


