YMER 3
OPERATORS GUIDE
March 2020
www.plcelectronicsolutions.com
D E S I G N E D A N D M A D E I N S W E D E N S I N C E 1 9 6 4
®
D E S I G N E D A N D M A D E I N S W E D E N S I N C E 1 9 6 4
®
10
Lens Mapping
This section covers the lens mapping function of Hedén Ymer-3.
Ymer-3 have lens mapping function on the focus channel, the unit have four different storage positions for storing lens data
internally. The focus mapping function elliminates the need to manually mark separate rings for each lens.
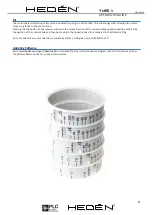
To map a lens to the scale ring, select one of the pre-marked scale rings, the lens mapping function matches the focus
distance of a lens to a pre-marked lens ring.
The lens mapping is made by selecting a pre-marked scale ring and then by matching up to 20 marks on the lens with the
corresponding marks on the pre-marked ring. It’s possible to use less than 20 marks, but in general more marks will give a
better results. The mapping is done by moving the motor to a mark on the lens, then pressing the AUX button and moving
the scale ring to the corresponding mark, the process is described in more detail below.
After mapping the lens, it will be matched to the pre-marked scale ring used.
-Select Lens
Ymer-3 has four internal positions to store mapped lenses, the lens selected is displayed on the home screen, select or
change the data storage position to store the lens before mapping a new lens. The stored lens will be overwritten when
mapping a new lens.
- The currently selected lens id displayed on the home screen
- Long press Enter key to open the Main Menu
- Select “Lens” to go into the lens selection menu, the data for the lens and lens ring
in the urrently selected lens position will be displayed.
- Press “Select” to select a different lens storage position (1-4)
- “Exit”
- Lens Map On/Off
To activate or de-activate the lens mapping
- Press enter to open Main Menu
- Select “Map On” To turn lens mapping on
- Select “Map Off” to turn lens mapping off
- “Exit to return to home screen
- Map new lens
To map a new lens to a pre-marked scale ring, first select the lens and scale ring, You will start by mapping the infinity mark
on the lens and then continue with other marks. You can map up to 20 marks on the lens, before you start, make a plan on
which marks to map.
Before starting to map, select lens position to store the lens, if a lens is already stored in that position it will be overwritten,
see section “Select Lens”
Mapping the lens:
- Press Enter to open the main menu, then go to “Map Len”
- In the MAP menu choose “MapLens” to start mapping a new lens
- Select lens ring according to the pre-marked ring choosen
- Select the first letter of the lens manufacturers name, note that selecting “None” will not store the lens
- Select the lens manufacturers name from the list
- Add focal length or other identifier, then select “Next”
- To map the lens, use the control knob to move the lens to the infinity mark on the lens
- Press and hold the AUX key on the transmitter and move the knob to the infinity mark on the scale ring, release AUX key
- Use the knob to move to the next marker on the lens
- Press and hold AUS button and move the scale ring to the corresponding position, release AUX key
- Repeat until you have mapped the wjole lens, you can see the marker counter.
- When ready or all marks are mapped, select “Save” wait until the screen say “Complete” and then select “Exit”
and then“Exit” to get to the main screen.
- The main screen should now be updated with the lens manufacturer and focal length


