background image

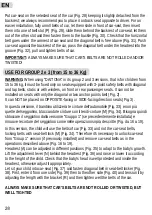
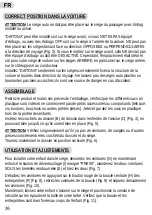
Put car-seat on the selected seat of the car (Fig. 28) keeping it slightly detached from the 
backrest; we always recommend you to place it on back seat opposite to driver. For an 
easier installation, fully unroll belts of car, let them slide in front of car-seat, then insert 
them into one of belt slot (P) (Fig. 29), slide them behind the backrest of car-seat, let them 
out of the other slot and then fasten them to the buckle (Fig. 30). Check that the horizontal 
belt goes under the armrest of car-seat and the diagonal belt is free above (Fig. 31). Push 
car-seat against the backrest of the car, pass the diagonal belt under the headrest into the 
groove (Fig. 32), pull and tighten belts of car.


IMPORTANT: ALWAYS MAKE SURE THAT CAR'S BELTS ARE NOT ROLLED AND/OR 
TWISTED!


USE FOR GROUP 2 e 3 (from 15 to 36 Kg)


WARNING: When using "DAITONA" in its group 2 and 3 versions, that is for children from 
15 to 36 kg, it must be fixed only on seats equipped with 3-point safety belts with diagonal 
and lap belts, static or with winders, on front or rear passenger seats. It can not be 
installed on seats with only the diagonal or two anchor points belt (Fig. 2).
It can NOT be placed on OPPOSITE-facing or SIDE-facing direction seats (Fig. 3).


In questa versione, il bambino utilizzerà le cinture dell'automobile (Fig. 33) e non più 
quelle del seggiolino, bloccando le cinture con il tendi-cinture (M) (Fig. 34). Bisogna quindi 
sbloccare il seggiolino dalla versione “Gruppo 1” (se precedentemente installata) e 
rimuove le cinture del seggiolino come nelle operazioni sopra descritte (Fig. da 16 a 19).


In this version, the child will use the belts of car (Fig. 33) and not the car-seat belts, 
locking belts with seat-belt lock (M) (Fig. 34). Therefore it's necessary to unlock car-seat 
from "Group 1" version (if previously installed) and remove car-seat belts as in the 
operations described above (Fig. 16 to 19).
Headrest (A) can be adjusted in different positions (Fig. 35) to adapt to the baby's growth. 
Lift the adjustment lever (N) behind the headrest (Fig. 36) and raise or lower it according 
to the height of the child. Check that the baby's head is well protected and inside the 
headrest, otherwise adjust it appropriately.
Let sit your child into car-seat (Fig. 37) and fasten diagonal belt in seat-belt locker (Fig. 
38). First, enter it from one side (Fig. 39) then to the other side (Fig. 40) and tension it by 
adjusting the length with the bracket (R) and then tighten well the belts of the car.
   
ALWAYS MAKE SURE THAT CAR'S BELTS ARE NOT ROLLED OR TWISTED, BUT 
WELL TIGHTED

Summary of Contents for Daitona

Page 1: ...LEGGERE ATTENTAMENTE E CONSERVARE PER FUTURA CONSULTAZIONE READ CAREFULLY AND KEEP INSTRUCTIONS FOR FUTURE REFERENCE Daitona 8 0 2 1 4 8 3 2 0 1 6 0 1...

Page 2: ......

Page 3: ......

Page 4: ......

Page 5: ...PRESS...

Page 6: ...PRESS...

Page 7: ......

Page 8: ...PRESS...

Page 9: ......

Page 10: ...PRESS 27 PRESS PRESS...

Page 11: ......

Page 12: ......

Page 13: ...ersonale non autorizzato la garanzia cessa di esistere I materiali e il prodotto stesso vengono seriamente e regolarmente esaminati dal nostro centro di controllo Non possono essere reclamati difetti...

Page 14: ...SEDILI PASSEGGERI EQUIPAGGIATI DI AIRBAG COMPONENTI DEL SEGGIOLINO Fig 1 A Poggiatesta B Schienale C Seduta D Cuscino riduttore E Spallacci imbottiti F Sparti gambe imbottito G Cinture H Fibbia I Pul...

Page 15: ...non contengano piccoli accessori o componenti come viti bulloni tappi o altre piccole parti Gettare e tenere fuori dalla portata dei bambini i sacchetti di plastica Fate incastrare i ganci dello schie...

Page 16: ...del vostro bambino allentate al massimo le cinture del seggiolino Fig 7 portatevi sul retro del seggiolino Fig 16 sfilate la cinturina degli spallacci dalla sua staffa O Fig 17 prendete la cintura di...

Page 17: ...intura orizzontale passi sotto il bracciolo del seggiolino e quella diagonale sia libera al di sopra Fig 31 Spingete bene il seggiolino contro lo schienale dell auto fate passare la cintura la diagona...

Page 18: ...enitori teniate alla salute e alla sicurezza del vostro bambino vi consigliamo pertanto di seguire queste semplici avvertenze e consigli d utilizzo ATTENZIONE NON LASCIARE MAI IL VOSTRO BAMBINO INCUST...

Page 19: ...Kg Quando si lascia l articolo esposto al sole aspettare che si raffreddi prima di utilizzarlo Non apportare alcuna modifica che possa compromettere la sicurezza del prodotto potrebbe essere pericolo...

Page 20: ...ttamente fissato le cinture di sicurezza dello stesso e senza averlo saldamente fissato al sedile del veicolo anche quando NON viene trasportato nessun bambino In caso di frenata improvvisa potrebbe c...

Page 21: ...o sicuro e asciutto non posizionarvi nulla sopra onde evitarne deformazioni e danneggiamenti Se utilizzate un seggiolino auto di seconda mano o se stato sottoposto a sollecitazioni violente in un inci...

Page 22: ...i Controllare regolarmente che l articolo e i suoi accessori non abbiano parti rotte difettose o mancanti ATTENZIONE Non lavare nessuna componente o parte in lavatrice Per pulire le parti plastiche e...

Page 23: ...zare in caso di incidente Controllare periodicamente anche durante i viaggi che il seggiolino auto e il vostro bambino siano correttamente posizionati e la cintura sia in tensione NON POSIZIONARE l ar...

Page 24: ...by not authorized people the warranty expire The materials and the product itself are seriously and regularly examined by our control center All defects and or deteriorations caused by wrong use by t...

Page 25: ...ANGER DO NOT USE ON PASSENGER SEATS PROVIDED WITH AIRBAGS CAR SEAT COMPONENTS Fig 1 A Headrest B Backrest C Seat D Adaptor pillow cushion E Shoulder pads F Crotch pad G Belts H Buckle I Belt release b...

Page 26: ...s are empty and do not contain small accessories or parts such as screws bolts plugs or other small parts Throw away and keep out of baby s reach the packing plastic poly bags Insert the hooks of the...

Page 27: ...them into the appropriate position to your child s height Fig 20 Insert again shoulder pads straps into its connector Fig 21 then belts into metal bracket Fig 22 and 23 Pull and tighten car seat belt...

Page 28: ...ced on OPPOSITE facing or SIDE facing direction seats Fig 3 In questa versione il bambino utilizzer le cinture dell automobile Fig 33 e non pi quelle del seggiolino bloccando le cinture con il tendi c...

Page 29: ...our baby Do not use with any broken defected or loosen parts Make assembly and installation operations WITHOUT any babies around Assembly of this product should be made by an adult Do not make any mod...

Page 30: ...the driver This car seat is NOT designed for a long period of sleep NEVER leave your child unattended on car seat into car If the vehicle is in motion NEVER REMOVE the child from the seat Stop before...

Page 31: ...eys child tires easily and needs to move we suggest to make frequent stops WARNING In an emergency it is important that your child can be released quickly just unlocking belts For this reason do not l...

Page 32: ...ome of its parts are deformed or severely worn it must be replaced it may not retain some of the original safety and be a source of danger CARE AND MAINTENANCE OF THE PRODUCT For better operation and...

Page 33: ...manual near car seat for future reference Inform each adult about use and behaviour in case of an accident Check periodically even during travels that car seat and your child are properly positioned a...

Page 34: ...r Si le produit est r par ou modifi par du personnel non autoris la garantie cesse d exister Les mat riaux et le produit lui m me sont examin s s rieusement et revus r guli rement par le centre de con...

Page 35: ...G COMPOSANTS DE SIEGES Fig 1 A Appui t te B Dossier C Assis D Coussin adaptateur E Bretelles rembourr es jam F Entrejambes G Ceintures H Boucle I Bouton de d verrouillage des ceintures L Sangle de r g...

Page 36: ...en plastique sont vides et ne contiennent pas de petits accessoires ou composants tels que vis boulons bouchons ou autres petites pi ces Jetez et gardez les sacs en plastique hors de la port e des en...

Page 37: ...les au maximum Fig 7 d placez vous l arri re du si ge Fig 16 enlevez les bretelles de son support O Fig 17 prenez la ceinture droite et retirez la de la patte de connexion de ceintures en m tal Q Fig...

Page 38: ...nture horizontale passe sous l accoudoir du si ge et que la ceinture diagonale est libre au dessus Fig 31 Poussez le si ge contre le fond du v hicule glissez la ceinture en diagonale sous l appui t te...

Page 39: ...ons comment vous les parents donnez la priorit garder la sant et la s curit de votre enfant et donc nous vous recommandons de suivre ces simples conseils d utilisation ATTENTION NE JAMAIS LAISSER VOTR...

Page 40: ...un poid sup rieur aux 36 Kgs Lorsque vous quittez le produit expos au soleil il faut attendre qu il refroidisse avant de l utiliser Ne pas apporter des modifications qui pourraient compromettre la s c...

Page 41: ...our relever le si ge auto par rapport au si ge de voiture ou pour lever l enfant du si ge dans le cas d un accident les ceintures de la voiture et le si ge auto peuvent ne fonctionner pas correctement...

Page 42: ...blesser les occupants lors de virages brusques un freinage brusque ou d un accident Retirer le ou fixer le au si ge de la voiture Ne pas relever le si ge d auto en rapport du si ge du passager de que...

Page 43: ...s parties sont d form es ou tr s us s il doit tre remplac il peut n avoir pas les caract ristiques originales de s curit et tre une source de danger SOIN ET MAINTENANCE DU PRODUIT Pour une meilleure e...

Page 44: ...lisez le tojours correctement quip et avec les ceintures bien tendues lorsque l enfant est dans la voiture Conservez ce manuel proximit du produit pour r f rence future Informer chaque adulte sur le c...

Page 45: ...ia isi pierde valabilitatea Materialele si insusi produsul sunt examinate cu seriozitate si cu regularitate de centrul nostru de control Nu pot fi reclamate defecte si sau deteriorari cauzate de folos...

Page 46: ...ALE SCAUNULUI AUTO Fig 1 A Tetiera B Spatar C Sezuta D Perna reductoare E Protectie vatuita pentru umeri F Despartitoare de picioare vatuita G Centuri H Catarama I Buton pentru deblocarea centureri L...

Page 47: ...a nu contina mici accesorii sau componente suruburi buloane dopuri sau alte parti mici Aruncati sau puneti departe de copii pungile de plastic Introduceti agatatorile spatarului B ale scaunului auto i...

Page 48: ...biti la maxim centurile scunului Fig 7 treceti in spatele scaunului auto Fig 16 scoateti curelusa de la protectia pentru umere O Fig 17 luati centura din dreapta si scoateti o din lacasul metalic Q Fi...

Page 49: ...ntura orizontala sa treaca pe sub bratul scaunului auto si cea diagonala sa fie libera deasupra acestuia Fig 31 Impingeti bine scaunul auto sub tetiera in santul predispus Fig 32 trageti si puneti cen...

Page 50: ...tii tineti la sanatatea si la siguranta copilului dumneavoastra deaceea va sfatuim sa urmati aceste simple avertismente si sfaturi pentru folosirea ATENTIE NU LASATI NICIODATA COPILUL SINGUR FARA SUPR...

Page 51: ...mici de 1an ATENTIE Acest articol NU este potrivit pentru copii cu greutate mai mare de 36 Kg Daca lasati articolul expus la soare asteptati sa se raceasca inainte de a l folosi Nu faceti nicio modif...

Page 52: ...ent centurile masinii si cele ale scaunelului ar putea sa NU functioneze corect ATENTIE Nu folositi NICIODATA scaunul auto fara sa fixati in mod corect centurile lui de siguranta si inainte de a l fix...

Page 53: ...t Cand scaunul auto nu este folosit se pune intr un loc sigur si uscat nu puneti nimic deasupra lui pentru a evita deformari sau deteriorari Daca folositi un scaun auto de mana a doua sau care a fost...

Page 54: ...pala niciun component si nicio o piesa a scaunului auto cu masina de spalat Pentru curatarea partilor din material plastic si a tesaturilor folositi prosoape cu apa calduta si detergenti neutri Mentin...

Page 55: ...modul de comportare in caz de accident Controlati periodic chiar si in timpul calatoriei ca scaunul auto si copilul dumneavoastra sa fie in pozitie corecta si cu centura intinsa NU POZITIONATI articol...

Page 56: ...VIA DELL ARTIGIANATO 1 24060 TELGATE BG ITALY Tel 39 035 830314 Fax 39 035 831350 www plebani it e mail info plebani it Seguici sui nostri social Follow us on Vers 07 2019...

Reviews: