IP-010
Page
5
of
13
Revision 3
3.
Clean and lubricate all studs and nuts, and prove free and easy nut running prior to the installation.
Lubricant is not recommended for underwater installations. Refer to the section on
Underwater
Installations
.
Note: The type of lubricant will dictate the torque value per the PLIDCO torque chart on the last
page.
4.
Assemble the PLIDCO Clamp+Sleeve around the pipe making sure the yellow painted ends are
matched and that the fitting is centered over the leak and/or damaged area as much as possible.
At no point should the leak/damaged area be closer than ½” from the circumferential seals. Try to
avoid having any leak spraying directly onto the longitudinal seals.
Most Clamp+Sleeves will have two different stud lengths for the sealing area. The longer studs are
used to help draw the sleeve together. For PLIDCO fittings with 3 holes per side in the seal area,
insert the longer studs in the center holes. For PLIDCO fittings with more than 3 holes per side in
the seal area, insert the longer studs in the four corner holes.
Sometimes it is helpful to loosely assemble the PLIDCO Clamp+Sleeve to one side of the leak then
reposition it centered over the leak.
5.
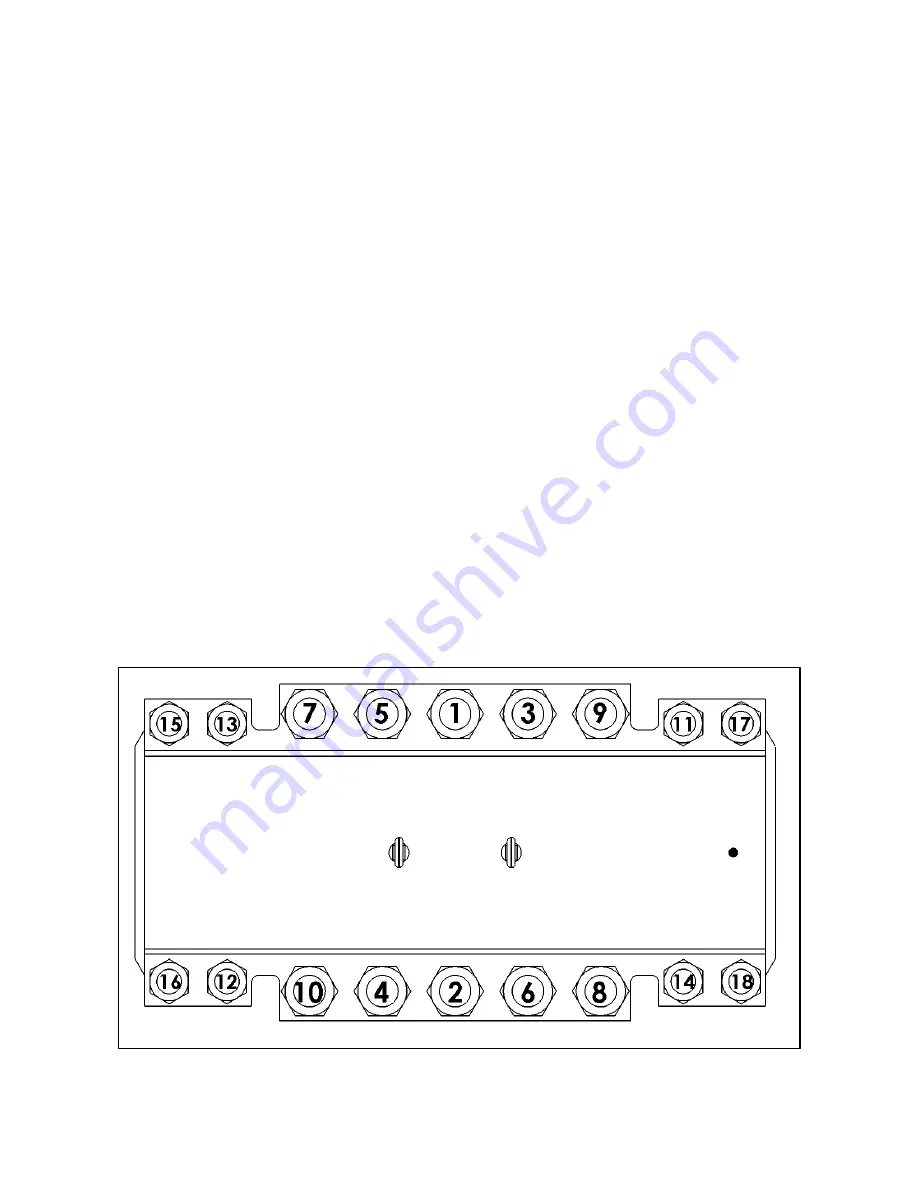
Torque all of the studs and nuts on the PLIDCO Clamp+Sleeve uniformly, using the
Torque Values
for Sealing Section
in the
PLIDCO Torque Chart for Clamp+Sleeve
located on the last page. The
actual fitting may have more or less bolts.
The best results are obtained by maintaining an equal
gap all around between the sidebars while tightening the studs. Ensure there is full nut engagement
by maintaining a minimum of 1/4 inch (6.4 mm) of stud extending beyond the nut. The sequence
for torquing the studs and nuts will be similar to the numerical pattern of Figure 5, and will be
executed repeatedly as follows:
•
1
st
time- Hand tight or 10% of the minimum torque value to bring the 2 halves together
•
2
nd
time - 50% torque.
•
3
rd
time- 100% torque.
Figure 5


