background image

OVERVIEW & TERMINOLOGY

1

2

3

4

5

6

7
8

9

10

11

11

12

13

14

15
16

17

18

19

20

21

22

23
24

25

26

27

28

29

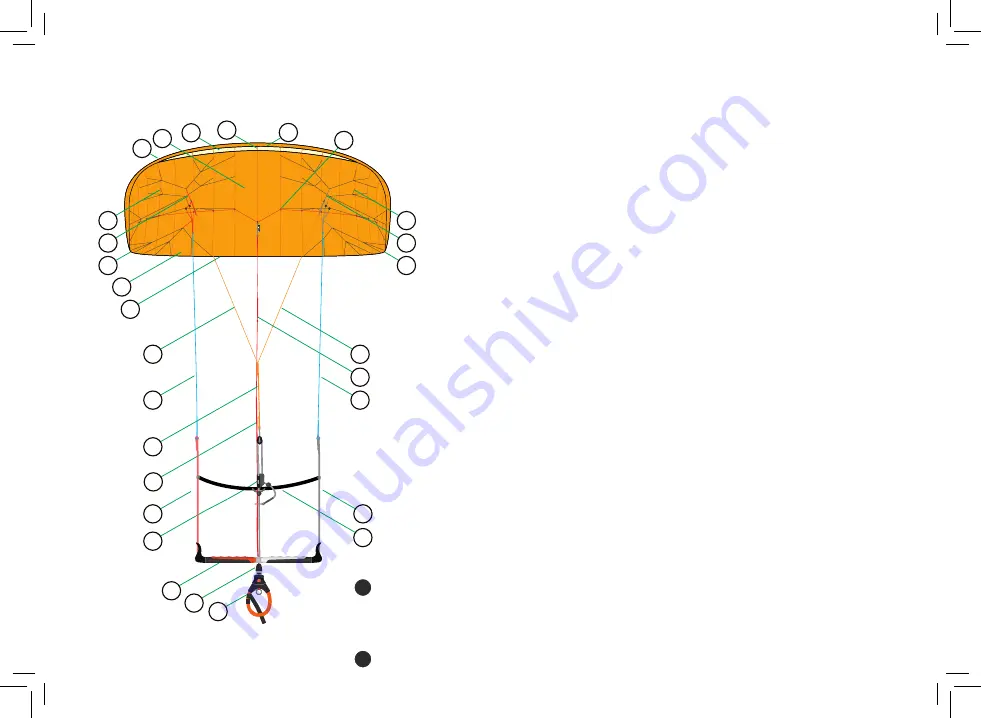
  1.  Top skin
  2.  Lower skin
  3.  Gauze covered air inlets
  4.  Velcro bridle loop
  5.  Leading edge

  7.  Left bridle
  8.  Left depower bridle
  9.  Right bridle
 10.  Right depower bridle
 11.  Velcro dirt-outs


12.  Dirt channel

 13.  Trailing edge 
 14.  Left top flying line
 15.  Right top flying line

16. Stop & go safety line

 17.  Left rear flying line
 18.  Right rear flying line
 19.  Center top flying line
 20.  Safety line
 21.  Left leader line
 22.  Power adjuster
 23.  Right leader line
 24.  Land & relaunch handle
 25.  Control bar with colour coded EVA foam
 26.  Swivel
 27.  Centrix Push-away depower loop with  

primary quick release

 28.  Safety leash
29.   Secondary quick release

6. Stop & Go safety system

O V E R V I E W   &   T E R M I N O L O G Y

1

2

3

4

5

6

7
8

9

10

11

11

12

13

14

15
16

17

18

19

20

21

22

23
24

25

26

27

28

29

  1.  Top skin
  2.  Lower skin
  3.  Gauze covered air inlets
  4.  Velcro bridle loop
  5.  Leading edge

  7.  Left bridle
  8.  Left depower bridle
  9.  Right bridle
 10.  Right depower bridle
 11.  Velcro dirt-outs


12.  Dirt channel

 13.  Trailing edge 
 14.  Left top flying line
 15.  Right top flying line

16. Stop & go safety line

 17.  Left rear flying line
 18.  Right rear flying line
 19.  Center top flying line
 20.  Safety line
 21.  Left leader line
 22.  Power adjuster
 23.  Right leader line
 24.  Land & relaunch handle
 25.  Control bar with colour coded EVA foam
 26.  Swivel
 27.  Centrix Push-away depower loop with  

primary quick release

 28.  Safety leash
29.   Secondary quick release

6. Stop & Go safety system

Summary of Contents for DEPOWER FOIL KITE

Page 1: ...PLKB PLKB PLKB FOR DEPOWER FOIL KITES U S E R M A N U A L...

Page 2: ...ity in all aspects of those products We have the right kites for all kite disciplines for any terrain and for all conditions All this is realized by a passionate crew of kite sports enthusiasts and we...

Page 3: ...ite is not a toy and should not be flown by inexperienced persons and certainly not by children Learn to fly kites by starting in light winds with a small sized kite Never use any type of kite or this...

Page 4: ...flying your kite it is very important to understand the wind window also known as the power zone and where the kite will create the least power edge of the window and zenith MAXIMUM POWER MINIMUM POWE...

Page 5: ...rimary quick release 28 Safety leash 29 Secondary quick release 6 Stop Go safety system O V E R V I E W T E R M I N O L O G Y 1 2 3 4 5 6 7 8 9 10 11 11 12 13 14 15 16 17 18 19 20 21 22 23 24 25 26 27...

Page 6: ...a should be free of kiteflyers or other people Also make sure there are no sharp objects on the ground to prevent any damage to your kite STEP 2 PREPARING YOUR KITE AND BRIDLES Take the kite out of th...

Page 7: ...and Life Line Safety flying line For Rear flying lines Starting at the kite slowly walk backwards while unwinding your lines Walk in the opposite direction of the wind this prevents line tangles and e...

Page 8: ...can save your life We recommend to check if your quick releases are in working order before every launch Re connecting the primary safety release Activating the primary quick release Re connect the pr...

Page 9: ...Check if your quick releases are in working order before every launch Regularly rinse your bar and safety systems with tap water Activating the secondary quick release Re connecting the secondary qui...

Page 10: ...u n c h w i t h H e l p e r upward Steer the kite towards the edge of the wind window and slowly let it fly up to the zenith LAUNCHING Self launch 45 o Make sure the kite is still secured from blowing...

Page 11: ...using the kite to produce more or less er Normal steering S T E E R I N G D E P O W E R I N G P O W E R I N G To make the kite turn pull on one side of the bar When pushing the bar away the power of t...

Page 12: ...safety line is not tangled or hooked behind any part of the bar or your body If you are flying your kite with the depower loop hooked in unhook or pull the primary quick release Move towards the bar w...

Page 13: ...E To relaunch your kite with the leading edge down pull on the relaunch handle Once it is in the air pull in one side of When the kite has completely turned around let go of the relaunch handle and gr...

Page 14: ...y into the kite taking care not to fold the fibers in the leading edge Place your kite in the bag to prevent it from getting damaged LANDING WITH A HELPER SELF LANDING LIGHT WINDS SELF LANDING STRONG...

Page 15: ...he black stopper balls to adjust the range of adjuster if preferred T O P R E A R L I N E A D J U S T M E N T S In the long term your top lines may stretch from your rear lines To get the best perform...

Page 16: ...the same length adjust the knots on the side leader lines on the bar if necessary Problem Probable cause Explanation Solution TROUBLESHOOTING Kite does not want to fly Are there any obstacles disturbi...

Page 17: ...s much as possible then dry your and repeat the action as described above R E M O V I N G S A N D O R O T H E R D I R T F R O M Y O U R K I T E If there is any sand mud or grass in the kite remove it...

Page 18: ...d to leave part of the bag open to allow fresh air to get in the bag and any remaining traces of moist to dry up Bar care Make sure you regularly check your bar for wear and tear Replace parts w neede...

Page 19: ...nty statements whether written oral or implied W A R R A N T Y Peter Lynn warrants this product when it is purchased from an authorized Peter Lynn dealer by a retail customer to be free of major defec...

Page 20: ...PLKB PLKB PLKB...

Reviews: