background image

C h e c k in g   C a l ib r a t io n

1 0

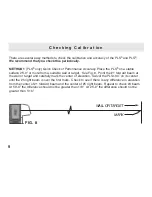
FI G. 9

METHOD 2

(both PLS

5

and PLS

3

) Exact Check of Level Accuracy. Find a fairly level site line

(preferably a concrete slab) 25’-0” or greater with two opposing walls. You can also use scrap 
2 x 4s, for example, as targets. See Fig. 9. Place the laser about 6” from target #1, and carefully
mark the elevation of #1 forward beam on the target. Swivel the laser 180˚  on its center. Mark
the elevation center of #1 forward beam on target #2. Move the laser to target #2. At 6” from the
target, mark the center of elevation of #1 forward beam on target #2. Swivel the laser on its cen-
ter and mark center of elevation at target #1. You now have two centers of elevation at each tar-
get. Carefully measure the distance between centers of each set of marks. If the distance is the
same, the laser is exactly level. If there is a difference, subtract one measurement from the other.
This method magnifies any error by a factor of two. Therefore, divide this difference by two to find
the exact error of level. The maximum error for the PLS

5

is 1/16” at 25’-0” or 1/8” at 50’-0.” The

maximum error for the PLS

3

is 1/8” at 25’-0” or 1/4” at 50’-0.”

TARGET #1

TARGET #2

Summary of Contents for PLS3

Page 1: ...OPERATIN G MAN U AL P A CI FI C LA S E R S Y S TE M S The Professional Standard NEW P L S 5 ...

Page 2: ...lignment information Thousands of our customers will attest to the savings of time and money through the performance convenience and versatility of PLS laser tools You can be confident of prompt service to your laser should the need arise CONTENTS Introduction About The Company 1A 1B Maintenance Warranty Features Safety Labeling Instructions Beams Plumb 6 Level Square Check Calibration Magnetic Br...

Page 3: ... contractors for contractors PLS tools were developed out of necessity by professionals with over 50 years of experience in commercial and residential interior and exterior layout PLS founders were contractors first before becoming manufacturers of the finest point to point alignment tools in the world Point to point reference means you can plumb with a PLS5 or PLS3 literally from floor to ceiling...

Page 4: ...of the work day can be spent on layout The PLS5 system gives square reference eas ily and quickly No more 3 4 5 The unique PLS cantilever design allows easy sight of the opposing reference points and is proven to be effective in installing curtain walls foundations columns skylights doors cabinetry and much more The portability and utility of PLS lasers make them attractive alignment tools when bu...

Page 5: ...g packing and insurance costs Upon comple tion of the repair or replacement the unit will be returned to the customer freight prepaid The war ranty will not apply to this product if it has been misused abused or altered Without limiting the foregoing battery leakage dents or gouges to the plastic housing broken optic windows damage to the switch LED membrane are presumed to result from misuse or a...

Page 6: ...t u r e s 3 BATTERY DOOR USE EITHER3AA 1 5V ALKALINE OR NICAD BATTERIES INDICAT OR LED ON GREEN TILT RED BATTERY LOW AMBER OPTICW INDOW S 5 1 4 X20 ACCESSORY MOUNTIN BASE OF EACH UNIT OPTICW INDOW S 3 ON OFF ...

Page 7: ...s 1 0 milliwatts Never stare directly into the laser beam or view the beam with optical instruments Turn the laser off when not in use CAUTION USE OF CONTROLS ADJUSTMENTS OR PROCEDURES OTHER THAN THOSE SPECIFIED HEREIN MAY RESULT IN HAZARDOUS RADIATION EXPOSURE These labels are attached to every PLS laser These are not to be removed or defaced S a f e t y L a b e l in g In s t r u c t io n s W ARN...

Page 8: ...beams of the PLS5 are 1 Forward Beam 2 Down Beam 3 Up Beam 4 Left Beam 5 Right Beam All PLS5 beams have the same brightness and are square to each other PLS3 The three beams of the PLS3 are 1 Forward Beam 2 Down Beam 3 Up Beam 2 3 3 2 ...

Page 9: ...floor track etc See Fig 2 Use the floor stand with your PLS5 or PLS3 to increase the sight angle of the 2 down beam The PLS3 and PLS5 can quickly survey existing conditions for plumb Use a tape and 3 up beam Position the laser near the structure Check any distance up or down the structure It is also possible to transpose marks from a roof or ceiling down to the floor Move the laser until the 3 up ...

Page 10: ...a tripod or wall mount swivel and mark See Fig 5 When turning your PLS5 or PLS3 on a tripod be sure tripod head is perfectly level Error in marks can result with tripod out of level To survey existing conditions for level point in the direction to survey Using a tape or rod with a bench mark the variations in level or grade can be noted quickly at various distances See Fig 6 MARK FIG 4 FIG 5 MARK ...

Page 11: ...line and center 1 forward beam on the center of the target Once centered move the pendulum target to square on 4 left beam or 5 right beam Make a mark on the floor or surface near the laser and the second mark at the desired distance from the laser See Fig 7 C L 8 FIG 7 MARK BEAM 1 BEAM 5 S q u a r e LAYOUTORREFERENCE LINE C L MARK ...

Page 12: ...e surface 25 0 or more from a suitable wall or target See Fig 8 Point the 1 forward beam at the wall or target and carefully mark the center of elevation Swivel the PLS5 90 on its center until the 5 right beam is over the first mark Check to see if there is any difference in elevation from the center of 1 forward beam and the center of 5 right beam Repeat to check 4 beam At 50 0 the difference sho...

Page 13: ...to target 2 At 6 from the target mark the center of elevation of 1 forward beam on target 2 Swivel the laser on its cen ter and mark center of elevation at target 1 You now have two centers of elevation at each tar get Carefully measure the distance between centers of each set of marks If the distance is the same the laser is exactly level If there is a difference subtract one measurement from the...

Page 14: ...the unit with the 2 down beam exactly centered on both axes over a cross mark See Fig 10 At the surface above mark both axes of 3 up beam Rotate the laser 180 and place the 2 down beam exactly centered on the same mark The 3 up beam should be exactly over the first mark If there is a difference between mark 1 and mark 2 the error of the plumb beam is one half that difference MARK DIST ANCE FIG 10 ...

Page 15: ...agnetic bracket a standard steel carpenter s framing square and one or more clamps and you have the ability to mount the laser in unlimited ways Clamp carpenter s square to concrete forms ladders wood studs etc Attach the PLS laser with magnetic mount as described above If you drill two small holes centered on the long section of the carpenter s square the square can be attached to unfinished dryw...

Page 16: ...he pendulum target is designed so the beams are best seen at this height For transfer of vertical lines To transfer vertical marks quickly and accurately to a wall 1 Place the front of the PLS5 laser against the wall with the 1 forward beam on the mark to be transferred If the mark is on the floor place the 2 down beam over the mark 2 Place the target with its back flat against the wall at the des...

Page 17: ...S5 partnered with our laser receiver gives the contractor the ability to accurately lay out a job site up to 250 feet even in the brightest outdoor conditions The PLS5 can also be used inside without the receiver for all point to point alignment tasks P L S 5 S ys t e m In t e r io r E x t e r io r S ys t e m 1 4 C L FIG 7 MARK BEAM 1 BEAM 5 LAYOUTORREFERENCE LINE C L MARK Beep Beep Beep Beep ...

Page 18: ...of form boards for concrete flatwork ELECTRICAL AND MECHANICAL CONSTRUCTION Rough in of conduit Rough in of waste and supply lines Rough in of natural gas supply lines FRAMING CONSTRUCTION Layout of control lines on concrete slabs decking and sub floors Alignment of exterior heavy gauge steel framing Layout alignment for commercial residential wood framing GLAZING CONSTRUCTION Layout install of cu...

Page 19: ...or Ni cad rechargeable Ni cad rechargeable Operating time 30 hrs continuous use 30 hrs continuous use Operating temp 0 F to 122 F 0 F to 122 F 18 C to 50 C 18 C to 50 C Storage temp 40 F to 158 F 40 F to 158 F 40 C to 70 C 40 C to 70 C Indicators Green light ON Green light ON Red light EXCEEDS Red light EXCEEDS TILT TILT Amber light BATTERY Amber light BATTERY LOW LOW Environmental Water resistant...

Page 20: ...PLS Lab Technicians PLS Pacif ic Laser Syst ems 2550 Ker ner Bl vd San Raf ael CA 94901 www pl sl aser com 800 601 4500 ...

Reviews: